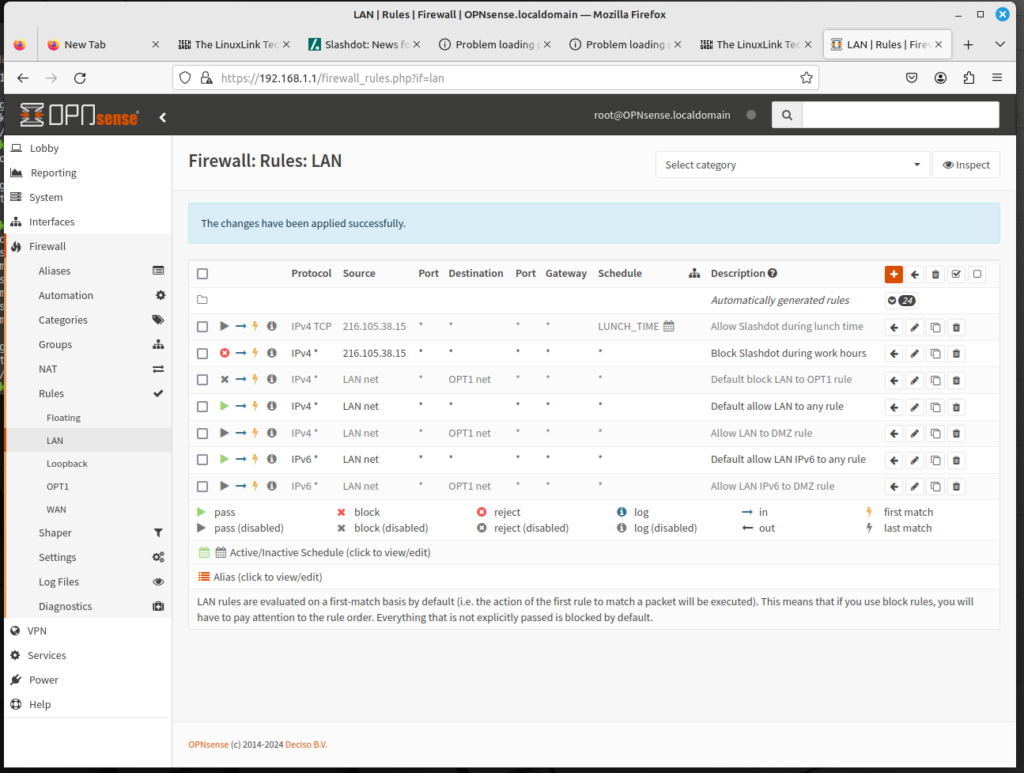
In the previous article, we showed how to add a schedule entry that could subsequently be used to modify a firewall rule. In this article, we we show how this can be done.
Let’s assume that we have decided to block Slashdot because we have decided that having workstations that can access Slashdot is counterproductive. But we also decide that we only want this rule to be applied during working hours – Monday through Friday, 9 AM to 5 PM. We also decide that accessing Slashdot will be allowed during lunch hour: noon to 1 PM. Essentially, we have three separate tasks to complete:
- Create a schedule entry for regular work hours.
- Create another schedule entry for lunch time.
- Create a rule to block Slashdot during work hours.
- Create another rule to allow Slashdot at lunch time.
- Test the rule to make sure it takes effect.
This may be fairly ambitious, but by focusing on each individual task, it should be possible. First, we log into OPNsense’s web GUI, and start to add schedule entries:
- On the left sidebar menu, click on Firewall, click on Settings, and click on Schedule.
- Click on the plus (+) icon to add a schedule entry.
- In the Name edit box, enter WORK_HOURS.
- In the Description edit box enter “Normal work hours”.
- In the Month calendar, click on the headers or Mon, Tue, Wed, Thu, and Fri.
- In the Time drop-down boxes, select 9:00 and 17:00.
- In the Time Range Description edit box, enter “Standard Work Hours”.
- Click on the Add Time button to add the time range.
- Click on Save to Save the schedule entry.
- Now you must add the lunch time schedule entry. Click on the plus (+) icon to add a schedule entry.
- In the Name edit box, enter LUNCH_TIME.
- In the Description edit box, enter “Normal lunch time”.
- In the Month calendar, click on the headers or Mon, Tue, Wed, Thu, and Fri.
- In the Time drop-down boxes, select 12:00 and 13:00.
- In the Time Range Description edit box, enter “Standard Lunch Time”.
- Click on the Add Time button to add the time range.
- Click on Save to Save the schedule entry.
Now that we have schedule entries for work hours and lunch time, we can begin to add firewall rules:
- On the left sidebar menu, click on Firewall, Rules, and LAN.
- Click on the plus (+) icon to add a firewall rule.
- In the Action drop-down box, select Reject.
- In the Protocol drop-down box, select TCP.
- In the Source drop-down box, select Single host or Network. In the edit box, enter 216.105.38.15. and select 32 in the CIDR drop-down box.
- In the Schedule drop-down box, select WORK_HOURS.
- In the Description edit box, enter a brief description (e.g. “Block Slashdot during work hours”).
- Click on the Save button to save the rule, and Apply Changes to reload the rules.
- We have created a rule to block Slashdot during work hours; now we just need to add a rule to allow Slashdot at lunch time. Click on the plus (+) icon to add a firewall rule.
- In the Action drop-down box, select Pass (which should be the default).
- In the Protocol drop-down box, select TCP.
- In the Source drop-down box, select Single host or Network. In the edit box, enter 216.105.38.15. and select 32 in the CIDR drop-down box.
- In the Schedule drop-down box, select LUNCH TIME.
- In the Description edit box, enter a brief description (e.g. “Allow Slashdot during lunch time”).
- Click on the Save button to save the rule, and Apply Changes to reload the rules.
Now you have all the firewall rules, and you just need to order them properly. You need to put the new rules before the “Allow LAN to any” rules. In addition, you must put the “Allow Slashdot during lunch time” rule before the “Block Slashdot during work hours” rule. This is because firewall rules are evaluated from the top down, and once a rule matches traffic, the rest of the rules are not evaluated. Thus, the allow Slashdot rule must be evaluated before all other rules; the deny Slashdot rule should be evaluated next. You can put these rules first by checking all the other rules, then select the ← arrow (the icon for “Move selected rules to end”). Then select the all the old rules, the “Block Slashdot during work hours” rule and do the same. Now the rules should be in the right order.
Next, you should verify the rules to make sure they actually work. Unless you are testing this during work hours, you probably should edit the Block Slashdot firewall rule. Scroll down to the Schedule drop-down box, and select any. Then save the rule. Edit the Allow Slashdot rule, and disable the rule temporarily. Now, if you surf to slashdot.org, the site should be blocked now. Once you have confirmed that this is actually the case, edit the Allow Slashdot rule. Re-enable it, and scroll down to the Schedule drop-down box and select any. Now, Slashdot should be allowed. Once you have confirmed this, re-edit the rules to apply to the schedule entries, save both of them, and click on Apply Changes to reload the firewall rules.
Admittedly, this was a relatively simple rule set. Most web sites actually have multiple web servers (and therefore, multiple IP addresses) which are used to host content to the rest of the world; Slashdot is unique in that it only has a single IP address. We will examine how to come up with a rule set to block social media sites in a future article.
