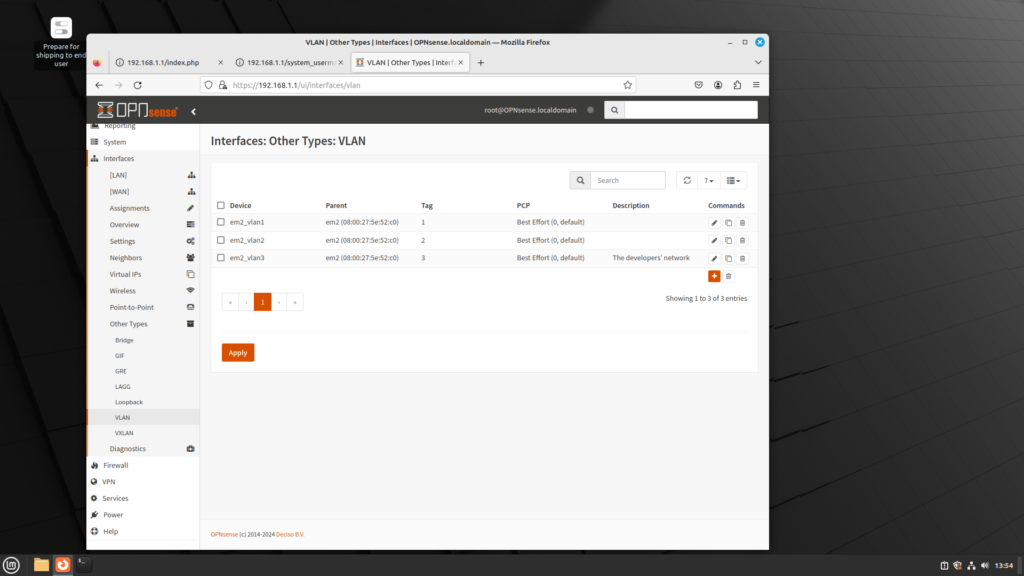
Now that we have configured the WAN, LAN and DMZ networks, we can configure Virtual LANs (VLANs). The word “virtual” is key: unlike traditional networking, in which networks are separated by routers, and each network has at least one switch, VLANs allow us to have several networks on one switch. This can be advantageous, for a variety of reasons:
- Each VLAN forms its own broadcast domain, limiting broadcast traffic and broadcast storms
- VLANs can be configured so that even if we move to another physical location, we connect to the same VLAN, giving us considerable flexibility and eliminating administrative overhead
- Each VLAN is segregated from each other, improving security.
Before you start configuring VLANs, you should have a network plan. For example, rather than create a network where several departments all have access to the network, you might think about dividing up the network by departments; e.g. we might have the following plan:
- Sales
- Marketing
- Engineers
- Developers
- Technicians
This is only one way of dividing up our network. We might divide up our network in a different way:
- C-level executives
- Upper management
- Middle management
- Supervisors
- Technicians
Configuring VLANs is so fundamental that we can configure VLANs in two different ways:
- Configuration at the command line (console), and
- Configuration within the web GUI
We will cover both configurations here.
Configuration at the Console
Configuration can be done at the console. In order to allow VLAN configuration, at least one interface must not have been allocated. Technically, you can use an interface that has already been allocated; for example, you could use the LAN or OPT1 network interface for VLANs. But it would not work well, and very likely, you will have to reconfigure the setup later.
In order to do VLAN configuration at the console, log into the console. There will be a menu for configuration. Select 1, which is Assign Interfaces.
- Next, the console queries if you want to install LAGGs (Link Aggregation). Type ‘N’ and press Enter.
- The console will query if you want to configure LANs. Type ‘Y’ and press Enter.
- The console will list VLAN-capable interfaces, and their MAC addresses. Type the parent interface and press Enter.
- The console will query you for the VLAN tag. Enter a number from 1 to 4094.
- The console will again list VLAN-capable interfaces and their MAC addresses. Either type the parent interface, or nothing if finished.
- Note that VLAN 0 and VLAN 4095 are omitted. That is because VLAN 0 will cause the VLAN tag to be ignored, while VLAN 4095 is reserved for internal use. All other tags are valid.
- The console will ask you to designate a WAN and LAN interface (and possibly optional interfaces; it depends on how many network interfaces you have). Enter these interfaces.
Configuration in the GUI
Assuming you have logged into the web interface, do the following:
- On the left menu panel, click on Interfaces
- On the left menu panel, click on Other Types
- On the left menu panel, click on VLAN
- Here you will find a listing of the currently confifgured VLANs. You can add a VLAN by clicking on the plus (+) logo. Clicking on this logo will invoke the VLAN dialog box, where you can configure:
- Device: the device name (e.g. em2_vlan1, em2_vlan2, etc.)
- Parent: the parent device
- VLAN tag: Any number from 1 to 4094.
- VLAN priority: This allows you to utilize the 802.1Q priority code point (PCP) field. This is a 3-bit field which makes reference to the IEEE 802.1p class of service. 802.1p defines how traffic should be treated based on the value of this field, which corresponds to the values in this table:
| PCP value | Priority level | Description |
| 0 | 1 | Traffic gets best effort treatment. |
| 1 | 0 | Traffic is assigned the lowest priority. It is handled in the background. |
| 2 | 2 | Traffic gets excellent effort treatment, which is one step below best effort. |
| 3 | 3 | Suitable priority level for critical applications. |
| 4 | 4 | Suitable for video requiring < 100 milliseconds of latency and jitter. |
| 5 | 5 | Suitable for voice requiring < 10 milliseconds of latency and jitter. |
| 6 | 6 | Suitable for internetwork control. |
| 7 | 7 | Traffic gets highest priority. |
- Description: A brief description of this VLAN.
- Clicking on the “Advance mode” button enables another option: edit VLAN. This option provides a drop-down box with the following options:
- 802.1Q: This is the standard that makes VLANs possible.
- 802.1ad: Old-school 802.1Q only allows 4095 VLANs. With the growth of networks, this has become more problematic. 802.1ad allows an additional tag nested inside a single-tagged 802.1Q packets, also known as “Q in Q”.
- Auto: Allows OPNsense to detect whether the switch supports Q in Q tagging; if it detects this, then 802.ad will be enabled; otherwise, 802.1Q is enabled.
- Click on the “Apply” button to apply settings.
- You can delete VLANs by clicking on the trash logo.
From my cursory look at VLAN support in OPNsense, it seems that OPNsense does not have as many options as pfSense, although it does support VLAN priority and 802.1ad, as well as link aggregation (LAGG).
There are two steps to VLAN configuration that we didn’t cover here:
- VLAN configuration at the switch
- Verifying VLAN configuration
I will cover both topics in a future article, so stay tuned for that.