For this article, I’m going to assume you have downloaded and installed OPNsense, either in a virtual machine or on a real system. You now can log into the web GUI at 192.168.1.1. When you have logged into the web GUI for the first time, a setup utility will take you through several steps:
- The hostname and domain of the router.
- The timezone and language.
- The time server hostname.
- DNS servers
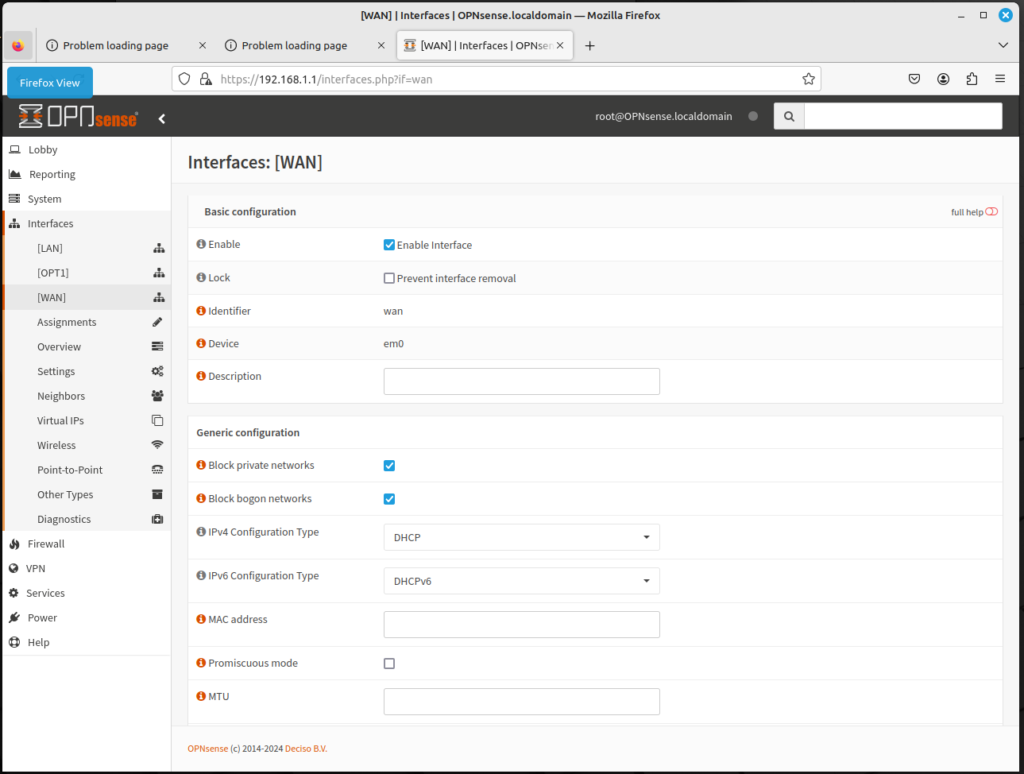
In addition to these settings, the setup utility will also let you configure the WAN and LAN interface, which we will now consider.
On the WAN interface, there is an option to block private networks and block bogon networks. We should address both these issues.
- Private networks, also known as RFC 1918 addresses, are blocks of network IP addresses reserved for private use. These addresses are commonly used behind a firewall to allow a single public IP address to be shared with multiple devices using Network Address Translation (NAT). As a general rule, it is good practice to prevent network traffic using private addresses from leaving the firewall via the WAN interface. This avoids unnecessary traffic on the WAN network and provides a security benefit by keeping information about the LAN network behind the firewall. This option should remain checked. There are two circumstances in which this option should not be selected:
- When your Internet service provider (ISP) assigns private network addresses to their customers
- When the firewall is behind another firewall or router.
- Bogon networks are those which should never be seen on the Internet, including reserved and unassigned IP address space; the presence of traffic from these networks can indicate either spoofed traffic or an unused subnet that has been highjacked for malicious use, Normally, bogon networks should be blocked on the WAN, so this option should be checked.
You need to choose the selected type for this interface. For most ISPs, this should be DHCP, as it is the mechanism used to distribute IP addresses. But if your ISP assigned a static IP address, there’s an option for this as well. There are also several different options for configuration type:
- PPP: Point-to-Point Protocol, which should be the option if your ISP supports it
- PPoE: Point-to-Point over Ethernet
- PPTP: Point-to-Point Tunneling Protocol, which some VPNs use
- L2TP: Layer 2 Tunneling Protocol, another option some VPNs use
There is an option for MAC address. Here you can enter a different MAC address, which
There are also options for MTU (Maximum Transmission Unit) and MSS (Maximum Segment Size). The default for MTU is 1500; the default for MSS is 536 for IPv4 and 1220 for IPv6. Increasing either of these options could optimize speed on your network, but in most cases, you probably should keep these at the default.
There is an option for speed and duplex. Here there is a variety of options, from 1000baseT, 100baseTX, and 10baseT. In most cases, you can leave this at the default value, which will cause the speed and duplex to autoselect.
In the WAN settings, there are options for DHCP client configuration and DHCPv6 client configuration, but for the most part, you can leave these settings unchanged and click on the Next button.
The next interface to configure is the LAN interface. There is also an option to block private networks and block bogon networks. It is generally recommended that these options will not be checked, as the LAN interface is not the interface to the Internet.
Next is the configuration type. Unlike the WAN interface, this should be configured as Static, unless you have a DHCP server upstream, in which case you should use DHCP. Selecting static means that you must manually configure the static IPv4 and IPv6 options. Unless you have reason for having a different address configuration, IPv4 should be designated as 192.168.1.1 and IPv6 should be designated as fd00:1::1/64.
There are also options for MAC address, MTU and MSS. Unless there is a compelling reason to change these options, you should keep these as the default values.
By clicking on the Save button, you will have configured both the LAN and WAN interfaces. Next is configuring the DMZ and configuring VLAN settings, which will be covered in future articles.
