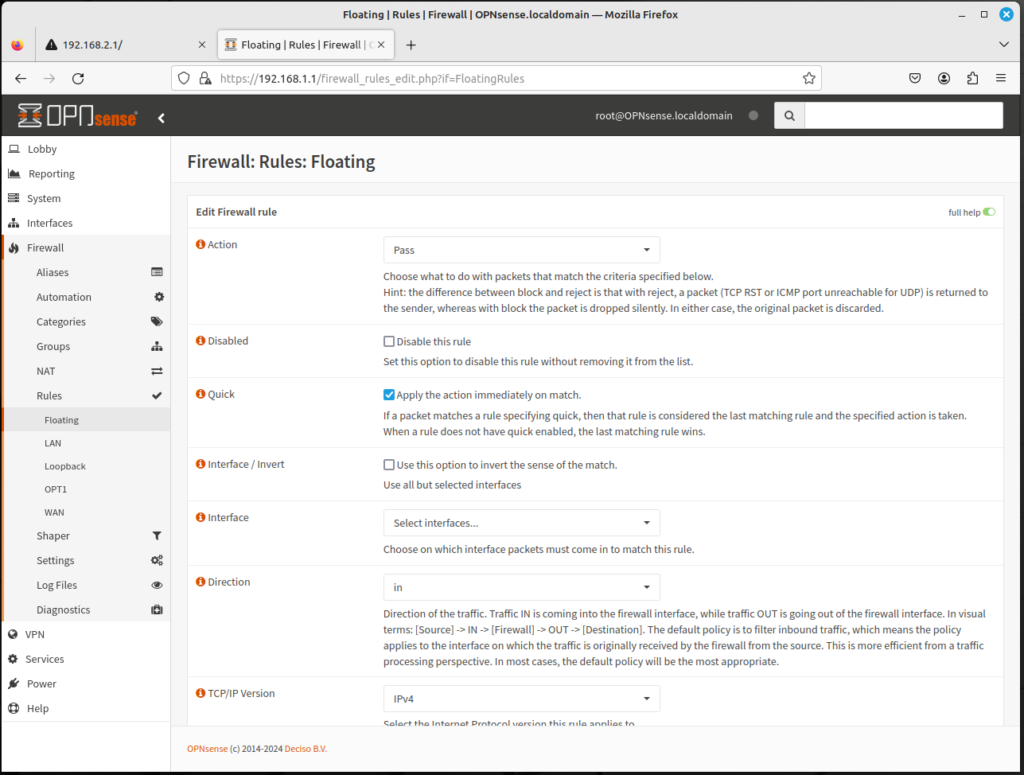
Floating firewall rules are rules that are different from other firewall rules in two significant ways:
- They can be applied in any direction (both into the interface an out of the interface)
- They can be applied to more than one interface
Floating rules can be created by navigating to the left sidebar menu, clicking on Firewall, clicking on Rules, and clicking on Floating; then you can add a rule by clicking on the plus (+) icon. The options are similar to those in a typical add firewall rule page, with the following exceptions:
- The Quick checkbox, if checked, will cause OPNsense to apply the rule to packets matching the rule and OPNsense will not attempt to filter the packets against any other rules.
- In the Interface listbox, more than one interface may be selected.
In general, floating rules are a special type of rule that can act on multiple interfaces, and on inbound traffic, outbound traffic, or in both directions. In OPNsense, however, interface rules can act on traffic from any or both directions.
Keep in mind that floating rules are parsed before other rules, so even if the Quick option isn’t enabled, a misconfigured floating rule could easily defeat the purpose of rules on individual interfaces.
To create a floating firewall rule, do the following:
- Click on the plus (+) icon in Firewall → Rules → Floating.
- In the Action drop-down box, select Pass to allow the packet, Block to block the packet, and Reject to reject the packet. The difference between Block and Reject is that reject will explicitly reject the packet, so the application or end user will know about the rejection, whereas Block will silently drop the packet.
- In the TCP/IP Version drop-down box, select IPv4, IPv6, or IPv4+IPv6.
- For Protocol, select the relevant protocol: TCP, UDP, TCP/UDP, or ICMP.
- For Source/Invert, clicking on this option inverts the sense of the match. Leaving the option unchecked does nothing.
- In the Source drop-down box, select This Firewall, any of the interfaces added to OPNsense (net or address), or any.
- If you selected a protocol, in Source drop-down box, select any of the pre-defined ports (e.g. FTP, HTTP, etc.), or enter your own port number.
- In the Source drop-down box, select This Firewall, any of the interfaces added to OPNsense (net or address), or any.
- If you selected a protocol, in the Destination drop-down box, select any of the pre-defined ports (e.g. FTP, HTTP, etc.), or enter your own port number.
- In the Log check box, select this option if you want packets handled by this rule to be logged.
- In the Category edit box, enter a (non-parsed) category.
- In the Description edit box, enter a brief (non-parsed) description.
- In No XMLRPC Sync, selecting this option prevents the rule (on Master) to automatically syncing to other CARP members.
- In the Schedule drop-down box, select a predefined schedule option to only enforce the rule at a specific time. Do nothing to enforce the rule at all times.
- In the Gateway drop-down box, select a gateway for policy-based routing, or leave it as default to use the system routing table.
- Click on Advanced Features to display a set of advanced features for floating rules, including priority, timeouts, and TCP flags.
- When you are done configuring options, click on Save at the bottom of the page to save the rule, and click on Apply Changes to reload the firewall rules.
In general, it is better to add and configure rules on a per-interface basis than having floating rules, and if you misconfigure a floating rule, things can go very wrong on your network. But if you know what you’re doing, floating rules can represent a powerful tool.
