XML Processing with Python: Part Seven

XML processingThe following Python SAX and DOM parsers are available: xml.sax and xml.dom.minidom. Here is an overview of xml.dom.

xml.dom.minidom is a lightweight DOM implementation, designed to be simpler and smaller than a full DOM implementation.

Converting from XML to DOM and Back

In the following example, we’ll use the example XML file from the first article in this series, which we’ll save as mlb.xml:

<?xml version=”1.0″?>
<mlb>
<team>
<name>New York Mets</name>
<generalmanager>Sandy Alderson</generalmanager>
</team>
<team>
<name>Washington Nationals</name>
<generalmanager>Mike Rizzo</generalmanager>
</team>
<team>
<name>Atlanta Braves</name>
<generalmanager>John Hart</generalmanager>
</team>
</mlb>

Then we’ll enter the following code into our Python interpreter:

from xml.dom.minidom import parse

from xml.dom.minidom import parse

def printMLB(mlb):
    teams = mlb.getElementsByTagName("team")
    for team in teams:
        print("*****Team*****")
        print("Name: %s"  % team.getElementsByTagName("name")[0].childNodes[0].data)
        for gm in team.getElementsByTagName("generalmanager"):
            print("General manager: %s" % gm.childNodes[0].data)
# open an XML file and parse it into a DOM
myDoc = parse('mlb.xml')
myMLB = myDoc.getElementsByTagName("mlb")[0]
# Get all the team elements in the library
teams = myMLB.getElementsByTagName("team")
# Print each team's name and general manager
printMLB(myMLB)
# Insert a new team in the list
newTeam = myDoc.createElement("team")
newTeamName = myDoc.createElement("name")
teamNameText = myDoc.createTextNode("Miami Marlins")
newTeamName.appendChild(teamNameText)
newTeam.appendChild(newTeamName)
newGeneralManager = myDoc.createElement("generalmanager")
generalManager = myDoc.createTextNode("Dan Jennings")
newGeneralManager.appendChild(generalManager)
newTeam.appendChild(newGeneralManager)
myMLB.appendChild(newTeam)
print("Added a new team!")
print("##########################")
printMLB(myMLB)
# Remove a team from the list
# Find New York Mets
for team in myMLB.getElementsByTagName("team"):
    for name in team.getElementsByTagName("name"):
        if name.childNodes[0].data.find("New York Mets") != -1:
            removedTeam = myMLB.removeChild(team)
            removedTeam.unlink()
print("Removed a team.")
print("##########################")
printMLB(myMLB)
# Write back to the XML file
mlb = open("mlb.xml", "w")
mlb.write(myMLB.toprettyxml(" "))
mlb.close()

To create a DOM, the document needs to be parse into a document tree. This is done by calling the parse method from xml.dom.mindom. This method returns a Document object, which contains methods for querying for child nodes, getting all nodes in the document of a certain name, and creating new nodes, among other things. The getElementsByTagName method returns a list of node objects whose names match the argument, which is used to extract the root node of the document: the <mlb> node. The print method uses getElementsByTagName again, and then for each team node, prints the name and general manager. nodes with text that follows them are considered to have a single child node, and the text is stored in the data attribute of that node, so team.getElementsByTagName(“name”)[0].childNodes[0].data simply retrieves the text node below the <name> element and returns its data as a string.

Constructing a new node in DOM requires creating a new node as a piece of the Document object, adding all necessary attributes and child nodes, and then attaching it to the correct node in the document tree. The createElement(tagName) method of the Document object correct node in the document tree. The createElement(tagName) method of the Document object creates a new node with a tag name set to whatever argument has been passed in. adding text nodes is accomplished almost the same way, with a call to createTextNode(string). When all the nodes have been created, the structure is created by calling the appendChild method of the node to which the newly created node will be attached. Node also has a method called insertBefore(newChild, refChild) for inserting nodes in an arbitrary location in the list of child nodes, and replaceChild(newChild, oldChild) to replace one node with another.

Removing nodes requires first getting a reference to the node being removed and then a call to removeChild(childNode). After the child has been removed, it’s advisable to call unlink() on it to force garbage collection for that node and any children that may still be attached. This method is specific to the minidom implementation and and is not available in xml.dom.

Finally, having made all these changes to the document, it would be a good idea to write the DOM back to the file from which it came. A utility method is included with xml.dom.minidom called toprettyxml, which takes two optional arguments: an indentation string and a newline character. If not specified, these default to a tabulator and \n, respectively. This utility prints a DOM as nicely indented XML and is just the thing for printing back to the file.

Note that in the program, we added one team (Miami Marlins) and deleted one team (New York Mets). The program should produce the following output:

*****Team*****
Name: New York Mets
General manager: Sandy Alderson
*****Team*****
Name: Washington Nationals
General manager: Mike Rizzo
*****Team*****
Name: Atlanta Braves
General manager: John Hart
Added a new team!
##########################
*****Team*****
Name: New York Mets
General manager: Sandy Alderson
*****Team*****
Name: Washington Nationals
General manager: Mike Rizzo
*****Team*****
Name: Atlanta Braves
General manager: John Hart
*****Team*****
Name: Miami Marlins
General manager: Dan Jennings
Removed a team.
##########################
*****Team*****
Name: Washington Nationals
General manager: Mike Rizzo
*****Team*****
Name: Atlanta Braves
General manager: John Hart
*****Team*****
Name: Miami Marlins
General manager: Dan Jennings

After running the program, I discovered that toprettyxml inserts extra whitespaces. Therefore, it might be better if we used toxml() (which doesn’t insert extra whitespaces), or use something else entirely such as xml.dom.ext.PrettyPrint, as described in this blog article.

External Links:

Download page for PyXML – an XML parser with a better solution than toprettyxml (PrettyPrint)

Wikipedia page on DOM

XML Processing with Python: Part Six

XML ProcessingDOM (Document Object Model)

At the heart of DOM lies the Document object. This is a tree-based representation of the XML document. Tree-based models are a natural fit for XML’s hierarchical structure, making this a very intuitive way of working with XML. Each element in the tree is called a Node object, and it may have attributes, child nodes, text, and so forth, all of which are also objects that are stored in the tree. DOM objects have a number of methods for creating and adding nodes, for finding nodes of a specific type or name, and for reordering or deleting nodes.

Differences between SAX and DOM

The major difference between SAX and DOM is DOM’s ability to store the entire document in memory and manipulate and search it as a tree, rather than force you to parse the document repeatedly, or force you to build your own in-memory representation of the document. The document is parsed once, and then nodes can be added, removed, or changed in memory and then written back out to a file when the program is finished.

Although either SAX or DOM can do almost anything you might want to do with XML, you might want to use one over the other in certain circumstances. For instance, if you are working on an application in which you will be modifying an XML document repeatedly based on user input, you might want the convenient random access capabilities for DOM. but if you are building an application that needs to process a stream of XML quickly with minimal overhead, SAX might be a better choice for you.

DOM is designed with random access in mind. It provides a tree that can be manipulated at runtime and needs to be loaded into memory only once. SAX is stream-based, so data comes in as a stream one character after the next, but the document isn’t seen in its entirety before it starts getting processed; therefore, if you want to randomly access data, you have to either build a partial tree of the document in memory based on document events, or reparse the document every time you want a different piece of data.

Most people find the object-oriented behavior of DOM very intuitive and easy to learn. The event-driven model of SAX is more similar to functional programming and can be more challenging to get up to speed on.

If you are working in a memory-limited environment, DOM is probably not a good choice. Even on a fairly high-end system, constructing a DOM tree for a large document (say 2-3 MB) can bring the computer to a halt while it processes. Because SAX treats the document as a stream, it never loads the whole document into memory, so it is preferable if you are memory constrained or working with very large documents.

Using DOM requires a great deal of processing time while the document tree is being built, but once the tree is built, DOM allows for much faster searching and manipulation of nodes because the entire document is in memory. SAX is somewhat fast for searching documents, but not as efficient for their manipulation. However, for document transformations, SAX is considered to be the parser of choice because the event-driven model is fast and very compatible with how XSLT works.

In the next article, we’ll look at SAX and DOM parsers for Python.

External Links:

XML DOM Parser at W3Schools

Document Object Model at Wikipedia

XML Processing with Python: Part Five

XML processingWhen parsing XML, you have your choice of two different types of parsers: SAX and DOM. SAX stands for the Simple API for XML. It was originally only implemented for Java, and was added to Python as of version 2.0. It is a stream-based, event-driven parser. The events are known as document events, and a document event might be one of several things; the start of an element, the end of an element, encountering a text node, or encountering a comment. For example, the following document:

<?xml version=”1.0″?>
<team>
<name>New York Mets</name>
</team>

might fire the following events:

   start document
   start element: team
   start element: name
   characters: New York Mets
   end element: name
   end element: team
   end document

Whenever a document event occurs, the parser fires an event for the calling application to handle. More precisely, it fires an event for the calling application’s Content Handler object to handle. Content Handlers are objects that implement a known interface specified by the SAX API from which the parser can call methods.

When parsing a document with SAX, the document is read and parsed in the order in which it appears. The parser opens the file or another datasource as a stream of data (so it doesn’t have to do it all at once) and then fires events whenever an element is encountered. Because the parser does not wait for the whole document to load before beginning parsing, SAX can parse documents soon after it begins reading the document. Because SAX does not read the whole document before it begins processing, however, it may process a partial document before discovering it is badly formed. As a result, SAX-based applications should implement their own error-checking.

When working with SAX, document events are handled by event handlers. You declare callback functions for specific types of document events, which are then passed to the parser and called when a document event occurs that matches the callback function.

In the next article, we will introduce DOM, and the pros and cons of using SAX or DOM, as well as a discussion of available parsers.

External Links:

SAX on Wikipedia

XML Processing with Python: Part Four

XML ProcessingXML is similar in structure and form to HTML. This is not entirely an accidental thing. XML and HTML both originated from SGML and share a number of syntactic features. The earlier versions of HTML are not directly compatible with XML, though, because XML requires that every tag be closed, and certain HTML tags don’t require a closing tag (such as <br> and <img>). However, the W3C has declared the XHTML schema in an attempt to bring the two standards in line with each other. XHTML can be manipulated using the same sets of tools as pure XML. However, Python also comes with specialized libraries designed specifically for dealing with HTML.

The HTMLParser class, unlike the htmllib class, is not based on an SGML parser and can be used for both XHTML and earlier versions of HTML. To try using the HTMLParser class, create a sample HTML file named headings.html that contains at least one h1 tag. Then save the file to your Python directory and run the following code:

from html.parser import HTMLParser
class HeadingParser(HTMLParser):
    inHeading = False
    def handle_starttag(self, tag, attrs):
        if tag == "h1":
            self.inHeading = True
            print("Found a Heading 1")
    def handle_data(self, data):
        if self.inHeading:
            print(data)
    def handle_endtag(self, tag):
        if tag == "h1":
            self.inHeading = False
hParser = HeadingParser()
file = open("headings.html", "r")
html = file.read()
file.close()
hParser.feed(html)

The HTMLParser class defines methods, which are called when the parser finds certain types of content, such as a beginning tag, an end tag, or a processing instruction. By default, these methods do nothing. To parse an HTML document, a class that inherits from HTMLParser and implements the necessary methods must be created. After a parse class has been created and instantiated, the parser is fed data using the feed method. Data can be fed to it one line at a time or all at once.

This example class only handles tags of type <h1>. When an HTMLParser encounters a tag, the handle_starttag method is called, and the tag name and any attached attributes are passed to it.

The handle_starttag method determines whether the tag is an <h1>. If so, it prints a message saying it has encountered an h1 and sets a flag indicating that it is currently an <h1>. If text data is found, the handle_data function is called, which determines whether it is an <h1>, based on the flag. If the flag is true, the method prints the text data. If a closing tag is encountered, the handle_endtag method is called, which determines whether the tag that was just closed was an <h1>. If so, it prints a message, and then sets the flag to false.

External Links:

HTMLParser at docs.python.org

Using the Python HTMLParser library

XML Processing with Python: Part Three

XML ProcessingIn the previous article, we discussed the Document Type Definition (DTD) language. In this article, we will discuss Schema and XPath.

XML Processing with Python: Schema

Schema was designed to address some of the limitations of DTDs and provide a more sophisticated XML-based language for describing document models. It enables you to cleanly specify numeric models for content, describe character data patterns using regular expressions, and express content models such as sequences, choices, and unrestricted models.

If you wanted to translate the hypothetical library model into a schema with the same information contained in the DTD, you would wind up with something like the following:

<?xml version="1.0"?>
<xs:schema xmlns:xs="http://www.w3.org/20001/XMLSchema">
<xs:element name="mlb">
   <xs:complexType>
      <xs:sequence>
         <xs:element name="team" maxOccurs="unbounded">
            <xs:complexType>
               <xs:sequence>
                  <xs:element name="name" type="xs:string"/>
                  <xs:element name="generalmanager" type="xs:string" maxOccurs="unbounded"/>
               </xs:sequence>
            </xs:complexType>
         </xs:element>
      </xs:sequence>
   <xs:attribute name="owner" type="xs:string" use="required"/>
   </xs:complexType>
</xs:element>
</xs:schema>

This expresses exactly the same data model as the DTD, but some differences are immediately apparent.

To begin with, the document’s top-level node contains a namespace declaration, specifying that all tags starting with xs: belong to the namespace identified by the URL “http://www.w3.org/2001/XMLSchema“. For practical purposes, this means that you now have a document model that you can validate your schema against, using the same tools you would use to validate any other XML document.

Next, notice that the preceding document has a hierarchy very similar to the document it is describing. Rather than create individual elements and link them together using references, the document model mimics the structure of the document as closely as possible. You can also create global elements and then reference them in a structure, but you are not required to use references; they are optional. This creates are more intuitive structure for visualizing the form of possible documents that can be created from this model.

Finally, schemas support attributes such as maxOccurs, which will take either a numeric value from 1 to infinity or the value unbounded, which expresses that any number of that element or grouping may occur. Although this schema doesn’t illustrate it, schemas can express that an element matches a specific regular expression, using the pattern attribute, and schemas can express more flexible content models by mixing the choice and sequence content models.

XML Processing with Python: XPath

XPath is a language for describing locations and node sets within an XML document. An XPath expression contains a description of a pattern that a node must match. If the node matches, it is selected; otherwise, it is ignored. Patterns are composed of a series of steps, either relative to a context node or absolutely defined from the document root. An absolute path begins with a slash, a relative one does not, and each step is separated by a slash.

A step contains three parts: an axis that describes the direction to travel, a node test to select nodes along that axis, and optional predicates, which are Boolean tests that a node must meet. An example step might be ancestor-or-self::team[1], where ancestor-or-self is the axis to move along, team is the node test, and [1] is a predicate specifying to select the first node that meets all the other conditions. If the axis is omitted, it is assumed to refer to the child axis for the current node, so mlb/team[1]/name[1] would select the name of the first team in the MLB database.

A node test can be a function as well as a node name. For instance, team/node() will return all nodes below the selected team node, regardless of whether they are text or elements.

The following table describes a handful of shortcuts for axes:


Shortcut Meaning
@ Specifies the attribute axis. This is an abbreviation for attribute::.
*
// Specifies any descendant of the current node. This is an abbreviation for descendant-or-self::*//. If used at the beginning of an XPath, it matches elements anywhere in the document.

External Links:

More info on Schema

More info on XPath

XML Processing with Python: Part Two

XML ProcessingXML is more than just a way to store hierarchical data. Otherwise, it would fall to more lightweight data storage methods that already exist. XML’s big strength lies in its extensibility, and its companion standards, XSLT, XPath, Schema, and DTD languages, as well as other standards for querying, linking, describing, displaying and manipulating data. Schemas and DTDs provide a way for describing XML vocabularies and a way to validate documents. XSLT provides a powerful transformation engine to turn one XML vocabulary into another, or into HTML, plaintext, PDF, or a host of other formats. XPath is a query language for describing XML node sets. XSL-FO provides a way to create XML that describes the format and layout of a document for transformation to PDF or other visual formats.

Another good thing about XML is that most of the tools for working with XML are also written in XML, and can be manipulated using the same tools. XSLTs are written in XML, as are schemas. What this means in practical terms is that it is easy to use an XSLT to write another XSLT or a schema, or to validate XSLTs or schemas using schemas.

XML Processing with Python: Schemas and Document Type Definitions

Schemas and Document Type Definitions (DTDs) are both ways of implementing document models. A document model is a way of describing the vocabulary and structure of a document. You define the data elements that will be present in your document, what relationship they have to one another, and how many of them you expect. For example, a document model for the XML example in the previous article might read as follows:

Major League Baseball is a collection of teams overseen by a single commissioner. Each team has a name and a general manager.

DTDs and schemas have different ways of expressing this document model, but they both describe the same basic formula for the document. Subtle differences exist between the two, but they have roughly the same capabilities.

Document models are used when you want to be able to validate content against a standard before manipulating or processing it. They are useful whenever you will be interchanging data with an application that may change data models unexpectedly, or when you want to constrain what a user can enter, as in an XML-based documentation system where you will be working with hand-created XML rather than with something from an application.

A DTD is a Document Type Definition. Therse were the original methods of expressing a document model and are commonplace on the Internet. DTDs were originally created for describing SGML, and the syntax has barely changed since that time, so DTDs have had quite a while to proliferate. The World Wide Web Consortium (W3C) continues to express document types using DTDs, so DTDs exist for each of the HTML standards, for Scalable Vector Graphics (SVG), MathmL and for other useful XML vocabularies.

If you were to translate the English description of the example Major League Baseball document into a DTD, it might look something like this:

<?xml version=”1.0″?>
<!ELEMENT mlb (team+)>
<!ATTLIST mlb
commisioner CDATA #REQUIRED
>
<!ELEMENT team (name, generalmanager+)>
<!ELEMENT name (#PCDATA)>
<!ELEMENT generalmanager (#PCDATA)>

To add a reference to this DTD in the library file discussed before, you would insert a line at the top of the file after the XML declaration that read <!DOCTYPE config SYSTEM “mlb.dtd”>, where mlb.dtd was the path to the DTD on your system.

The first line, <?xml version=”1.0″?> tells you that this is going to be an XML document. Technically, this line is optional. The next line, <!ELEMENT mlb (team+)>, tells you that there is an element known as mlb, which can have one or more child elements of the team type. The syntax for element frequencies and groupings in DTDs is terse, but similar to that of regular expressions.

The next bit is:
<!ATTLIST mlb
commissioner CDATA #REQUIRED
>

The first line specifies that the mlb element has a list of attributes. Notice that the attribute list is separate from the mlb element declaration itself and linked to it by the element name. If the element name changes, the attribute list must be updated to point to the new element name. Next is a list of attributes for the element. In this case, mlb has only one attribute, but the list can contain an unbounded number of attributes. The attribute declaration has three mandatory elements: an attribute name, an attribute type, and an attribute description. An attribute type can be either a data type, as specified by the DTD specification, or a list of allowed values. The attribute description is used to specify the behavior of the attribute. A default value can be described here, and whether the attribute is optional or required.

DTDs have a number of limitations. Although it is possible to express complex structures in DTDs, it becomes very difficult to maintain. DTDs have difficulty cleanly expressing numeric bounds on a document model. If you wanted to specify that MLB can contain no more than 30 teams, you could write <!ELEMENT mlb (team, team, team, team etc etc)>, but that quickly becomes an unreadable mess of code. DTDs also make it hard to permit a number of elements in any order. If you have three elements that you could receive in any order, you have to write <!ELEMENT team ( ( (name, ((generalmanager, stadium) | (stadium, generalmanager))) | (generalmanager, ((name, stadium) | (stadium, name))) | (stadium, ((name, generalmanager) | (generalmanager, name)))))>, which is beginnign to look more like LISP and is more complicated than it should be. Finally, DTDs do not allow you to specify a pattern for data. Thankfully, the W3C has published a specification for a slightly more sophisticated language for describing documents, known as Schema.

External Links:

Document Type Definition on Wikipedia

XML Processing with Python: Part One

XML processingExtensible Markup Language, or XML, is a powerful, open standards-based method of data storage. The vocabulary of XML is infinitely customizable to fit whatever kind of data you want to store. Its format makes it human readable, while remaining easy to parse for programs. It encourages semantic markup, rather than formatting-based markup, separating content and presentation from each other, so that a single piece of data can be repurposed many times and displayed in many ways.

XML Processing: A Simple Hierarchical Markup Language

At the core of XML is a simple hierarchical markup language. Tags are used to mark off sections of content with different semantic meanings, and attributes are used to add metadata about the content.

Here is an example of a simple XML document that could be used to describe different baseball teams:

<?xml version=”1.0″?>
<mlb>
<team>
<name>New York Mets</name>
<generalmanager>Sandy Alderson</generalmanager>
</team>
<team>
<name>Washington Nationals</name>
<generalmanager>Mike Rizzo</generalmanager>
</team>
<team>
<name>Atlanta Braves</name>
<generalmanager>John Hart</generalmanager>
</team>
</mlb>

Notice that every piece of data is wrapped in a tag and that tags are nested in a hierarchy that contains further information about the data it wraps. You probably guessed that <generalmanager> is a child piece of information for <team>, as is <name>.

Unlike semantic markup languages like LaTeX, every piece of data in XML must be enclosed in tags. The top-level tag is known as the document root, which encloses everything in the document. an XML document can have only one document root.

Just before the document root is the XML declaration: <?xml version=”1.0″?>. This mandatory element lets the processor know that this is an XML document. As of this writing, there are two versions of XML: 1.0 (last updated in 2008) and 1.1 (last updated in 2006). Because version 1.1 is not fully supported yet, for our examples we will be concentrating on version 1.0.

One problem with semantic markup is the possibility for confusion as data changes contexts. For instance, you might want to have a list of teams in a database about baseball. However, without a human to look at it, the database has no way of knowing that <team> means a baseball team, as opposed to, for example, a football team. This is where namespaces come in. A namespace is used to provide a frame of reference for tags and is given a unique ID in the form of a URL, plus a prefix to apply to tags from that namespace. For example, you might create an baseball namespace, with an identifier of http://server.domain.tld/NameSpaces/Baseball and with a prefix of mlb: and use that to provide a frame of reference for the tags. With a namespace, the document would look like this:

<?xml version=”1.0″?>
<mlb:baseball
xmlns:mlb=”http://server.domain.tld/NameSpaces/Baseball”>
<mlb:team>
<mlb:name>New York Mets</mlb:name>
<mlb:generalmanager>Sandy Alderson</generalmanager>
</mlb:team>
<mlb:team>
<mlb:name>Washington Nationals</name>
<generalmanager>Mike Rizzo</mlb:generalmanager>
</mlb:team>
<mlb:team>
<mlb:name>Atlanta Braves</mlb:name>
<mlb:generalmanager>John Hart</mlb:generalmanager>
</mlb:team>
</mlb:baseball>

It’s now explicit that the team element comes from a set of elements defined by a baseball namespace, and can be treated accordingly.

A namespace declaration can be added to any node in a document, and that namespace will be available to every descendant node of that node. In most documents, all namespace declarations are applied to the root element of the document, even if the namespace is not used until deeper in the document. In this case, the namespace is applied to every tag in the document, so the namespace declaration must be on the root element.

A document can have and use multiple namespaces. For instance, the preceding example library might use one namespace for library information and a second one to add publisher information.

Notice the xmlns: prefix for the the namespace declaration. Certain namespace prefixes are reserved for use by XML and its associated languages, such as xml:, xsl:, and xmlns:. A namespace declaration can be added to any node in a document, and that namespace will be available to every descendant node of that node.

External Links:

XML at Wikipedia

W3 XML home page

Python Database Programming: Part Nine

Python Database ProgrammingPython Database Programming: Committing and Rolling Back Transactions

Each connection, while it is engaged in action, manages a transaction. With SQL, data is not modified unless you commit a transaction. The database then guarantees that it will perform all of the modifications in the transaction or none. As a result, you will not leave your database in a potentially erroneous condition.

To commit a transaction, we call the commit method of a connection:

conn.commit()

Note the the transaction methods are part of the connection class, not the cursor class.

If something goes wrong, like an exception is thrown that you can handle, you should call the rollback method to undo the effects of the incomplete transaction; this will restore the database to the state it was in before you started the transaction, guaranteed:

conn.rollback()

The capability to roll back a transaction is very important, because you can handle errors by ensuring that the database does not get changed. In addition, rollbacks are very useful for testing. You can insert, modify and delete a number of rows as part of a unit test and then roll back the transaction to undo the effects of all the changes. This enables your unit tests to run without making any permanent changes to the database. It also enables your unit tests to be run repeatedly, because each run resets the data.

The DB API defines several globals that need to be defined at the module level. You can use these globals to determine information about the database module and the features it supports. The following table lists these globals.

Global What It Holds
Apilevel Should hold ‘2.0’ for the DB API 2.0, or ‘1.0’ for the 1.0 API.
Paramstyle Defines how you can indicate the placeholders for dynamic data in your SQL statements. The values include:

  • ‘qmark’: Use question marks
  • ‘numeric’: Use a positional number style; e.g. ‘:1’, ‘:2’, etc.
  • ‘named’: Use a colon and a name for each parameter.
  • ‘format’: Use the ANSI C sprintf format codes.
  • ‘pyformat’: Use the Python extended format codes.

With a cursor object, you can check the definition attribute to see information about the data returned. This information should be a set of seven-element sequences, one for each column of result data. These sequences include the following items:

(name, type_code, display_size, internal_size, precision, scale, null_ok)

None can be used for all but the first two items, as shown in this example:

((‘FIRSTNAME’, None, None, None, None, None, None),
(‘LASTNAME’, None, None, None, None, None, None),
(‘NAME’, None, None, None, None, None, None))

With databases, errors happen a lot. The DB API defines a number of errors that must exist in each database module. The following table lists those errors:

Exception Usage
Warning Used for non-fatal issues. Must subclass StandardError.
Error Base class for errors. Must subclass StandardError.
InterfaceError Used for errors in the database module, not the database itself. Must subclass Error.
DatabaseError Used for errors in the database. Must subclass Error.
DataError Subclass of Database error that refers to errors in the data.
OperationalError Subclass of DatabaseError that refers to errors such as the loss of the connection to the database. These errors are generally outside of the control of a Python scripter.
IntegrityError Subclass of DatabaseError for situations that would damage the relational integrity, such as uniqueness constraints or foreign keys.
InternalError Subclass of DatabaseError that refers to errors internal to the database module, such as a cursor no longer being active.
ProgrammingError Subclass of DatabaseError that refers to errors such as bad table name and other things that can safely be blamed on the scripter.
NotSupportedError Subclass of DatabaseError that refers to trying to call unsupported functionality.

Your Python scripts should handle these errors. You can get more information about them by reading the DB API specification.

External Links:

Database Programming at wiki.python.org

Database Programming at python.about.com

Databases at docs.python-guide.org

Python Database Programming: Part Eight

Python database programming

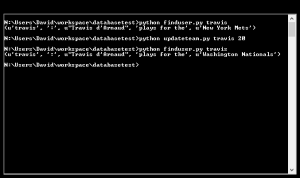
Executing updateteam.py at the command line.

In the previous article, we introduced some more complex query operations using Sqlite. In this article, we will use Sqlite to both modify a table entry and delete a table entry.

Python Database Programming: Updating a Record

First, we need to enter the code for updating the player table, which we will call updateteam.py. We want to re-assign player Travis d’Arnaud to the Washington Nationals:

import sqlite3
import sys
conn = sqlite3.connect('my_database')
cursor = conn.cursor()
newteam = sys.argv[2]
player = sys.argv[1]
# Query to find the player ID:
query = """
select p.idnum
from user u, player p
where u.username=? and u.idnum = p.idnum
"""
cursor.execute(query,(player,));
for row in cursor.fetchone():
    if (row != None):
        playerid = row
# Now, modify the player:
cursor.execute("update player set team=? where idnum=?", (newteam,playerid))
conn.commit()
cursor.close()
conn.close()

When you run this script, you need to pass the name of the user/player to update, as well as the team ID number of the team to which you want to transfer the player. For example:

>python finduser.py travis
(u'travis', ':', u"Travis d'Arnaud", 'plays for the', u'New York Mets')

>python updateteam.py travis 20

>python finduser.py travis
(u'travis', ':', u"Travis d'Arnaud", 'plays for the', u'Washington Nationals')

The example output shows the before and after picture of the player row, verifying that the updateteam.py script work.

The updateteam.py script expects two values from the user: the user name of the player to update (in this case, travis) and the team number of the new team (in this case 20, the team id number of the Washington Nationals). This example also shows the use of the fetchone method on the Cursor. The final SQL statement then updates the player row for the given user to have a new manager.

Python database programming

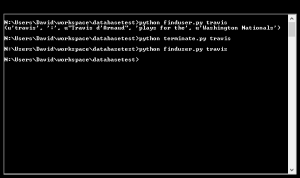
Executing terminate.py at the command line.

Python Database Programming: Deleting a Record

The next example uses a similar technique to delete a player from the table.

import sqlite3
import sys
conn=sqlite3.connect('my_database')
cursor = conn.cursor()
player = sys.argv[1]
# Query to find the employee ID:
query = """
select p.idnum
from user u, player p
where u.username=? and u.idnum = p.idnum
"""
cursor.execute(query,(player,))
for row in cursor.fetchone():
    if (row != None):
        playerid = row
# Now, modify the employee:
cursor.execute("delete from player where idnum=?", (playerid,))
conn.commit()
cursor.close()
conn.close()

When you run this script, you need to pass the user name of the player to delete. You should see no output unless the script raises an error:

>python finduser.py travis
(u'travis', ':', u"Travis d'Arnaud", 'plays for the', u'Washington Nationals')
>python terminate.py travis
>python finduser.py travis
>

This script uses the same techniques as the updateteam.py script by performing an initial query to get the player ID number for the given user name and then using this ID number in a later SQL statement. With the final SQL statement, the script deletes the player from the player table.

External Links:

Database Programming at wiki.python.org

Database Programming at python.about.com

Databases at docs.python-guide.org

Python Database Programming: Part Seven

Python database programming

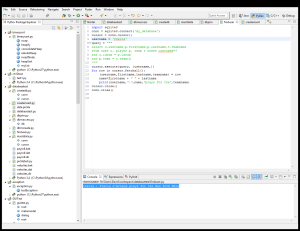
Using Sqlite to perform a join operation under Eclipse.

In the previous article, we used connection objects to insert values into an existing database. In this article, we will cover performing some simple join operations.

Python Database Programming: A Join Query

The following script implements a simple query that performs a join on the player and team tables:

import os
import sqlite3

conn = sqlite3.connect('my_database')
cursor = conn.cursor()
cursor.execute("""
select player.firstname, player.lastname, team.teamname
from player, team
where player.team = team.teamid
order by player.lastname asc
""")
for row in cursor.fetchall():
print(row)
cursor.close()
conn.close()

When you save and run this script, you will see output like the following:

('Lucas', 'Duda', 'New York Mets')
('Bryce', 'Harper', 'Washington Nationals')
('Travis', "d'Arnaud", 'New York Mets')

This script initializes the connection and cursor in the same manner as the previous script. Then it passes a simple join query to the cursor execute method. This query selects two columns from the player table and one from the team table. This is a simple query, but you will still want to format your queries so they are readable, similar to what is shown here.

When working with user interfaces, you will often need to expand IDs stored in the database to human-readable values. In this case, for example, the query expands the team ID, querying for the team name. You can’t expect people to remember the meaning for numeric IDs.

They query also orders the results by the players’ last names in ascending order. This means that it starts at the beginning of the alphabet, which is what you would normally expect. However, you can reverse this and have them sorted in descending order. Note that it doesn’t work quite the way I wanted it to; “d’Arnaud” appears last because it was double-quoted.

After calling the execute method, the data, if any was found, is stored in the cursor object. You can use the fetchall method to extract the data. You can also use the fetchone method to fetch one row at a time from the results. Note also how the data appears as Python tuples.

In order to perform the next join operation, we must first run the following script:

import os
import sqlite3
conn=sqlite3.connect('my_database')
cursor=conn.cursor()

# Create tables
cursor.execute("""
create table user
    (idnum integer,
    username varchar)
""")

# Insert data into the table
cursor.execute("""
insert into user(idnum, username)
values(100, 'travis')
""")


conn.commit()
cursor.close()
conn.close()

This script creates a new table (user) and inserts one record: an idnum (100) with a corresponding username (travis).

Now we are ready to run the following script:

import sqlite3
conn = sqlite3.connect('my_database')
cursor = conn.cursor()
username = 'travis'
query = """
select u.username,p.firstname,p.lastname,t.teamname
from user u, player p, team t where username=?
and u.idnum = p.idnum
and p.team = t.teamid
"""
cursor.execute(query, (username,))
for row in cursor.fetchall():
    (username,firstname,lastname,teamname) = row
    name=firstname + " " + lastname
    print(username,":",name,"plays for the",teamname)
cursor.close()
conn.close()

When you run this script, you should see the following:

travis : Travis d'Arnaud plays for the New York Mets

This script performs a join on all three example tables, using table-name aliases to create a shorter query. The purpose is to find a given user in the database by searching for that user name. The script also shows an example of expanding both the player’s ID to the player’s name and the team’s ID to the team’s name. All of this makes for more readable output.

This example also shows how you can extract data from each row into Python variables. For example:

(username,firstname,lastname,teamname) = row

An important new feature of this script is the use of a question mark to enable you to build a query using dynamic data. When you call the execute method on the Cursor, you can pass a tuple of dynamic data, which the execute method will fill in for the question marks in the SQL statement. Each element in the tuple is used, in order, to replace the question marks. [Thus, you need to have as many dynamic values as you do in the SQL statement.]

query = """
select u.username,p.firstname,p.lastname,t.teamname
from user u, player p, team t where username=?
and u.idnum = p.idnum
and p.team = t.teamid
"""

cursor.execute(query, (username,))

The query used in this example is very helpful when you want to start updating rows in the tables, because users will want to enter meaningful values.

External Links:

Database Programming at wiki.python.org

Database Programming at python.about.com

Databases at docs.python-guide.org