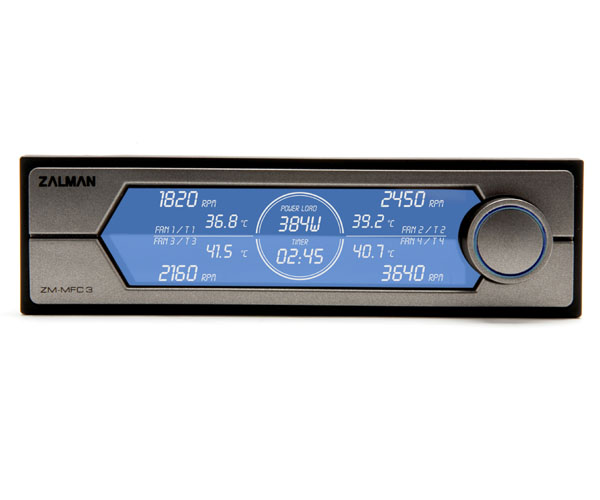
Front view of the Zalman ZM-MFC3.
The Zalman ZM-MFC3 is a 4-channel, 8 watt per channel manual fan controller. It fits into a 5.25″ drive bay, and has an LCD display. It is an improved version of the Zalman ZM-MFC3. One thing that makes this unit unusual is that unlike most controllers, which are open in the back, leaving the PCB exposed, the ZM-MFC3 is completely enclosed in a case. This is one of the priciest controllers reviewed so far on this site (as of this writing, it is selling for $87.43 U.S.D. on Amazon), but you get a lot of extras with it.
The Zalman ZM-MFC3 comes in a rather small cardboard box with a picture of the controller on the front. The back of the box contains a list of the main functions of the ZM-MFC3, along with some of the more important specifications. Inside the box, the controller itself is in an anti-static plastic bag. All the accessories are included in a white box, and there is also a fairly detailed manual inside the box. The accessories are: four cables for connecting the fans (three of them have 3-pin connectors and one has a 4-pin connector for PWM fans; four temperature sensors; an expansion card bracket with a CVS connector which enables you to measure the power and some screws. One of the included cables is a Y-connector that allows you to control two fans on a single channel; there is a white connector and a blue connector on the other end. The white connector will feed the RPM signal back to the controller when plugged in, while the blue connector will not; this avoids the problem of two fans on the same channel supplying RPM data to the unit. If you use this cable and only plug in one fan, you will want to plug in the white connector. Another cable enables you to connect either two fans on a single channel, or a CPU fan (the second connector in this case can be plugged into a header on the motherboard that supplies the CPU fan’s RPM signal). The thermal sensors connect to the controller with a single connector, which makes cable management somewhat easier, but also makes it impossible to disconnect unused sensors. Also, the thermal sensor cables are only 21 inches (533 mm) long, so you may have trouble placing them if you have a large case. The sticky tape included for taping the temperature probes is purported to not stick very well, but this is a common complaint with many controllers.
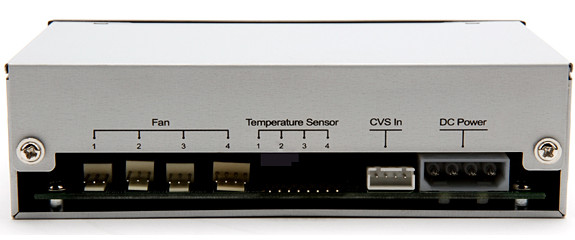
Rear view of the ZM-MF3, showing the connectors.
The controller itself is fairly small (about 3.4″ deep) and fits in a single drive bay. Installation of the ZM-MFC3 is simple: just slide it into an empty drive bay and secure it with the screws. As for the connectors, they are easy to recognize, and the cables that correspond to each connector cannot be connected anywhere else. The one part of installation that is different from installing other controllers is connecting the power consumption meter. You must connect the CVS cable to the controller, and screw in the bracket in front of one of the unused expansion slots. then connect the watt meter to the power connector of your PC, and connect the USB-like connector from the watt meter to the bracket. [Even though the port on the bracket looks like a USB port, do not connect it to the USB header on your motherboard, or you may damage both the power consumption meter and your motherboard.]
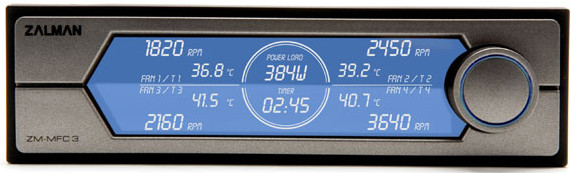
Controlling the fans is easy. There is a large knob on the right side of the front panel. Pushing the wheel in and holding it for three seconds enables you to set the fan speeds. Pushing the knob repeatedly enables you to select one of the four channels, and once you have selected the fan whose speed you want to change, turning the wheel alters the speed. The display is easy to read and can be read from different viewing angles, which is a major improvement over the ZM-MFC2’s display. All four temperatures and fan speeds can be viewed at the same time (the fan speed and temperature of each channel takes up one quadrant of the display). The circle in the center of the display shows both the total power load (in watts), and the time since the computer was booted (total uptime in hours and minutes). The controller does not need any additional software in order to measure the power load.
In conclusion, the Zalman ZM-MFC3 is a solidly-built, easy-to-use controller with an impressive LCD readout. I hesitate to give it an unqualified endorsement for the following reasons. [1] It is not an automatic controller – even though it has thermal probes, there is no way of varying the fan speed according to the temperature. Many purchasers of fan controllers may never avail themselves of such functionality, but considering how expensive the ZM-MFC3 is, it is something I would expect. [2] The wattage per channel is fairly low (8 watts per channel) – again, this may be enough for most users, but for the price I would have expected more, and I suspect some users have shyed away from this product because the power output is inadequate. Still, if you are willing to spend close to $90 on a fan controller, this is one to consider. It delivers on everything Zalman claims it does, there is no overhead on performance, and it is definitely an improvement on the ZM-MFC2. Moreover, the power consumption meter is a unique feature which cannot be replicated easily via software or other means. Thus, the ZM-MFC3, while far from an ideal product, has a lot to recommend it.
Zalman ZM-MFC3 Specifications:
Dimensions: 147(L) x 87(W) x 42(H) mm
Power & Temperature Display: 10~999W/ -9.9 °C~+99.9 °C
Fan Compatibility:
1 x 4-Pin(Supports fans with PWM function)
3 x 3-Pin (Supports fans with RPM output function)
Fan RPM Control: PWM Regulation Method (Fan PWM)
Voltage Control: Method (Fan No.1~3)
Output Current: MAX 0.7A per each channel
Output Voltage: +4~11VDC
Input Voltage: +12VDC/+5VDC
External Links:
Zalman’s product page for the ZM-MFC3.
Recent Comments