Tkinter GUI Framework: Part One

Tkinter

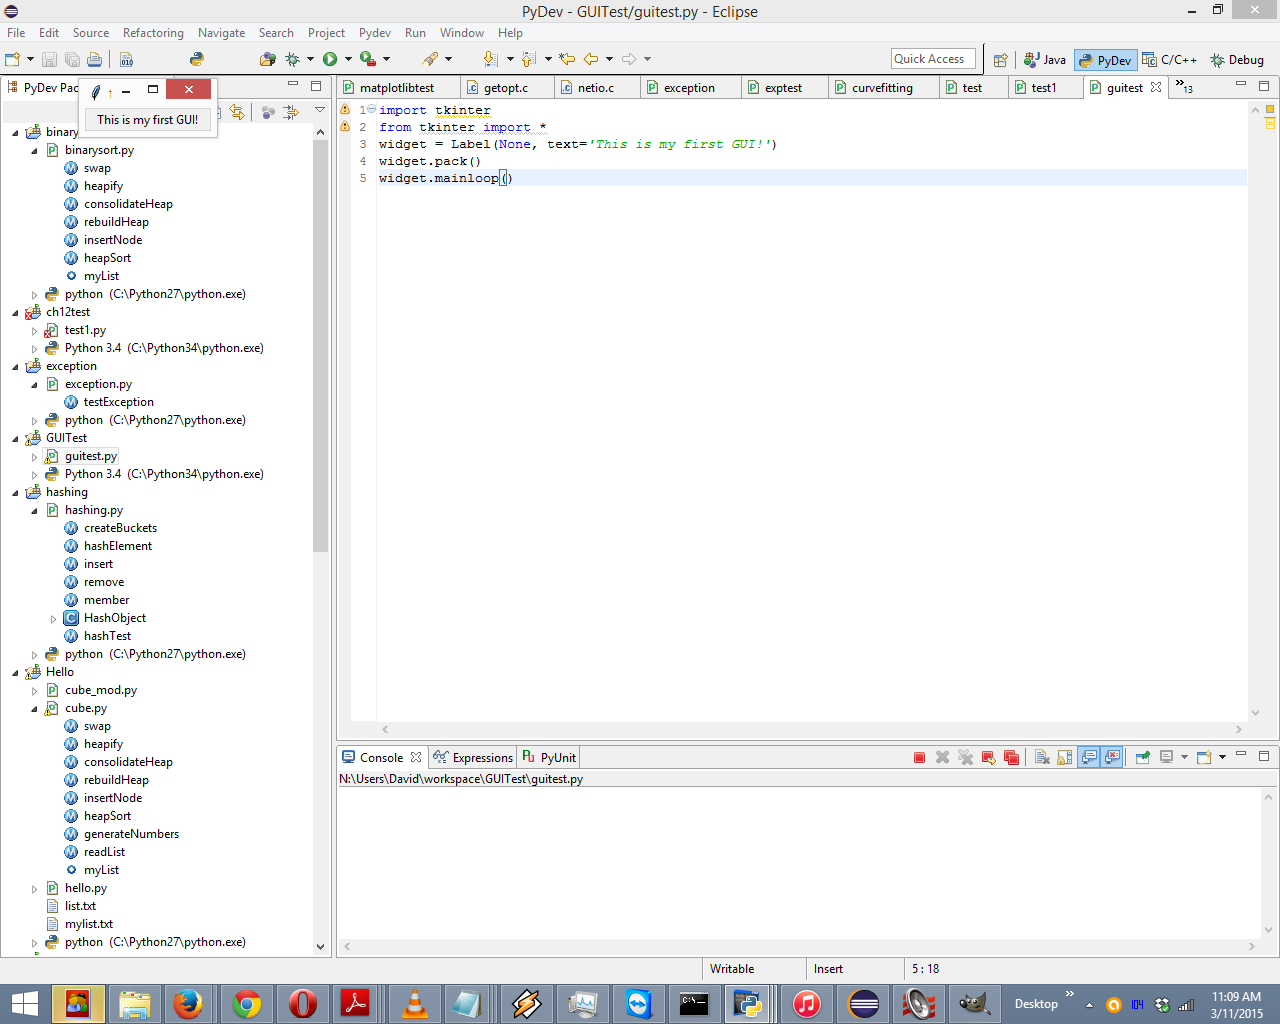
Tkinter in action with the PyDev module in Eclipse under Windows 8.1.

There is wide support for writing GUIs with Python with many different toolkits. These toolkits, binary modules for Python that interface with native code written in C/C++, all have different APIs and different feature sets. Only one comes with Python by default: the TK GUI toolkit.

Other options are wxPython, PyQT, and pyGTK. For this series of articles, we will be using Tkinter, which is Python’s standard GUI package and comes installed with Python. It is perhaps the most used GUI programming kit and is portable across virtually every platform.

Installing Tkinter

If you installed Python under Windows, the Python Windows installer includes Tcl/Tk as well as Tkinter. This is essentially a one-click install of everything needed. Linux and the BSD platforms require a separate installation of Tcl/Tk. This is usually available as a binary package. Under Ubuntu/Debian/Mint, you can use the following command:

sudo apt-get install python python-tk idle python-pmw python-imaging

This installs Python, Tkinter (which is not really needed since it automatically gets installed with Python), IDLE, Python MegaWidgets and PIL. In Fedora Core, it’s:

yum install tinker

Getting Started with Tkinter

The first thing to understand is that most GUI frameworks, including Tkinter, are based on a widget model. A widget is a component of a GUI. Buttons, labels and text boxes are all widgets. Most widgets have graphical representations on screen, but some widgets (such as tables and boxes) exist only to contain other widgets and arrange them on the screen. A GUI is constructed out of an arrangement of widgets.

In this script, we create a GUI of a simple window and a label:

import tkinter
from tkinter import *
widget = Label(None, text='This is my first GUI')
widget.pack()
widget.mainloop()

The first thing the script does is import the Tkinter module. Next, we could either import Label from Tkinter, for simply import all (*) from Tkinter (we did the latter). After that, we create an object for each widget (in this case, Label). The Label is then arranged in the parent window. Finally, the widget is displayed.

This is acceptable as a first GUI script, but it would be nice if the label would re-center itself when the dialog box that contains it is resized (if you try to resize it, you will see that this is not the case). However, we can fix this with a small code change:

import tkinter
from tkinter import *
Label(text='This is my first GUI').pack(expand=YES, fill=BOTH)
mainloop()

When you run the program, try resizing the window. You will see the “This is my first GUI” text label stay centered no matter what the window looks like.

In these initial examples, we created the widgets and configured them at the same time. However, we may want to wait to configure them after they are created:

import tkinter
from tkinter import *
root = Tk()

widget = Label(root)
widget.config(text='This is my first GUI')
widget.pack(side=TOP, expand=YES, fill=BOTH)
root.mainloop()

In this example, we called upon the configure method to achieve the same result as in the previous example. If we wanted to, we could change the appearance of the widget later in the program.

External Links

How to Install Tkinter at unpythonic.net

Tkinter wiki at python.org

Python Programming: Part Two (Python IDLE)

Python IDLEIn the previous article, we introduced some basic concepts about Python and how to use Python at the interactive command line. In this article, we will introduce variables, and also consider how to save a code module and run it, both from the command line and the Python IDLE interface.

The previous article contained the following Python statement:
>>>> a = 3+4

This was our first example of a Python variable. As you may have deduced, in Python, unlike C/C++ or some other languages, you don’t have to declare variables separately. You declare a variable when you use it for the first time. There are three distinct numeric types: integers, floating point numbers, and complex numbers. In addition, Booleans are a subtype of integers.

Numbers are created by numeric literals or as the result of built-in functions and operators. Unadorned integer literals yield integers. For example:
>>> x = 10

yields an integer variable x. Numeric literals containing a decimal point or an exponent sign yield floating point numbers. For example:
>>> x = 3.5

yields a floating point variable x.

You can also create a complex number. Appending ‘j’ or ‘J’ to a numeric literal yields an imaginary number to which you can add an integer or float to get a complex number with real and imaginary parts. For example:
>>> x = 10j + 5

creates a complex number with 5 as the real part and 10 as the imaginary part. You can retrieve both parts by typing:
>>> print(x)

or just the real or imaginary parts:
>>> print(x.real)
>>> print(x.imag)

The variables real and imag, however, are read-only variables and cannot be used to change the values of the real and imaginary components. The constructors int(), float() and complex() can be used to produce numbers of a specific type. For example:
>>> x = int(23)

creates an integer with a value of 23. Interestingly, leaving the parameter blank like this:
>>> x = int()

results in the value 0 being assigned to x.

Textual data in Python is handled with str objects, or strings. Strings are immutable sequences of Unicode code points. String literals can be written in several different ways – single quoted, double quoted, or triple quoted:
>>> text = ‘This is a test’
>>> text = “This is a test”
>>> text = ”’This is a test”’
>>> text = “””This is a test”””

Strings are immutable sequences of Unicode code points. Therefore:
>>> text[0] = ‘B’

is not allowed. However, if we want to print a single character from the string, we can do this:
>>> print(text[0])

or, if we want to print multiple characters that represent a subset of the string, we can specify two indices separater by a colon. For example:
>>> print(text[0:3])

will result in ‘This‘ being printed.

So far, we have been typing in programs at the interactive prompt, which has one big disadvantage: programs you type there go away as soon as the Python interpreter executes them. Because the code typed in interactively is never stored in a file, you cannot run it again without retyping it. To save programs permanently, you need to write your code in files, which are usually called modules. Modules are text files containing Python statements. Once a module is coded and saved in a file, you can ask the Python interpreter to execute the module any number of times.

To code a module, open your favorite text editor (e.g. Notepad in Windows, perhaps vi, emacs or gedit in Linux) and type some statements into a new text file called module01.py:

# My first Python script
name = str(input(‘Please enter your name: ‘)) # Read some input
print(‘Welcome to Python, ‘+name) # Print something out

In this module, we introduced three new concepts. The first line of the module is a comment. A hashtag (#) introduces a comment, which is just a description of what the program is doing. Comments can appear on a line by themselves or to the right of a statement. Multiline comments can be added, but must begin and end with three single quote marks, like this:
”’This is an example
 of a multi-line comment that can be inserted into a Python script on the command line or in the Python IDLE interface”’

The other concept we introduced was the input function. input() simply reads characters from the standard input device (in this case, a keyboard). We used the str() constructor to ensure that name is created as a string.

The third concept we introduced was the plus sign (+) to concatenate the literal string ‘Welcome to Python, ‘ and name. As you probably guessed, the program will read in a string from the keyboard representing the user’s name, and will print out a welcome message containing the user’s name.

Once you have saved this text file, you can ask Python to run it by listing its full filename as the first argument to a python command, typed at the system command prompt; e.g.:
> python module01.py

Using the Python IDLE Interface to Run a Module

Python IDLE

Python IDLE interface running our simple script.

Alternatively, from the Python IDLE interface, you can navigate to File -> Open, and then browse to module01.py and open it. A new window should appear with the code for the module in it. Navigate to Run -> Module (or in Windows, just press F5) to run the module, and the output should appear in the main IDLE window, after it prints the “RESTART” banner message:

Please enter your name: Grumbledook
Welcome to Python, Grumbledook

There are other ways we can load a module. We could use the import command, assuming the module is within Python’s path:

>>> import module01

If we make changes to the code, we would have to use the reload command in order for them to take effect:

>>> from imp import reload
>>> reload(module01)

Finally, we could use the exec() and open.read() commands in conjunction to simultaneously load and run the module:

>>> exec(open(‘module01.py’).read())

These three options should work both at the command line and in the Python IDLE interface.

In the next article, we will introduce some additional concepts and also code our first Python function.

External Links:

Wikipedia article on Python IDLE interface

Python IDLE website

Python IDLE wiki

How to Install Python IDLE on Linux

How to Install Python IDLE on eHow

Python Programming: Part One

Python programmingPython, as mentioned earlier, is an interpreted language. An interpreter is a program that executes other programs, and when you are doing Python programming, the Python interpreter reads your program and carries out the instructions it contains.

In its simplest form, a python program is just a text file containing Python statements. For example, the initial “Hello, world” program from the previous article is a very simple Python script, but it passes for a fully functional Python program:

print(‘Hello, world!’)

This program contains a single Python print statement, which simply prints a string to the output stream, and thus is a very simple example of Python programming. We can also output the results of numeric expressions if we want:

print(3+5)

This will print an “8” to the output stream.

Python Programming: Running Python Programs

Perhaps the easiest way to begin Python programming is to type in programs at Python’s interactive command line. There are many ways to do this: start it in an IDE, from a system console, and so on. Assuming that Python is installed on your system (we covered installation in a previous article), the simplest and most platform-neutral way to start the Python interpreter is usually just to type python at your operating system’s prompt, without any other arguments. The notion of a system shell prompt is cross-platform, but how you access it varies by platform:

  • In Windows, you can type python in a DOS console window (the Command Prompt), found in the Accessories section of the Start -> Programs menu, by right mouse-clicking on the window icon on the lower left corner of the screen in Windows 8, or in the Start -> Run dialog box (run “cmd.exe”).
  • On Unix/Linux/Mac OS X, you might type this command in a shell or terminal window.
  • On handheld devices, you generally click the Python icon in the home or application window to launch an interactive session.

If you have not set your shell’s PATH environment variable to include Python’s install directory, you may need to type the full path to the Python executable on your machine (e.g. c:\Python34\python in Windows for version 3.4). The installer should update the path, however, and I have not had to type the full path under Windows or Linux. Of course, you can always use the change directory command to go to the Python install directory.

In Windows, you can also begin interactive sessions for Python programming by starting IDLE’s main window or by selecting the “Python (command line)” menu option from the Start button menu (in Windows 7 and earlier). I made a desktop shortcut for Python in Windows 8. Both the command line Python interpreter and IDLE spawn a Python interactive prompt with equivalent functionality.

When coding at the Python interactive prompt, we can type as many Python commands as we want, and each command will be run immediately after it is entered:
>>> print(‘Hello, world!’)
Hello, world!
>>> a = 3+4
>>> print(a)
7
The first command prints: Hello, world!. The second command assigns the sum of 3+4 to the variable a, and the third command prints out the value of a. Note that because the interactive session automatically prints the results of expressions you type, so you do not even need to say “print” at the prompt:
>>> a
7

We did not do much with the code in this article, but hopefully it served as an adequate introduction to Python programming, and the main point we want to remember here is that the interpreter executes the code entered on each line immediately, when the [ENTER] key is pressed. There is no need to create a source code file, and no need to run the code through a compiler and linker first, as you would do with a language such as C or C++. As we will see in future articles, you can also run multi-line statements at the interactive prompt. Such statements run immediately after you’ve enter all of its lines and pressed [ENTER] twice to add a blank line.

External Links:

The official Python site – contains many useful resources for Python programming.