Aerocool Strike-X X-1000 Review


Aerocool Strike-X X-1000 Review

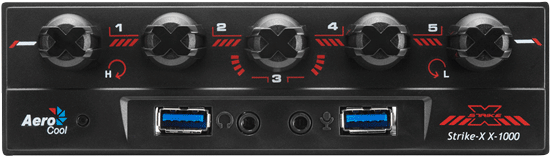
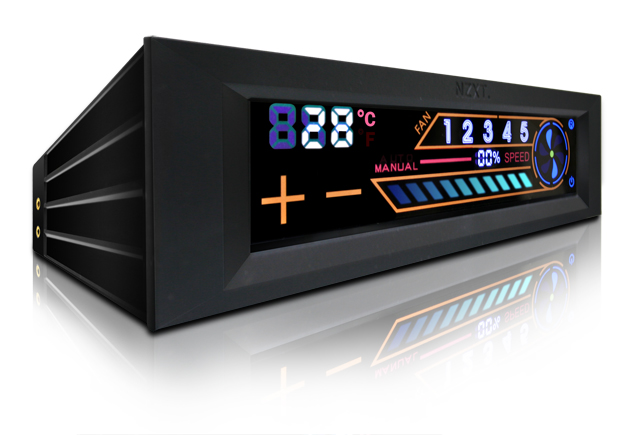
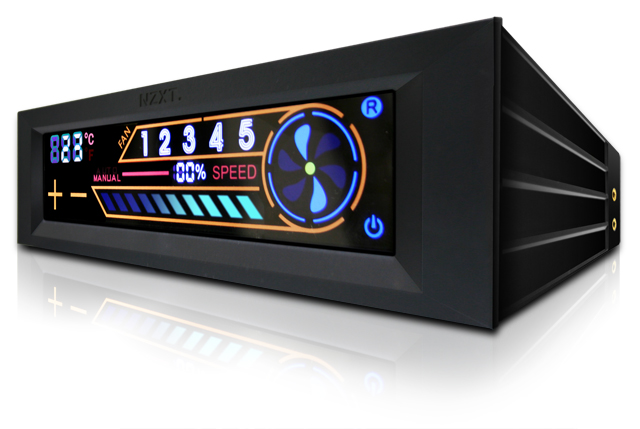
Front view of the Aerocool Strike-X X-1000

The Aerocool Strike-X X-1000 is a 5-channel, 25 watt per channel manual fan controller. It features a fan fail alarm that is supposed to sound when one or more of the fans fail. Like some of the other Aerocool controllers, this unit has 2 USB 3.0 ports and audio jacks (standard HDA header). It fits into a single 5.25″ drive bay. One of the advantages of this controller is that it enables the user to switch off fans completely if desired. It has a fairly steep price ($44.98 on Amazon), so you will probably want to do some serious comparison shopping before buying this one.

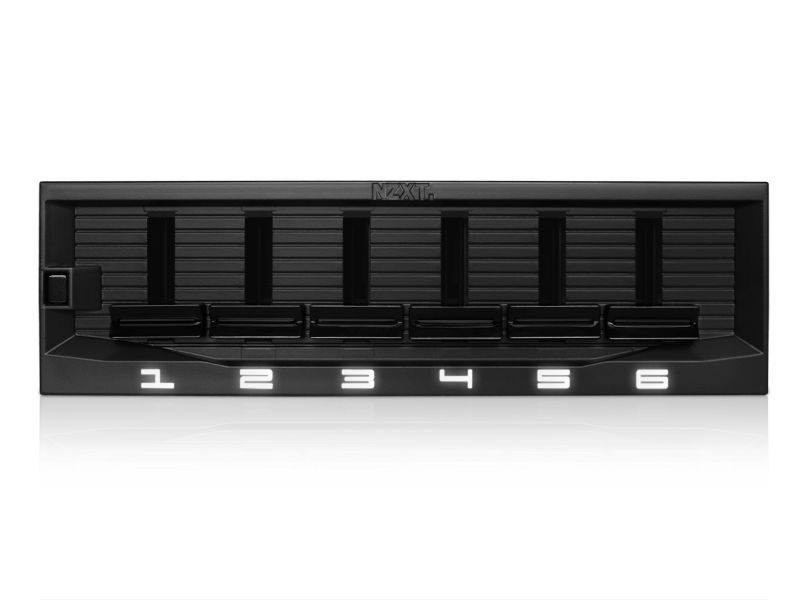
The front of the box features a large picture of the Strike X X-1000 and also lists some of the features of the controller. Unlike some other controllers, this one comes with an extensive user’s manual, so if you need help in using or installing the product, you should be able to find it. The front panel is dominated by its black-and-red color scheme. The controller circuitry is contained on a single black PCB, and the only cables that are hard-wired to the board are the USB and audio cables – all other cables are removable. There is a USB 2.0 header on the same cable for backwards compatibility as well. Since the USB and audio ports are connected to the motherboard by means of a header, the speed and quality will be as good as the they are on your motherboard.

Aerocool Strike-X X-1000 Review

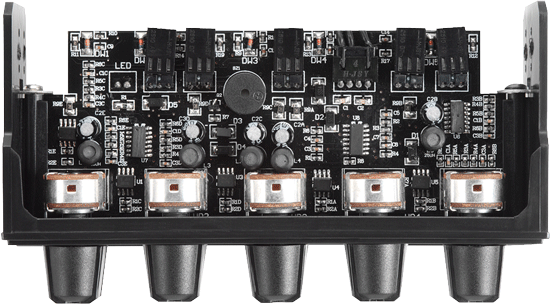
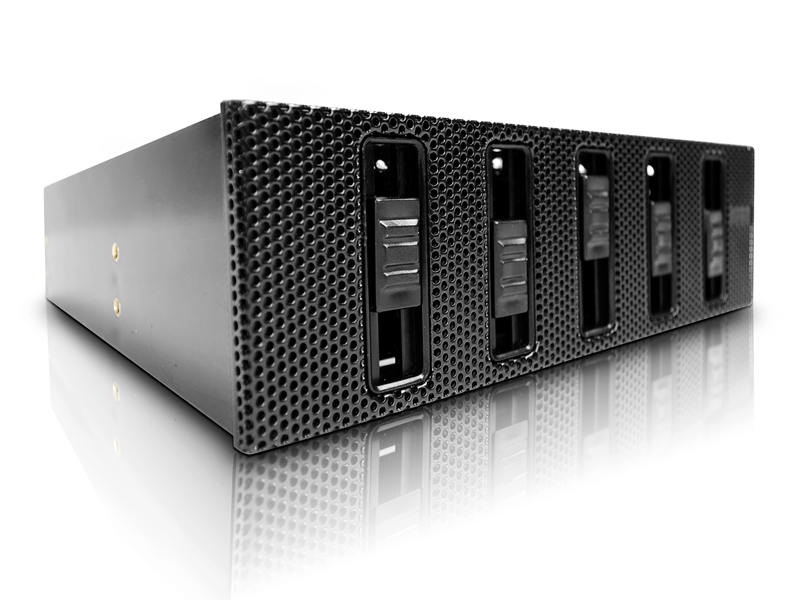
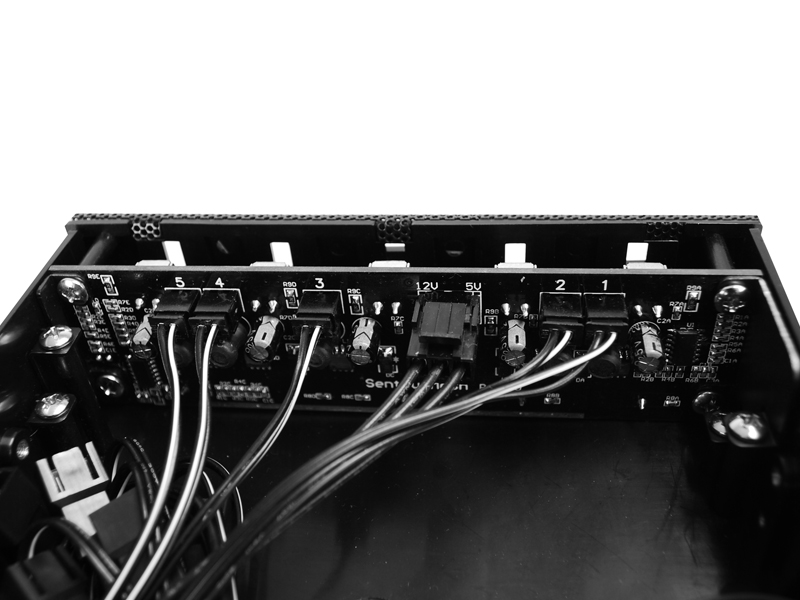
Top view of the Strike-X X-1000, showing the PCB.

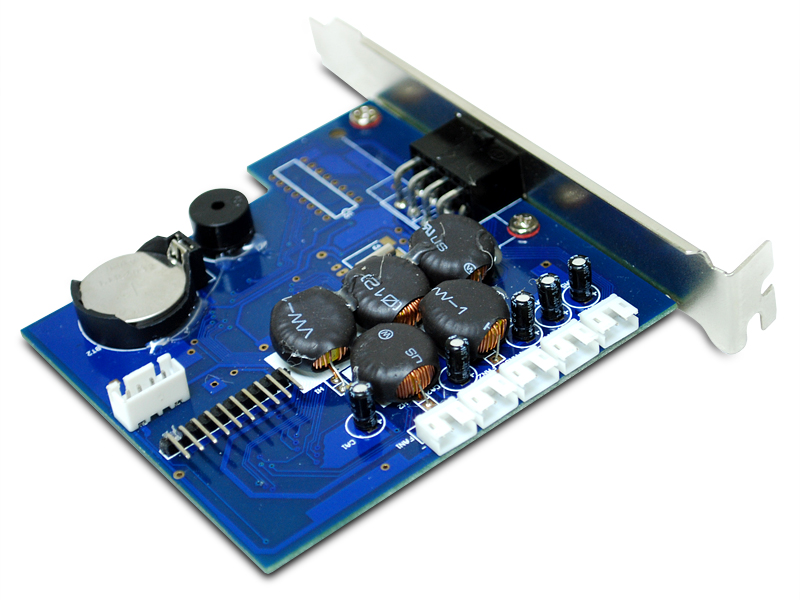
There are 5 fan cables provided with the controller; only one of them allows you to plug in a 4-pin PWM fan, so if you have more than one 4-pin fan, you will need 3-to-4-pin adapters. The power cable uses a custom 3-pin connection to the board but the other end has a standard 4-pin Molex connector. The Molex also acts as a pass-through, so if you did not have any spare Molex ports on the PSU, you will not need a Y-connector to connect everything. The fan cables are about 18 inches long, so they should be long enough, regardless of where in the case the fans are located.

The knobs are made of plastic; they are easy to move although they lack the solid feeling of metal knobs. If a knob is turned all the way to the left, there is a tactile “click” indicating that the fan is off. As the user turns the knob to the right, there is a minimal lag between when the knob is turned and when the fan speed changed. The fans run at a minimum of 5 volts, so the user can control the fan speed from 40 to 100 percent.

One of the problems with this unit is with the fan alarm. The controller incorporates an alarm which is supposed to go off when one or more of the fans stop running. Several users have reported that the alarm goes off even when there is nothing wrong with the fan, and the only way to turn it off is to disconnect the power cable to the controller. Whether this is a design defect or a quality control issue is not known. At the time this article was written, Amazon was still selling this controller, but on Newegg the Strike-X X-1000 is listed as “discontinued”, and one wonders if the number of returns due to customers having problems with the fan alarm was a factor in Newegg’s decision not to keep it in stock.

Although Strike-X X-1000 is a bit expensive for a manual fan controller, the real issue with this unit is the malfunctioning fan alarm. The problem might even be tolerable if there was a switch or a button to turn off the fan alarm. But there is no such means of disabling the fan alarm, and for that reason, I would advise avoiding this product. The feedback given by customers on Newegg suggests as much. At the very least, you should find out whether Aerocool has since fixed the problem; nobody wants to spend the shipping fees on an RMA if it can be avoided.

Specifications

Voltage Supply: +5V Range: 4.6-5.4V / +12V Range: 11.5V-12.5V
Working Temperature: 0-50 C
Storage Temperature: -10 C – 60 C
Humidity: 10% – 90%
Total wattage per channel: 25W (When exceeding 25W, power will be shut off due to auto protection)

External Links

Aerocool’s product page for the Strike-X X-1000

Aerocool Touch-2100 Review


Fan controller review: Aerocool Touch-2100

Front view of the Aerocool Touch-2100, with the display set to red.

Today’s fan controller review covers the Aerocool Touch-2100 is a 5-channel, 25 watt per channel fan controller with a touchscreen interface. It fits into 2 5.25″ drive bays. The touchscreen is large and colorful, and undoubtedly will be aesthetically pleasing in any gaming rig. It carries a relatively steep price tag (at the time this review was written, Amazon was selling it for $59.99). Therefore, you will want to make sure it meets your requirements before buying this unit.

The Touch-2100 allows the user to increase or decrease the speed of each of the fans manually. In addition, an alarm temperature can be set to a particular channel in order to monitor the increase in temperature for that sensor. Once the detected temperature exceeds the alarm temperature, the Touch-2100 will automatically increase the fan for that channel to the maximum speed. Once the temperature falls below the alarm temperature, the fan speed will revert to the manually set speed.

Inside the box is the fan controller itself, an instruction manual, and a power cable. On the front panel is the LCD touchscreen, and beneath are there are 2 USB 3.0 ports and a microphone and headphone jack. In addition to the fan and temperature sensors, there is a USB cable for the USB ports.

The Touch-2100 installs into a dual 5.25″ bay (although there may be a small gap). Once you have connected the controller the the PSU, connected the fans to the controller (it should be noted that the controller does not include any 3-pin to Molex adapters, so you will have to get your own if you want to use fans with Molex connectors), and place the sensors where you want them, you will be ready to use this unit.

One of the advantages of this controller is that once the cables are connected and the sensors are in place, everything else is configurable from the LCD touchscreen. To toggle between Celsius and Fahrenheit, you simply touch the C/F button (in the upper left of the screen). Touching the Color button (in the lower left corner) allows you to rotate through seven color selections (red, green, yellow, blue, purple, skyblue, white) plus the light off function. You may want to adjust the temperature alarm as well. To do that, touch the digits in TEMP2 for the appropriate channel. The digits will begin to blink, and pressing the + and – buttons on the left side of the touchscreen allows you to move the alarm temperature up and down. The default alarm temperature is 70º C. Touching the digits a second time causes the controller to memorize the new setting.

There are some issues with the display. First, the white looks more like lavender. Second, the display is hard to see when looking up at the touchscreen; it is apparently meant to be looked at from either the same level or a higher level (the products page for the Touch-2100 on the Aerocool website confirms that the best viewing range for the screen is from 15 to 45 degrees). Third, there is no way to lock the touchscreen so settings aren’t changed by accident.

Another point that should be addressed is that if you connect more than one fan to a channel (with a Y connector), all fans will feed back an RPM signal to the controller. This will result in erratic RPM readings. The way to solve this problem (other than putting the fans on a separate channel, or if another channel is not available, get a second controller) is to cut the yellow lead for all but one of the fans on the channel. That way, only one RPM signal will be fed to the controller (presumably, you want to keep the lead of the fan whose speed you want to monitor intact).

Other than these small issues, the Aerocool Touch-2100 is a solid fan controller, and with 25 watts per channel, should do the job. With 7 different display colors, you probably won’t have to worry about it not matching the color of your case. If you are willing to spend $59.99 on a controller and have two drive bays to spare, the Touch-2100 is a viable option.

Specifications

Voltage Supply: +5V Range 4.6-5.4V / +12V Range: 11.5-12.V
Working Temperature: 0-50º C
Storage Temperature: -10º C-60º C
Humidity: 10-90%
Total Wattage Per Channel: 25W (When exceeding 25W, power will be shut off due to auto protection)

External Links

Aerocool’s product page for the Touch-2010

Touch-2100 manual in PDF format

Weekly Hardware Roundup: 5-24-2013


Project Ophelia - Hardware Roundup

Dell’s Ophelia is expected to be available to consumers in August.

Here is the hardware roundup for May 24, 2013, covering this week in hardware news.

Dell Announces Thumb-Sized “Ophelia” PC to Ship in July 2013

During CES 2013, Dell introduced Project Ophelia, an Android-powered flash drive about the size of a standard USB thumb drive. It plugs into the HDMI port of an HDTV or monitor, turning it into an Android-based PC that can run applications or access files stored remotely.

Ophelia can turn any screen or display into a PC, gaming machine or a TV set top box, according to Jeff McNaught, executive director of cloud computing at Dell. Users will be able to download apps, movies and TV shows from the Google Play store, and will also be able to run Android games or stream movies from Hulu or Netflix.

The first units will ship in July to developers, and could ship out to customers as soon as August. The first version of Ophelia will have Wi-Fi and Bluetooth capabilities and is targeted at users who do most of their computing on the Web. But Dell also wants to give Ophelia the ability to run Windows, OS X, Chrome and other operating systems that users can switch between. Dell would deliver these operating systems virtually through its cloud services.

Whether or not Ophelia will carve out a niche for itself remains to be seen; it seems that inexpensive tablets can do much of what Ophelia will do. Nonetheless, its low price (Tarken Maner, VP and general manager of Cloud Client Computing at Dell, expects the device to cost under $100 at launch) will undoubtedly give it an advantage over products like Google’s Chromebook, which also delivers applications and data through the cloud.

You can see Dell’s press release about Ophelia here.

D-Link Shipping New Wireless AC Routers

D-Link announced on May 14 the launch of four Wireless AC routers, with prices starting at $79.99 USD. All four silo-shaped routers will be available at local retailers soon, and the speeds range from 433 Mbps to 1300 Mbps. The group’s top-of-the-line router, the Wireless AC1750 Dual Band Gigabit Cloud Router, costs $169.99 USD. All 4 routers offer 4 “Fast” Ethernet ports on the back as well.

All 4 routers are dual band (2.4 GHz and 5 GHz), and the reported maximum speeds are likely only on the 5 GHz channel. The routers also offer easy remote network management, thanks to the free mydlink Lite app for iOS and Android.

You can find out more about these routers at D-Link’s product pages for them:

D-Link AC1750

D-Link AC1200

D-Link AC1000

D-Link AC750

ASRock Releases Teaser Showing off 802.11ac WiFi and Bluetooth 4.0 For its A-Style Motherboards

The ASRock A-Style motherboards, which also features Purity Sound (a form of improved onboard audio), HDMI-in (a means of showing video from external devices such as tablets via an HDMI port that works even when the computer is powered down), Waterproof by Comformal Coating, and Home Cloud, has released a video showing two additional features of the motherboard: built-in 802.11ac WiFi and Bluetooth 4.0.

802.11ac WiFi is a new wireless computer networking standard that provides high-throughput wireless local area networks on the 5GHz band with data transferring speeds up to 867Mbps, a vast improvement over the throughput provided by 802.11n (purportedly 289%). Besides the new WiFi, some models will also come with a new ASRock Wi-SD front tray which includes 4 USB 3.0 ports and an SD 3.0 card slot.

Information from the ASRock website about the WiFi features of the A-Style motherboard.

NVIDIA Launches the GTX 780

NVIDIA launched the GeForce GTX 780, the successor to the GTX 680, on May 23. The GTX 780 packs 34% more performance, 50% more Compute Unified Device Architecture (CUDA) cores, and 50% more memory than the 680. At $649, the GTX offers performance comparable to the GTX Titan, NVIDIA’s flagship graphics card, at a price $350 cheaper. It uses the same cooler as the Titan, and the length and weight of the card is almost identical as well.

The GTX 780 features 2 DVI ports (DVI-D and DVI-I) along with a full-sized DisplayPort and HDMI ports. It also supports Scalable Link Interface (SLI), so you can put 2 of these cards in your system for a multiple monitor setup. The GTX 780 requires a 6-pin and an 8-pin power connector to work, and NVIDIA recommends using at least a 600W PSU (the card draws 250W).

Also announced was NVIDIA’s “GeForce Experience” utlity, which will be a free option with the GTX 780 driver package, and purports to optimize settings to match your hardware with a “single click”.

Here are the specifications of the card:

GeForce-GTX-780-Specs - Hardware Roundup

Specifications for the GTX-780.

Here is NVIDIA’s press release announcing the GTX 780.

Gigabyte Unveils Three Z87 Motherboards

Gigabyte has released information about 3 Z87 motherboards it is slated to produce: the Mini-ITX Z87Z-WiFi, the Z87X-UD4H, and the Z87-UDSH.

The Z87Z-WiFi is a Mini-ITX form factor board that looks very similar to the Gigabyte GAZ77N-Wifi. It has 2 DDR3 memory slots, 4 SATA 6 Gbps slots, a single PCI Express x16 slot and one PCIe Mini socket (which contains a WiFi card that runs the 802.11ac standard). It is an LGA Socket 1150 motherboard.

Gigabyte’s Z87X-UD4H has a 16-phase VRM for the processor. It has DDR3 memory slots, and 3 PCI-Express 3.0 x16 slots (x16/x8/x4). 1 PCI-Express 2.0 x1 and a traditional PCI slot are also present. The new board has 6 SATA 6 Gbit/s ports, as well as two eSATA 6 Gb/s connectors. No less than 10 USB 3.0 connectors are featured, four of which come through an internal header. The I/O panel contains 7.1 HD audio, Gigabit LAN, DVI, D-Sub, HDMI and DisplayPort.

The Z87X-UD5H is similar the smaller UD4H and is equipped with the same 16-phase power design, memory slots and expansion slots. The UD5H offers 4 more SATA 6 Gbit/s ports, for a total of ten. Through a header, FireWire functionality can also be added. Another difference is that the UD5H has a second Gigabit connector and the D-Sub port is substituted by an additional DVI connector.

Trendnet Introduces TEW-811DRU Dual-Band 802.11ac Router

Yet another dual-band router has been released, and this time, Trendnet is the manufacturer. The new device is called the TEW-811DRU. The router supports wireless connections on both the 2.4 and 5 GHz band with speeds of up to 867 Mbps over 802.11ac and 300 Mbps using the older 802.11n protocol.

A Gigabit WAN connector is present, in addition to four Gigabit LAN ports. The USB 2.0 connector can be used for storage through FTP via network-attached storage devices or external hard disk drives/solid-state drives, but also to share devices such as a printer with the network. A power switch, WPS button and LED indicators can be found on the router. The TEW-811DRU is compatible with IPv6 and uses the WPA2 security protocol for wireless networks.

Trendnet’s TEW-8100DRU AC1200 dual-band router will be available shortly at a recommended price of $179.99.

For more information, see the official product page for the Trendnet TEW-811DRU.

NZXT Sentry LXE Review


NZXT Sentry LXE Review

The NZXT Sentry LXE display panel.

The Sentry LXE is a somewhat unusual product, an external fan controller with an intuitive touch screen. It is a 5-channel, 10 watt per channel controller that connects through a PCI card interface. At a relatively moderate price ($53.48), it is a good option for PC users who want a stylish fan control option without having to use up a drive bay.

The Sentry LXE ships in a simple, shrink-wrapped red box which has a picture of the controller on the front. On the back of the box is more information about the controller, including specifications in several languages. Inside the box, everything is wrapped in plastic between 2 pieces of foam. The box includes the manual, controller card, a 3-volt battery to power the card, 2 extra temperature sensors, temperature probe tape, 2 screws and several cables.

The card that controls the fans rests in any available PCI slot on the motherboard and is secured just like any other expansion card. The battery goes in the lower right hand portion of the card. The thermal sensors are attached directly above it. The 8=pin interface cable that runs from the card to the stand-alone display uses the same Molex mini-fit connections as an ATX or PCI-Express power connector, but the patters don’t match up with any other connectors; the cable is 7 feet long, so the users should be able to place the display wherever they want on the desk. The fan cables are about 2 feet long (which should be enough to reach anywhere in the case), and are numbered 1 through 5. One problem is that the cables are 3-pin cables and thus will not accommodate 4-pin PWN fan connections without modification.

Sentry LXE expansion card

The PCI expansion card which contains the controller circuitry.

Installation is a bit more involved than it might be for a standard fan controller, but it is not overly complex. First, hook up all the fans and temperature sensors; it helps if you have cable ties to make it manageable. After connecting the fans and putting the temperature probes in place, then all that is left to do is put the battery in, connect the 4-pin internal power cable to a Molex connector on the PSU, mount the card into an open PCI slot and connect the interface cable. Powering up the computer will cause the LCD display to light up.

The manual for the Sentry LXE leaves much to be desired and does not go into detail on how to operate the controller. Fortunately, however, the touchscreen interface is rather intuitive. On the right side of the display window are the RPM readings for each of the 5 fans. The user can operate the LXE in either auto or manual mode. When in auto mode the controller automatically adjusts the fan speed based on a predefined temperature scale (the adjustable temperature is just the alarm temperature, though). The LXE can also be operated in manual mode. To adjust the fan speed, the user simply taps twice on the fan number on the left side of the display. The number will flash and + and – signs will appear in the lower left corner of the display which will either increase or decrease the RPM setting that corresponds to the selected fan. Fans can be adjusted from 100 to 40 percent, then turned off completely. The LXE also allows the user to set temperature alarms; to set these alarms, the user taps once on the fan number and then uses the + and – signs to set the maximum temperature for each of the 5 thermal sensors. Once configured, an audible alarm sounds if the temperature goes above the configured setting. There is also a built-in clock and calendar which can be set by tapping the time readout on the display. The last two “buttons” are the power button and reset button: the power button shuts off the screen (but the controller continues to run), and the reset button (which must be pressed and held in order for the reset to work) will revert the controller back to default settings. The display leaves a bit to be desired; the + and – buttons could be bigger, and the touch screen requires a firm tap. Moreover, the fans take up to 5 seconds to response to the user changing the fan RPM.

Running the controller in automatic mode will allow the user to maintain reasonable temperatures while keeping the fan noise to a minimum, even while running CPU and GPU-intensive software such as games. Running the LXE and manual mode also works well, while also bringing down the temperatures several degrees. The temperature probes are very accurate, which is par for the course with NZXT controllers.

On the whole, the Sentry LXE is a good product. There are some issues: the PCI card does not stay in place particularly well (the user would do well to secure the card in place with a screw), the connectors do not accommodate 4-pin PWM fan connectors, and there are the above mentioned user interface issues. Still, this is a unique product, and with 10 watts per channel, it should satisfy both the typical desktop user and the overclocker as well.

Specifications

Max Power: Up to 10 W per channel
Colors Available: Black
DC Input: 12 V (Standard 4 Pin Molex connector)
Fan Connectors: 5
Material: Aluminum, LCD screen, PCB
Plug Type: 3-Pin Molex KK (male)
Model Number: SEN2-001
Material: LCD Screen, Plastic, PCB
Included Accessories: 2x screws
Connections: 1x Molex, 5x Temperature Sensors
Max Combined Wattage: 50 Watts
Brightness Levels: On / Off
Control Modes: Manual / Automatic
Fan Channel Quantity 5
Temperature Range: 0 to 99°C
Measurement Frequency 2 Seconds
Temp Alarm Range: 30? to 90?
Minimum Power To Fans: 40%
Screen Size: 5.27 Inches
Screen Type: Capacitive Touch
Fan Control Method: Voltage
Warranty: 2 Years
Finish: Black brushed Aluminum
Form Factor: External Device & Expansion Slot
UPC: 895562002735

Features

Intuitive Touch Screen LCD – Advanced, touch screen LCD displays temperatures in C/F, RPMs, along with the date, time, and day of the week. Users have the ability to switch the display off for complete darkness for more immersive gaming sessions

Complete Control – 5 Temperature Probes keep tabs on thermals throughout the case while the 5 Fan controllers adjust the fans’ RPM speed for at least 10W per channel. Allows users to automatically adjust the fan speeds to correspond to a specific temperature, manually customize for extreme overclocking capabilities, or set to absolute silence

Temperature Alarm – Instant notification if temperatures rise above a designated point

Sleek Design – Brushed aluminum frame provides sleek aesthetics for any desktop.

Rechargeable Battery – The Sentry LXE features a rechargeable battery for up to 500 times, keeping the LXE life time longer without the hassle of replacing batteries constantly.

Using a NZXT developed PCI board and external touch display, the LXE allows for more 5.25″ bays freed up for other peripherals.environment. Simply set the fan controller atop your PC or desktop and connect through PCI card interface.

NZXT Sentry LX Review


NZXT Sentry LX

Front view of the NZXT Sentry LX.

The NZXT Sentry LX is an automatic, 5-channel fan controller with a total of 6 watts per channel. It has a large LCD display and fits into any dual 5.25″ drive bay. Retailing at $54.99 (although it is currently being sold on Amazon for $47.99), it is not cheap, but it does have some advanced features that other fan controllers lack.

The Sentry LX comes in a simple cardboard box with a picture of the controller on the front. Inside, the controller itself is wrapped in plastic with 2 foam blocks on either end. The accessories are contained in a separate plastic bag. There is also a folded manual which goes into great detail about installation and use of the controller. There are screws to hold the unit in place, extra temperature sensors and orange stickers to hold the sensors in place included, along with a battery, which will be needed to store the settings of the controller if the user disconnects power from it. The display is protected by plastic foil.

The front is made of anodized aluminum, which gives it a sturdy look. There are six buttons on the left side of the front panel: an up arrow button, a down arrow button (the up/down buttons are used to raise or lower the currently selected function – clock time, alarm time, fan speed, etc.), a “set” button (which saves the setting), a “mode” button (which toggles the functionality of the unit from manual to automatic), a “fan select” button (which gives you access to each of the 5 fans), and a “reset” button (to reset the fan and clock/alarm settings). Turning the unit around reveals that the electronic components are contained on a single blue printed circuit board. On the PCB are several components including capacitors, a single integrated circuit (an 8-bit RISC microprocessor produced by ELAN Microelectronic, the Rhe EM78P510N), and the temperature probe connectors. These probes can be removed if they are not being used, but they are covered with hot glue, so you will have to peel the glue away before removing them. Also, there is a holder for the battery, which is used to maintain the settings and run the clock. A single Molex connector is used to power the fan controller and fans. The five fan connectors and probes are labeled from 1 to 5. When the controller is run in automatic mode, each fan will adjust in accordance with the temperature read by its respective sensor. There are protectors fitted over the sensors, which is a good idea, because the sensors are rather fragile.

Installation of the Sentry LX is fairly simple: just slide it into a dual 5.25″ drive bay and secure it into place with the provided screws. Then all that is left to do is connect the power, connect the fans to the headers, and secure the temperature sensors in place with the provided adhesive. It should be noted that that the headers are 3-pin headers. Thus, fans with four pins, such as PWM fans and those using Molex connectors cannot be plugged into the unit.

Once installed, the display is bright and the numbers are clearly visible. Hitting the reset button makes all the areas light up at once, so you can check to see if any segments of the LCD are damaged. After the reset, the fans are adjusted according to the temperature of each sensor and the clock is reset to 12:00 and January 1, 2008. The display shows fan speed, temperature (and can show fan speed/temperature of all 5 fans/sensors simultaneously) and time/date. Setting up the clock is easy, and the settings will be maintained even when the PC is turned off, thanks to the battery. The fans can be controlled in 10-percent increments: 100, 90, 80, 70, 60, 50, and 40 percent, and then turned off completely. The user cannot decrement to 30, 20, or 10 percent. The user can set up a temperature alarm, which will activate if the temperature rises past a specified point. The temperature sensors seem accurate. One problem is that the feature whereby an alarm goes off when a fan is unplugged does not seem to work on some units (on these units, the alarm sounds when a temperature sensor is unplugged). In addition, some users have complained about dead pixels on the LCD display or non-functioning displays.

On the whole, this looks to be another solid product from NZXT. On the plus side is the big LCD display (it should be noted, however, that the display does not turn off automatically when the computer is shut off – you have to turn it off manually) and the accuracy of the temperature sensors. On the negative side, the controller provides only 6 watts per channel (which should be enough for most fans but still pales in comparison with many other fan controllers) and the fan headers only accept 3-pin fans (which actually should not be too much of a problem, since there are 4-pin to 3-pin adapters, although none are included with this controller). Still, the Sentry LX is a product to consider if you are willing to spend about $50 for a fan controller and your PC has a dual 5.25″ drive bay you can spare.

Specifications

Dimensions: Dual 5.25″ Bay
Max Power: Up to 6 W per channel
Colors Available: Black
DC Input: 12 V (Standard 4 Pin Molex connector)
Fan Connectors: 5
Material: Black anodized aluminum
Plug Type: 3-Pin Molex KK (male)
Model Number: SEN-001LX
Material: LCD Screen, Aluminum, PCB
Included Accessories: 8x M3 Screws, adhesive
Connections: 1x Molex, 5x Temperature Sensors
Max Combined Wattage: 30 Watts
Brightness Levels: On / Off
Control Modes: Manual / Automatic
Fan Channel Quantity 5
Temperature Range: 0 to 120°C
Measurement Frequency 2 Seconds
Temp Alarm Range: 30? to 90?
Minimum Power To Fans: 40%
Screen Size: 5.00 Inches
Screen Type: Capacitive Touch
Fan Control Method: Voltage
Warranty: 2 Years
UPC: 811121010126
Control Method: Buttons
Temperature Range: 0 to 99?

Features

Large dual 5.25″ LCD screen
NZXT designed intuitive control, set and change fan speeds and settings on the fly
Auto/Manual modes, let the LCD take control or set fan speeds to your liking
Temperature alarm
Aluminum finish
NZXT Designed graphical interface, easy to read and understand
Saved Settings, calender and fan settings are stored even during system off so settings don’t need to be redone
Supports up to 6 Watt per channel
Supports only 3-pin fans

External Links

NZXT’s product page for the Sentry LX

Lamptron FC5 (v2) Review


Lamptron FC5

Front view of the Lamptron FC5.

The Lamptron FC5 is a 4-channel, 30 watt per channel fan controller that, like several other controllers marketed by Lamptron, combines functionality and style. The controller is made of CNC milled aluminum, and is available in black and also unpainted. As with most fan controllers it fits in a 5.25-inch expansion bay.

The FC5 includes 4 long temperature probes, 4 3-pin extension cables for the fans, an extra jumper pin for setting the various color options of the unit, a Molex cable, and mounting screws. The LCD screen takes up a good portion of the front of the FC5; unlike some of the cheaper controllers, this LCD is not black and white but is capable of producing various colors (although it can only display one color at a time). Unlike the FC Touch, the display screen on the FC5 is somewhat difficult to read; the angle of view at which the user can accurately read information is narrow in the horizontal plane and even narrower in the vertical plane. How readable the display is from an angle is partially dependent on the color the user chooses; the red and blue display colors have somewhat more contrast than other colors and thus allow for a slightly better viewing angle. Below the LCD panel are four large knobs; each controls one of the four channels. The plastic knobs are solid in their position and do not wiggle out of place when being turned. All changes to the color of the LCD, alarm function, and the display readouts are done by changing jumpers on the PCB.The user has a choices of displaying temperature (in Celsius or Fahrenheit) or voltages for the bottom line readout.

There are two PCBs for the controller: one for the LCD, and one for the controller itself. Along the top edge of the controller PCB are the 4 3-pin fan headers as well as the single 4-pin Molex input power connector (out of the way, to make room for the other wires). Below the fan headers are the heatsinks; each channel has its own heatsink, which are more than enough to dissipate the heat. There are also several high-quality Rubycon capacitors on the PCB. The mounting for all the fan, power, temperature headers, heatsinks and capacitors are solid and clean. Two Atmel ATMEGA8Ls, which are 8-bit RISC microcontrollers, Each one has 8K of in-system self-programmable flash memory, 512 bytes EEPROM and 1K of internal SRAM. On the lower left of the PCB, there are 3 sets of jumpers, one each for red, green and blue. If all 3 are jumpered, the display is white. If only the red, green, or blue jumper is enabled, the display will be red, green or blue respectively. If 2 jumpers are set, then the display will be either cyan, purple or yellow. The knobs can be adjusted from fully on to fully off on each channel. Voltages remain relatively stable across the board. The controller can handle several fans without much of a voltage sag. The temperature probes seem long enough to run anywhere in virtually any case on the market.

Retailing for about $55, the FC-5 is another solid performer from Lamptron. With 30 watts per channel, it should provide enough power output for most users. There are some negatives here: the colors on the display can only be changed via the jumpers, which some users may not appreciate, and viewing the display from an angle can be difficult. In addition, the $55 price tag may be a bit steep for some users. Still, those who purchase this controller will likely find it well worth the price.

Specifications:

Dimensions: 5.25″ bay
Power Output: Up to 30w per Channel
Face Plate Color Available: Black Anodized/Silver Aluminum
DC Input: +12v (Standard 4-Pin Connector)
DC Output: 0-12v
Changeable Display Color: Red, Yellow, Green, Cyan, Blue, Purple, White
Control Channels: 4

Features:

New and Improved LCD!
CNC milled face plate from blocks of 3/4″ thick solid aluminum
Bring out that full aesthetic appeal you always wanted in the 5.25 inch bay
Four knobs to control four 3-pin channels
User’s choice of displaying Celsius, Fahrenheit, or voltages for the bottom line readout

External Links:

Lamptron’s product page for the FC5 (v. 2)

Review: NZXT Sentry 2


NZXT Sentry 2

Front and side view of the NZXT Sentry 2.

The NZXT Sentry 2 is a full system fan controller with a touch screen interface. It fits in a 5.25″ drive bay and is compatible with any fan that uses voltage control. What initially surprised me the most about this controller, however, was the price: while many rudimentary fan controllers – ones that lack temperature sensors or LCD displays – sell for $25 and up, the NZXT Sentry 2 offers an LCD touch-screen interface and other advanced features at a budget price (at the time this article was written, Amazon was selling it for $27.98). It is not as powerful as some other controllers in the same price range (it supplies only 10 watts per channel), so if you are considering the Sentry 2, you probably will want to do some back-of-envelope calculations on your power requirements before making a purchase.

The Sentry 2 ships in a small black box, the back of which includes a list of features (e.g. the backlight on the LCD screen can be turned off, and it has a temperature alarm). Inside, the controller is wrapped in a red bag with styrofoam placed around its edges. All of the wires are wrapped in the bag as well. Also included with the controller are 2 spare temperature sensors, installation screws, adhesive tape to attach the sensors, and one-page “user manual”. [The manual includes no information on how to install the sensors nor how to operate the LCD touchscreen.]

The front panel of the Sentry 2 is made of black plastic and therefore will look best in cases with a black plastic front. Looking at back of the controller reveals that all the circuitry is contained on a single PCB. The controller ships with temperature sensors, main power and fan output cables connected and glued to the circuit board.

The Sentry 2 will install easily into a tool-less case; otherwise, the screws provided with the unit will hold it in place. After that, all you need to do is connect it to the power supply with one standard Molex connector, stick the temperature sensors on the places you want to monitor and connect the fans to the outputs. Each of the 5 outputs has 2 connector types: a 3-pin miniature connector and a 4-pin Molex connector. However, the 3-pin connectors have no rotation sensor, and are not compatible with 4-pin miniature connectors with an extra pin for PWM. Thus, you will not be able to connect PWM fans to the controller unless you cut off the part of the connector for the fourth pin.

Another problem is that the NZXT cannot monitor the speed of the CPU fan, even if it is connected to the controller. Also, the power connectors for the fans are male, while most fans have male inputs.

Once connected, the Sentry 2 panel lights up when the computer is turned on. The panel contains 4 main areas. On the right side, there is a fan icon which the user must touch to select each one of the fans (in sequence). The fan on the touch screen spins whenever the fan selected is spinning. In the upper left corner, there is the temperature readout of the temperature sensor corresponding to the channel selected (temperature can be displayed in Fahrenheit or Celsius). Beneath the temperature readout are plus and minus buttons, which adjust the alarm temperature when the fan is in automatic mode and the fan speed when the panel is in manual mode. Touching the area which says which mode you are in allows you to toggle between manual an automatic. In the upper-right corner is a button to reset the controller (marked by an “R”), but you have to hold down the button for 7 seconds before anything happens. The same goes for the on-off button (in the lower right corner), and the button for switching between Fahrenheit and Celsius.

NZXT Sentry 2 alt view

Another view of the Sentry 2.

The temperature alarm is effective and will sound when the temperature sensor goes above the level set (when the controller is in automatic mode). There is also an alarm to indicate a defective fan; the sound it makes is different than that made by the temperature alarm. One problem is that the alarm is not particularly loud; you will have to be near the computer to hear it. The temperature sensors are fairly accurate and should get the job done.

Overall, the Sentry 2 is a functional, low-priced fan controller. There are several negatives, though: there is no braiding or grouping for the wires, so there is potentially a huge mess of wires (some zip ties might help here); the wires are super-glued to the controller, so when taking the controller out, you will have to take out the temperature sensors as well; moreover, the unit comes with bad instructions. Moreover, the fact that the fan connectors are 3-pin and cannot easily accommodate 4-pin PWM fan connectors will be an issue with some users. In addition, the fact that the maximum output is 10 watts per channel limits this controller’s appeal. Finally, some users have reported problems with this controller, such as the LCD display dying, and one or more of the channels malfunctioning after a period of time, which may be an indicator of quality control problems at NZXT. Still, as one of the few fan controllers under $30 to sport a touch screen (and a pretty nice one at that), the Sentry 2 is worth considering if you are considering purchasing a fan controller.

Specifications

Dimensions: 5.25″ Bay
Max Power: Up to 10 W per channel
Colors Available: Black
DC Input: 12 V (Standard 4 Pin Molex connector)
Fan Connectors: 5
Material: Plastic; finish is matte black plastic bezel
Plug Type: 3-Pin Molex KK (male)
Model Number: SEN2-001
Material: LCD Screen, Plastic, PCB
Included Accessories: 4x M3 Screws
Connections: 1x Molex, 5x Temperature Sensors
Max Combined Wattage: 50 Watts
Brightness Levels: On / Off
Control Modes: Manual / Automatic
Fan Channel Quantity 5
Temperature Range: 0 to 120°C
Measurement Frequency 2 Seconds
Temp Alarm Range: 30? to 90?
Minimum Power To Fans: 40%
Screen Size: 4.63 Inches
Screen Type: Capacitive Touch
Fan Control Method: Voltage
Warranty: 2 Years

Features:

Touch screen interface
Five fan control through an intuitive interface
Ultra fast selection and response time
Display temperatures in both F and C
Light switch turns off the meter when sleeping
Automatic and manual modes of control
Full compatibility with all types of fans using voltage control
With a maximum of 10 Watts per channel, the Sentry 2 will support almost all high end fans
Tuned accuracy with only a tolerance of one degree
Sound alarm to alert when the temperature is over
Stored settings, the Sentry keeps your settings even after power off

News: NZXT Announces the Sentry Mix 2


Sentry Mix 2

The Sentry Mix 2.

NZXT has released a new fan controller, the Sentry Mix 2. The controller is designed to resemble audio mixing equipment, with 6 sliding potentiometers for controls. The Sentry Mix 2 has 6 channels, with 30 watts per channel. The unit will fit in a 5.25″ drive bay. The fan headers are 4-pin connectors, and will accommodate both 4-pin PWM fans and 3-pin fans. There are two Molex connectors for power input.

There is no pricing information for this product yet, but you can read about the Sentry Mix at NZXT’s website.

3DGAMEMAN has posted a video review of this product:

Specifications

Model Number AC-SEN-MIX2-M1
Material Acrylic, Plastic
Fan Connector 4-Pin
Finish Matte black bezel with glossy black sliders
Included Accessories 4x M3 Screws
Form Factor Single 5.25″
UPC 815671011527
EAN 5060301690770
Connections 2x Molex
Cable Finish Black Rubber
Cable Finish RGB Color Changing
Maximum Combined Wattage 180 Watts
Control Method Sliders
Fan Channel Quantity 6
Fan Channel Wattage 30 Watts
Minimum Power To Fans Minimum Power To Fans
Minimum Power To Fans 40%
Minimum Power To Fans Voltage
Warranty 2 Years

Review: NZXT Sentry Mesh


Sentry Mesh

The NZXT Sentry Mesh.

The NZXT Sentry Mesh is a 5-channel, 30 watt per channel fan controller. Its simple-yet-elegant design and its moderate price ($24.99) will appeal to PC users looking for a no-frills solution to controlling fans.

The Sentry Mesh comes in a cardboard box wrapped in plastic, along with instructions on a single sheet of paper and a small bag of screws. The controller is light and is made of strong, solidly-built plastic, about 2 mm thick and with structural support on the sides and bottoms. The front of the controller boasts a minimalist design, with a mesh design, five linear potentiometers, and a small embossed “NZXT” logo. The fan controller uses only one 5.25″ drive bay. It has no temperator sensors or USB ports.

There are 4 holes on each side for the mounting screws. Viewing the rear of the case reveals that the controller fits on a single circuit board. Thankfully, all the cables are connected to the board with removable connectors (especially in light of the fact that there is no braiding or grouping on the cables). The cables extend approximately 18″ from the PCB, making the sentry Mesh suitable for installation in all but the largest full-tower cases. Those with full-towers may need to buy extension cables. Power is provided by one 4-pin Molex connector, which in turn powers up to 5 individual fans. The fan connectors are Molex KK plugs, so you will need an adapter (not included) if you have fans with the older large Molex connectors. Each cable has a numbered tag at the end of it to indicate which channel to which the cable belongs.

Installation of the NZXT Sentry Mesh is easy; the sides are long enough so that it fits snugly in tool-less cases. If the user’s case requires screws, however, there are 4 screws included. The mesh used for the controller is identical to that used in some of the Cooler Master cases such as the Storm Scout. The fans connect up easily, and once the controller is powered up, the Sentry Mesh maintains its low-profile appearance, with the exception of a white LED under the NZXT logo.

Sentry Mesh - Back

A view of the NZXT Sentry Mesh from the rear, showing the PCB and connectors.

The Sentry Mesh is designed so that so less than 40 percent (4.8 V) of the maximum 12 V of power is provided to the fans. This means that in the potentiometer’s lowest position, the fans are still providing airflow while remaining virtually silent. This ensures that no matter how low the sliders are set, the fans are still running. This is probably a good idea, but users who want more control over their fans may want to consider the Sunbeamtech Rheosmart 6 or another controller that allows the user to reduce the voltage to zero.

The NZXT Sentry Mesh is a low-profile unit which should provide enough power for most users. It has a few minor problems, such as the lack of any braiding or grouping for the cables, and the fact that 4-pin Molex adapters for the fans are not included, but the positives far outweigh the negatives, and at a price of $24.99, it offers a great deal of value at a low price.

Specifications

Dimensions: 5.25″ Bay
Max Power: Up to 30 W per channel
Colors Available: Black
DC Input: 12 V (Standard 4 Pin Molex Connector)
Fan Connectors: 5
Fan RPM Sliders: 5
Material: Plastic and steel mesh
Pot Type: Linear
Plug Type: 3-Pin Molex KK
Min. Voltage: 40%

Features

Mesh design to camouflage with mesh facade
Five 30W Controls
Easy-to-use sliders

Weekly Hardware Roundup: 5-17-2013


This article is the first in what I intend to be a regular Friday feature on this blog: a weekly hardware roundup, focusing on hardware for desktop and laptop computers.

Raspberry Pi Camera Module Available

Raspberry Pi

The Raspberry Pi in all its glory.

The Raspberry Pi Foundation has announced the launch of its first official accessory for the single-board computer: a five megapixel camera board.

The Raspberry Pi, a fully-functional computer on a circuit board which has a price tag of about $50, has sold over a million units. While third-party add-on boards have been available, the Foundation concentrated on making Raspberry Pis, until now.

This week, the Foundation announced the release of the official Raspberry Pi Camera Board. Designed to plug into the Pi’s Camera Serial Interface (CSI) port, the module is just 25mm by 25mm and 9mm tall and packs a 5-megapixel sensor and a surprisingly powerful imaging engine (previously found on Nokia’s N8 smartphone).

The camera module’s release will likely be followed with at least one other official accessory: the Foundation will likely develop a small form factor display which will use the Display Serial Interface (DSI) capabilities of the computer.

More information on the Raspberry Pi camera board

AMD Unveils 8970M

AMD has unveiled the latest addition to its laptop graphics series. The new range currently consists of only one card: the top of the line HD 8970M, which has an impressive 1280 stream processors, double that of the 8800M. It uses AMD’s GCN architecture and features full DirectX 11.1 support.

Due to its power output, the 8970M will probably only be found on very bulky laptops, such as the MSI GX70, a 17-inch model with a full 17-inch HD screen and a quad-core AMD A10 APU.

Here are the full specs for the 8970 GPU:

Stream Processors: 1280
Engine Clock: 850 Mhz
Memory Clock: 1200 Mhz
Single Precision Compute Power: 2304 GFLOPS
Double Precision compute Power: 144 GFLOPS
Direct X Version: 11.1
Architecture: GCN

PDF with a feature summary of the Radeon HD 8970

Asus Announces Z87 Line of Motherboards

Asus has announced its Z87 motherboards for Intel’s new Haswell CPUs. This motherboard will be of interest to most readers of this blog, as the CPU fan header on all Z87 motherboards adds a MOSFET between the power supply unit (PSU) and CPU fan. As a result, Asus’ software fan control suites are now able to vary the speed of 3-pin fans and 4-pin pulse-width modulated (PWM) fans. A simple latch built-in to the header detects when a 3-pin or 4-pin fan is connected. This has the potential to render expensive automatic fan controllers useless. The UEFI BIOS also receives some upgrades: the user will be able to add notes relating to settings and there is also a history of BIOS changes. In addition, the board implements Thermal Armor, which Asus, touts as “Total Airflow-Boosting Heat Dissipation”, the world’s first-ever thermal design for the entire motherboard, which is purported to safeguard the system against hot air and help keep temperatures down, conducting hot air away and out of the case through special airflow channels.

The mini-ITX market it also attended to with this board line-up, with a new overclocking-oriented model called the Z87 I-Deluxe.

More information on the Z87

Arctic Announces Alpine 20 Plus

Arctic has announced the arrival of a new CPU cooler, the Alpine 20 Plus. The cooler is only compatible with the the LGA 2011 socket, but works for both desktop version of the Intel Core i7; and the Xeon processors that fit in LGA 2011 sockets.

The cooler is made from an aluminum block and has a number of aluminum fins through which air is pushed by a 92mm fan. The fan’s speed can vary from 600 RPM to 2200 RPM and is a PWM fan. The cooler has an MSRP of $14.50 and has a 6-year warranty.

http://www.arctic.ac/en/p/cooling/cpu/640/alpine-20-plus-co.html

HP Announces Two New X2s

HP announced this week that it is expanding it’s x2 detachable PC portfolio with two new models: the Android-powered HP SlateBook x2 packed with a Tegra 4 system on a chip (SoC), and the Windows 8-powered HP Split x2. They will be released in the U.S. in August with starting prices of $479.99 and $799.99 respectively.

The SlateBook x2 has Android 4.2.2 “Jelly Bean” installed and has services like Google Now, Google Maps and more. The hardware contained within is not entirely known, but it will have a 10.1-inch HD touchscreen, 64 GB of internal storage and DTS+ sound. The HP Split x2 is based on Intel’s third-generation processors and Windows 8 Pro. It will have a 13.3-inch HD touchscreen, HP Connected Music, Beats Audio, a 2MP HP Truevision Full HD webcam, and an HP ClickPad.

More information on the x2 lineup