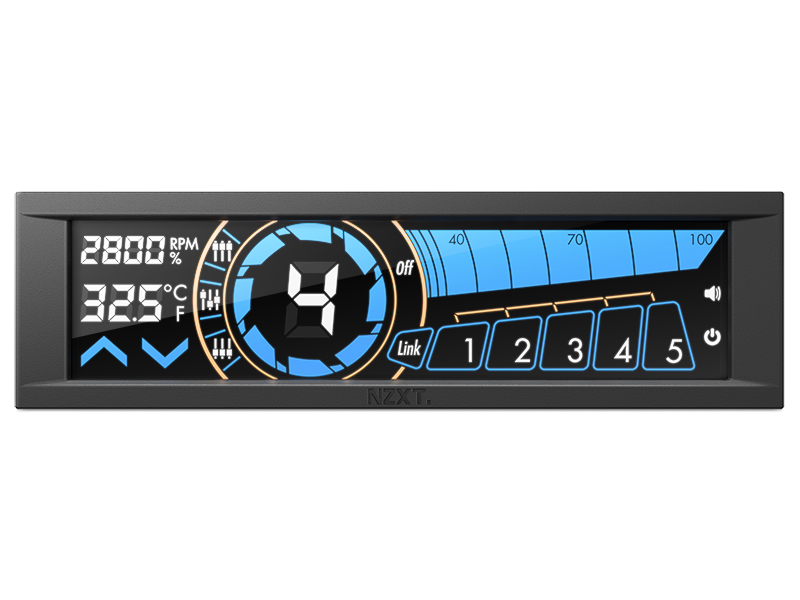
Front vew of the NZXT Sentry 3.
The NZXT Sentry 3 is a full system fan controller with a touch screen interface. It is compatible with any 3-pin or 4-pin PWM fan and fits in a 5.25-inch drive bay. Once again, NZXT has done a superb job at providing a high-value, touch screen fan control at a budget price ($34.99 on Amazon as of this writing). With 15 watts per channel and 5 channels (for a total of 75 watts), it should meet the power requirements of most users. In fact, the product literature boasts that each channel can accommodate 3 fans. While it’s unlikely you will be running 15 fans simultaneously, it’s nice to have that option.
The Sentry 3 comes in a cardboard box that has large pictures of both the front and back of the controller as well as some features and specifications of the unit. Once you remove the controller from the box, you’ll realize just how large the screen is. The NZXT Sentry 3 offers the largest touchscreen of any single bay fan controller currently on the market (5.4 inches), and the large touchscreen is surrounded by a thin bezel. When powered off, you can see the touch points of the screen, which creates a bit of an eyesore. However, most users will leave the display on, so this should not be a major issue. The power button is near the edge of the screen, and therefore can be hard to press.
There are 5 fan connections, each of which will support a 3-pin or 4-pin fan. Although this controller allows you to connect 4-pin fans, it will not use any pulse-width modulation (PWM) features of such fans, as it controls fan speed through voltage adjustment. If you have fewer than 5 fans, you can unplug the connectors that are not needed. The NZXT Sentry 3 also has a 4-pin Molex connector for power. 2 temperature sensors are provided, but only one can be connected at a time. You also get tape to hold the sensor down, zip ties, screws and a user guide.
NZXT Sentry 3: Installation and Operation
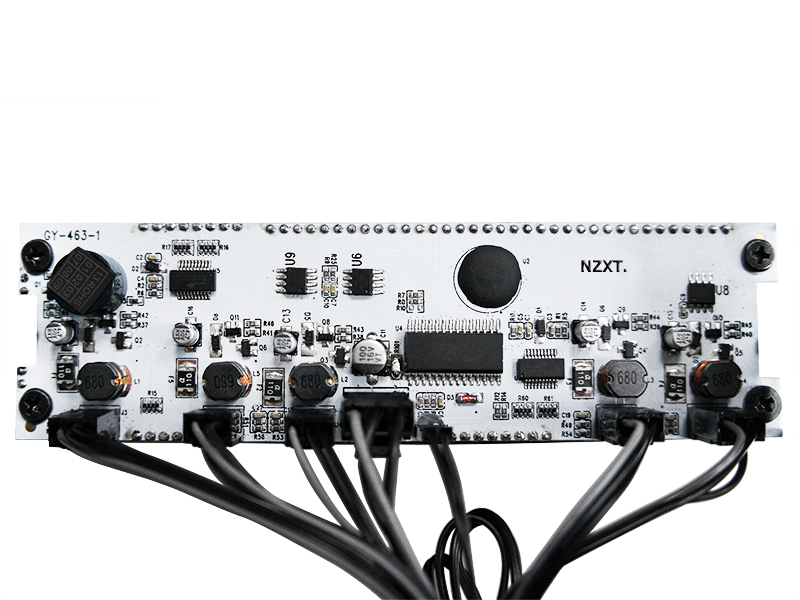
Rear view of the NZXT Sentry 3.
Installation of the NZXT Sentry 3 is relatively simple. Place the unit into any available 5.25-inch bay, and once it is screwed in place, connect one end of the fan cables to the controller and the other end to the fans. Connect the controller’s power connector to the power supply. Now, when you power up your computer, the controller should be operational. The screen layout is fairly intuitive. In the top left is the selected fan’s speed. If the fan is being controlled individually, it also shows the RPM. If the fan is linked to other fans, it shows the percentage. [One of the features of this controller is that you can selectively link multiple fans so they all increase/decrease at the same time. Underneath the fan speed is your current temperature reading from the probe. There is a circle in the middle of the display; by clicking on the circle, you can change modes. There are 3 modes: performance, manual, and quiet. In the manual mode, you have full control over the speed of the fans, while in the performance and quiet modes, the fan speed is handled by the controller based on the reading from the thermal probe. To the right of the circle is the powerslide bar which tells you the current percentage. This allows you to adjust the fans in manual mode. Underneath the bar is the channel selector; if you have fans linked together they will show an orange bar above each channel. To the right of the channel selector are the speaker and display switches; these allow you to mute the controller and turn off the display.
The NZXT Sentry 3 is easy to install and the touchscreen is easy to use, requiring only a light tap to operate. There are some minor issues, however, with this controller. One issue is that you cannot manually lower the fans past 40 percent (somewhat common with voltage-controlled fans). Another issue is that when you first boot the computer, the fans run at 100 percent for about 30 seconds before finally ramping down. In addition, when you decrease the speed, the controller can take 15-20 seconds to respond. Finally, the temperature sensors do not seem to be very accurate, although they should be close enough to be effective.
Despite these minor issues, the NZXT Sentry 3 is a good value, and with 15 watts per channel, it should handle even the most powerful fans, or even multiple fans on one channel with a splitter. If you are looking for a high-quality, high-powered fan controller at a reasonable price, the NZXT Sentry 3 should be on your short list.
Specifications:
Model Number: AC-SEN-3-B1
Dimensions: 129mm x 31mm
Material: Steel, ABS Plastic, Capacitive Touchscreen, PCB
Fan Connector: 3-Pin or 4-Pin Finish Textured Injected Plastic
Included Accessories: 4x M3 Screws
Form Factor: Single Bay 5.25″
UPC: 15671011923
EAN: 5060301691173
Connections: 1x Molex, 1x Temperature Sensor, 5x PWM Male Fan Connectors
Maximum Total Wattage: 75 Watts
Brightness Levels: On / Off
Control Modes: Manual / Performance / Quiet
Fan Channel Quantity: 5 Channels
Fan Channel Wattage: 15 Watts
Temperature Range: 0 to 120°C
Minimum Power To Fans: 0%
Screen Size: 5.4 Inches
Screen Type: Capacitive Touch
Fan Control Method: Voltage
Warranty: 2 Years

Recent Comments