Aerocool CoolTouch-E Review

Aerocool CoolTouch-E

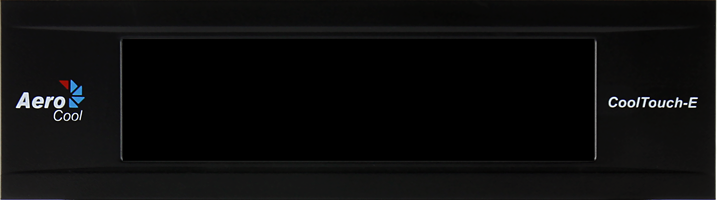
Front view of the Aerocool CoolTouch-E.

The Aerocool CoolTouch-E is a 4-channel, 20 watt per channel touchscreen fan controller which fits into a single 5.25-inch drive bay. The touchscreen is aesthetically pleasing, although not as much as some of Aerocool’s other touchscreen controllers. This controller, however, does offer good performance at a reasonable price ($36.99 on Amazon as of this writing).

The CoolTouch-E is made of black plastic; the front is dominated, as you might expect, by the touchscreen. If you look at the rear of the controller, you can see the PC board and the fan connector header. The power supply connector is a 4-pin Molex connector, while the fan connectors support bouth 3-pin PWM fans and 4-pin fans.

Installation of the Aerocool CoolTouch-E is easy: just slide the unit into an open bay and secure it with the included mounting screws (there are 4 of them). Then connect your fans to the included mounting screws. Then, connect the CoolTouch-E to your power supply and connect your fans to the controller. As mentioned earlier, this controller comes with both 3-pin and 4-pin connectors, so you should be able to connect any fan in your case to it. Since each of the CoolTouch-E’s four channels can supply up to 20 watts, if you have more than four fans, you may be able to split one or more of the connectors to accommodate them.

One installed, you can select one of 7 available colors for the display from the front panel. A button in the bottom right of the screen lets you change the color of the fan controller’s backlight. The colors available are: red, green, yellow, blue, purple, light blue, and white. You can also turn off the display. This is helpful if your system has a particular color scheme and you want to match it.

Aerocool CoolTouch-E

Rear view of the CoolTouch-E.

On the left of the touchscreen display, there is a fan animation which indicates that the fan is going. The currently selected channel is displayed in the middle of the screen; the arrows on either side let you switch channels. To the left of this is a control that lets you disable the selected fan. On the other side of the channel display are two speed control buttons (plus and minus buttons) that allow you to adjust the speed. The Aerocool CoolTouch-E can run fans at three speeds: 50%, 75%, and 100%. The top half of the screen is a speed indicator. Some users may take issue with the fact that the controller only allows you to adjust the fan to three different fan speeds (many other controllers allow you to adjust the speed along a sliding scale), but having a choice of three different speeds (as well as being able to turn the fan off) will likely be enough for most users.

In addition, some users may take issue with the construction of the CoolTouch-E. It deserves mention that the controller is made of plastic, not anodized aluminum like some other controllers, and thus will probably not be as sturdy as the latter, not to mention the fact that touchscreens are inherently fragile.

However, if you want a powerful, aesthetically-pleasing fan controller at a reasonable price, the Aerocool CoolTouch-E just might be for you. It does not have all the features of some of Aerocool’s more expensive controllers, or of some competing products, but it will get the job done.

Aerocool CoolTouch-E Specifications:

  • Product Dimension: 148.6(W) x 42.5(H) x 65(D) mm
  • Box Dimension: 187(W) x 60(H) x 148(D) mm
  • Net Weight: 125g
  • Gross Weight: 250g (Retail box included)
    LCD viewable area: 100 (W) x 25 (H) mm
  • Connectors:
    • For Power Supply – 4-pin Molex connector x 1
    • For 3-pin fans/PWM fans – mini 4-pin connector x 4
    • For 4-pin fans – 4-pin Molex connecrtor x 4
  • Material: ABS Plastic
  • Speed Range: 0>50%>75%>100%
    Max. wattage per fan channel: 20W
    Inside this packaging: screw 4 (M3x5)

Product Links:

AeroCool Touch-E Fan and Temperature Controller (CoolTouch-E) on Amazon

CoolTouch-E product page at aerocool.us

NZXT Sentry 3 Review

NZXT Sentry 3

Front vew of the NZXT Sentry 3.

The NZXT Sentry 3 is a full system fan controller with a touch screen interface. It is compatible with any 3-pin or 4-pin PWM fan and fits in a 5.25-inch drive bay. Once again, NZXT has done a superb job at providing a high-value, touch screen fan control at a budget price ($34.99 on Amazon as of this writing). With 15 watts per channel and 5 channels (for a total of 75 watts), it should meet the power requirements of most users. In fact, the product literature boasts that each channel can accommodate 3 fans. While it’s unlikely you will be running 15 fans simultaneously, it’s nice to have that option.

The Sentry 3 comes in a cardboard box that has large pictures of both the front and back of the controller as well as some features and specifications of the unit. Once you remove the controller from the box, you’ll realize just how large the screen is. The NZXT Sentry 3 offers the largest touchscreen of any single bay fan controller currently on the market (5.4 inches), and the large touchscreen is surrounded by a thin bezel. When powered off, you can see the touch points of the screen, which creates a bit of an eyesore. However, most users will leave the display on, so this should not be a major issue. The power button is near the edge of the screen, and therefore can be hard to press.

There are 5 fan connections, each of which will support a 3-pin or 4-pin fan. Although this controller allows you to connect 4-pin fans, it will not use any pulse-width modulation (PWM) features of such fans, as it controls fan speed through voltage adjustment. If you have fewer than 5 fans, you can unplug the connectors that are not needed. The NZXT Sentry 3 also has a 4-pin Molex connector for power. 2 temperature sensors are provided, but only one can be connected at a time. You also get tape to hold the sensor down, zip ties, screws and a user guide.

NZXT Sentry 3: Installation and Operation

NZXT Sentry 3

Rear view of the NZXT Sentry 3.

Installation of the NZXT Sentry 3 is relatively simple. Place the unit into any available 5.25-inch bay, and once it is screwed in place, connect one end of the fan cables to the controller and the other end to the fans. Connect the controller’s power connector to the power supply. Now, when you power up your computer, the controller should be operational. The screen layout is fairly intuitive. In the top left is the selected fan’s speed. If the fan is being controlled individually, it also shows the RPM. If the fan is linked to other fans, it shows the percentage. [One of the features of this controller is that you can selectively link multiple fans so they all increase/decrease at the same time. Underneath the fan speed is your current temperature reading from the probe. There is a circle in the middle of the display; by clicking on the circle, you can change modes. There are 3 modes: performance, manual, and quiet. In the manual mode, you have full control over the speed of the fans, while in the performance and quiet modes, the fan speed is handled by the controller based on the reading from the thermal probe. To the right of the circle is the powerslide bar which tells you the current percentage. This allows you to adjust the fans in manual mode. Underneath the bar is the channel selector; if you have fans linked together they will show an orange bar above each channel. To the right of the channel selector are the speaker and display switches; these allow you to mute the controller and turn off the display.

The NZXT Sentry 3 is easy to install and the touchscreen is easy to use, requiring only a light tap to operate. There are some minor issues, however, with this controller. One issue is that you cannot manually lower the fans past 40 percent (somewhat common with voltage-controlled fans). Another issue is that when you first boot the computer, the fans run at 100 percent for about 30 seconds before finally ramping down. In addition, when you decrease the speed, the controller can take 15-20 seconds to respond. Finally, the temperature sensors do not seem to be very accurate, although they should be close enough to be effective.

Despite these minor issues, the NZXT Sentry 3 is a good value, and with 15 watts per channel, it should handle even the most powerful fans, or even multiple fans on one channel with a splitter. If you are looking for a high-quality, high-powered fan controller at a reasonable price, the NZXT Sentry 3 should be on your short list.

Specifications:

Model Number: AC-SEN-3-B1
Dimensions: 129mm x 31mm
Material: Steel, ABS Plastic, Capacitive Touchscreen, PCB
Fan Connector: 3-Pin or 4-Pin Finish Textured Injected Plastic
Included Accessories: 4x M3 Screws
Form Factor: Single Bay 5.25″
UPC: 15671011923
EAN: 5060301691173
Connections: 1x Molex, 1x Temperature Sensor, 5x PWM Male Fan Connectors
Maximum Total Wattage: 75 Watts
Brightness Levels: On / Off
Control Modes: Manual / Performance / Quiet
Fan Channel Quantity: 5 Channels
Fan Channel Wattage: 15 Watts
Temperature Range: 0 to 120°C
Minimum Power To Fans: 0%
Screen Size: 5.4 Inches
Screen Type: Capacitive Touch
Fan Control Method: Voltage
Warranty: 2 Years

External Links:

NXZT Sentry 3 on Amazon

AeroCool V12XT Review

Aerocool V12XT Review

Front and side view of the Aerocool V12XT.

The AeroCool V12XT is a four channel, 6 watt per channel automatic fan controller. It fits into two 5.25″ drive bays and has a touchscreen interface. This controller is somewhat pricey ($59.99 on Amazon at the time this article was written), but users who want a rather ostentatious fan controller and who have two drive bays to spare will undoubtedly want to consider the AeroCool V12XT.

The AeroCool V12XT comes packaged in a black cardboard box which has a large image of the V12XT on the front of the box. The back of the box has a list of features and also an image showing the layout of the touchscreen display. Inside the box, the V12XT is between two pieces of plastic; inside the box are some extra cables, screws, adhesive for the sensors, and manuals.

The front of the controller is solidly built, even though it is made of plastic. The V12XT ships with the cables are already connected to the back panel. The power cable is in the upper left corner of the PCB; the four fan controller cables are connected to the lower left corner, and the large temperature sensor connector, which connects all four temperature sensors, is in the upper right of the PCB. In the lower right corner, there are four heatsinks (one for each channel). All cables are labeled; the fans are labeled FAN1-FAN4, and the temperature sensors are labeled CPU, VGA, HDD, and SYS. The temperature sensors also have a plastic sleeve to protect them. The FAN1 connector supports 4-pin PWM fans, and FAN2-4 support only 3-pin fans.

Installation is a simple matter (the AeroCool V12XT will fit into two empty 5.25″ drive bays), although it should be mentioned that the AeroCool V12XT apparently is not compatible with tool-less cases (the bay locks are not compatible with them). You will have to use screws; fortunately, screws are included with the controller. The screws are fairly short, so you may have to screw one in only part way before starting the screw on the other side. One the unit is in the case, it is easy enough to connect the fans and put the temperature sensors in place (keep in mind FAN1 is the only 4-pin connector).

Once the controller is installed and your machine is powered up, the front panel of the AeroCool V12XT illuminates. The screen looks somewhat like a car dashboard. There are two dials: the larger displays the current speed of whichever of the four fans is slected, and the smaller dial shows the current temperature of whichever of the four temperature probes is selected. Tapping the temperature dial enables you to set the threshold for the temperature alarm for this sensor, at which point the AeroCool V12XT spins the fan for that channel up to its full speed. The unit can only display settings for one channel at a time; pressing the buttons 1 through 4 allow the user to select different channels.

The V12XT’s display was apparently meant to be viewed from above; when viewed straight on, the unlit portions of the screen are clearly visible and the display looks rather dull. Fortunately, the unit has a button for turning off the screen. There is also a lock button above the fan RPM readout, and you cannot make changes to the settings without first touching it. Still, the fact that you have to press the screen three times to adjust a fan speed or temperature alarm threshold is annoying.

Finally, I would be remiss if I did not at least mention the numerous reports of quality control issues with AeroCool fan controllers, including the V12XT. There have been reports of poorly-soldered connections, touchscreens with dead areas, and of units that had to be returned. A cursory look at the customer reviews on Amazon and Newegg suggests that quality control is an issue, at least with the V12XT.

In conclusion, unless you are infatuated with the touchscreen, you are probably better off looking elsewhere. $59.99 is a lot of money to spend on a fan controller, and for that, you are gambling that you will get a controller that actually works. If you win the quality control lottery, you will still be saddled with an underpowered (6 watts per channel) fan controller with a touchscreen interface that is not particularly intuitive to use. If you have two drive bays and $59.99 to spare and you like gaudy LCD displays, then you might consider the AeroCool V12XT. Otherwise, this is one to avoid.

AeroCool V12XT Features:

Large LCD screen
LCD backlight on/off
Switch between Celsius and Fahrenheit
Overheating alarm temperature warning
HDD working display
“Lock” function provided to prevent careless miss-touch

AeroCool V12XT Specifications:

Dimension: 149.5 (W) x85 (H) x 70(D) mm
LCD viewable area: 115 (W) x 57 (H) mm
Connectors: 4 x 3-pin connectors / 4 x heat sensors
Material: ABS front bezel w/ steel bracket
Max wattage per fan channel: 6W

External Links:

AeroCool’s product page for the V12XT