Aerocool Touch 1000 Review

Aerocool Touch 1000

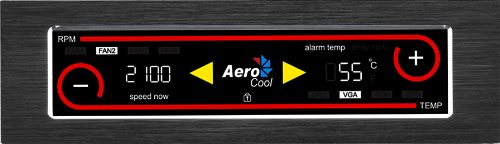
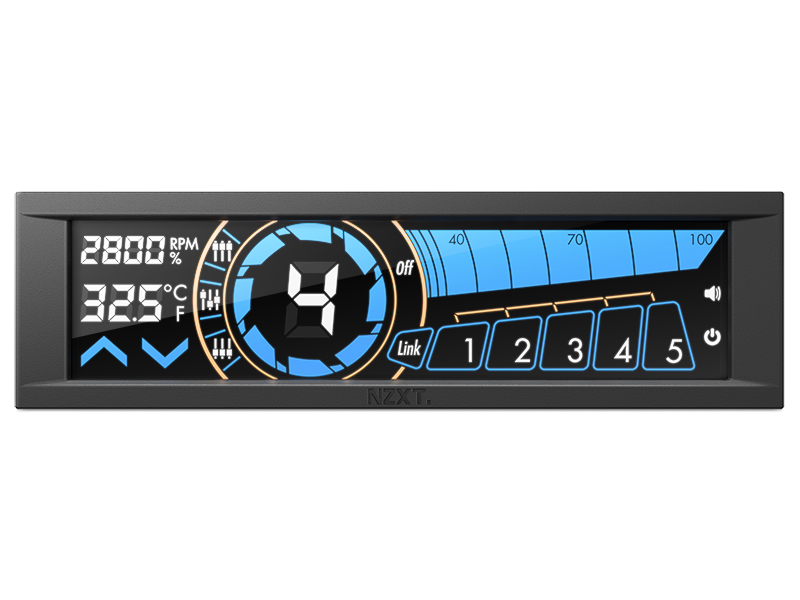
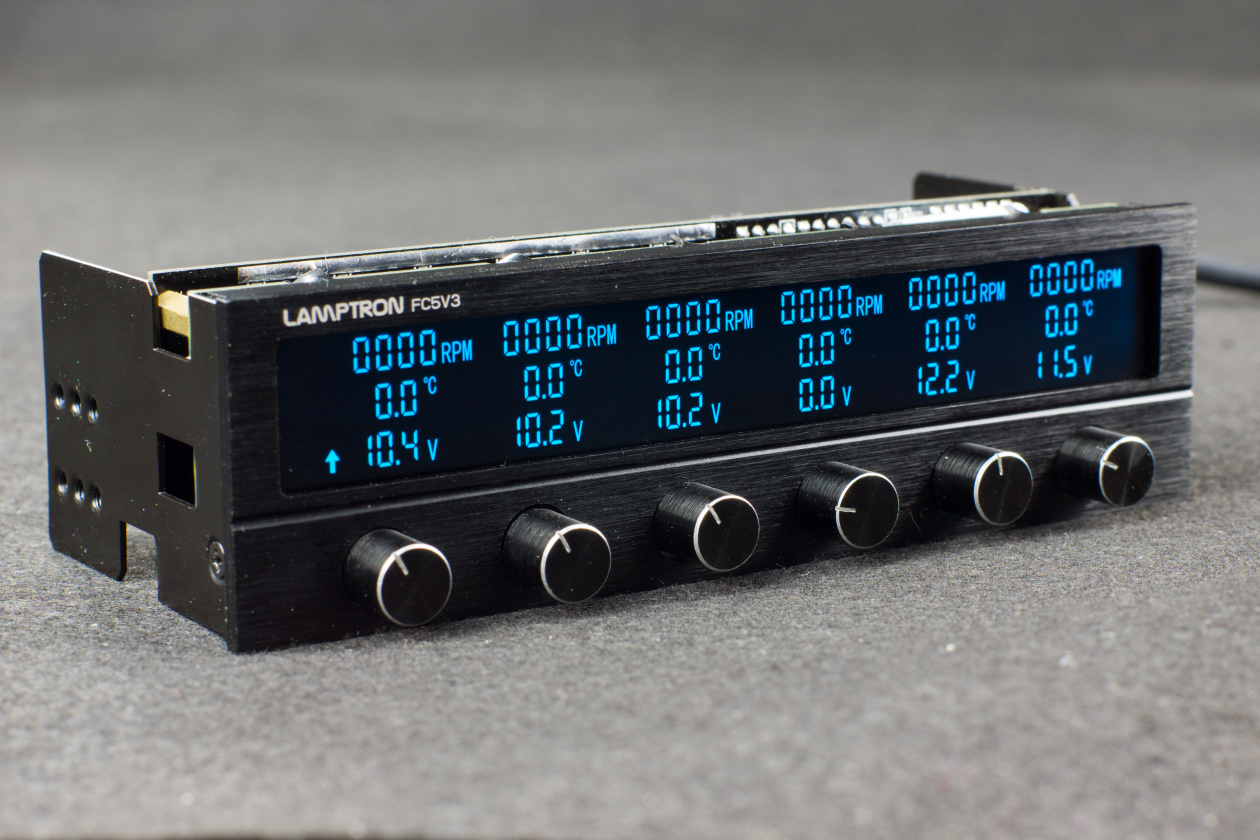
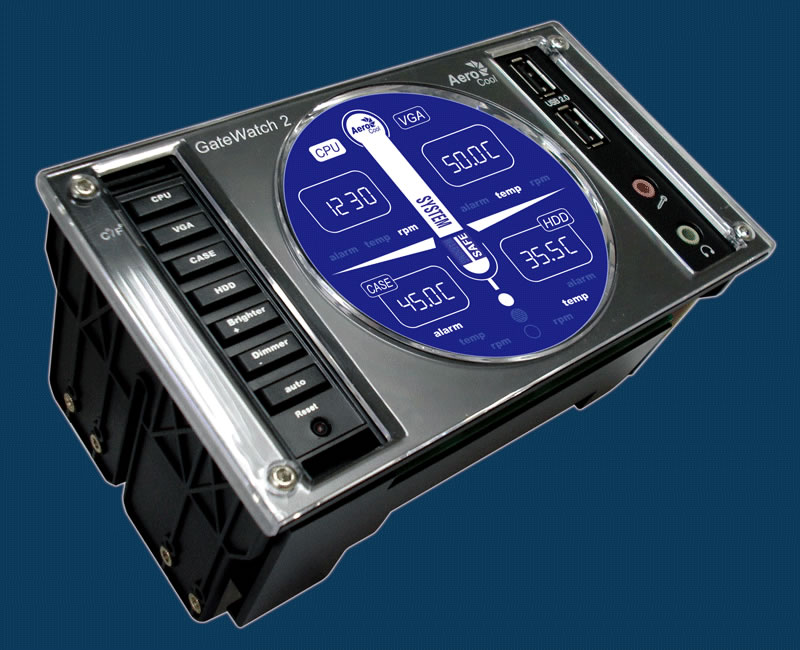
Front view of the Aerocool Touch 1000.

The Aerocool Touch 1000 is a 4 channel, 6 watt per channel automatic fan controller which fits in a single (5.25-inch) drive bay. It has a touchscreen display, an overheating alarm temperature warming, and a lock function to prevent inadvertent changes. The Touch 1000 is essentially a single-bay version of the Aerocool Touch 2000 (which was previously reviewed on this website), so it will be interesting to see how it compares with the Touch 2000. With the touchscreen display, it definitely has aesthetic appeal, but at this price ($47.00 on Amazon as of this writing), you’ll want to make sure it meets your needs before buying it.

The Aerocool Touch 1000 comes in a small box. The front of the box shows a large image of the LCD touchscreen display. The back goes into the features, specifications, and labels the buttons on the panel. These features are listed in many different languages.

When you open the box, you’ll find that the panel comes neatly packed in the box with some cardboard padding. A sticker protects the touchscreen from any scratches or thumbprints. Also included with the controller are the user manual and some extra parts. The controller includes screws for the fan, tape to hold the sensors in place, two extra sensors and two extension cables.

The Touch 1000 has an LCD touchscreen with black anodized aluminum. The panel can display data for up to four temperature sensors and four fans; only one of each is viewable at a time, but by tapping a button, you can rotate through the four readings.

Aerocool Touch 1000: Installation

Aerocool Touch 1000

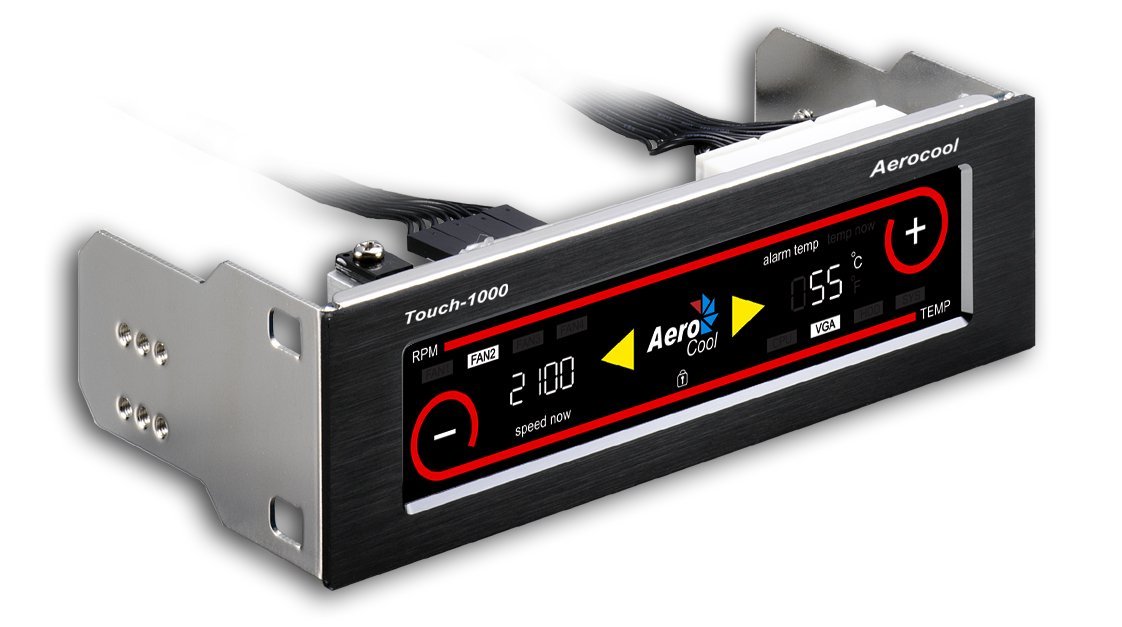
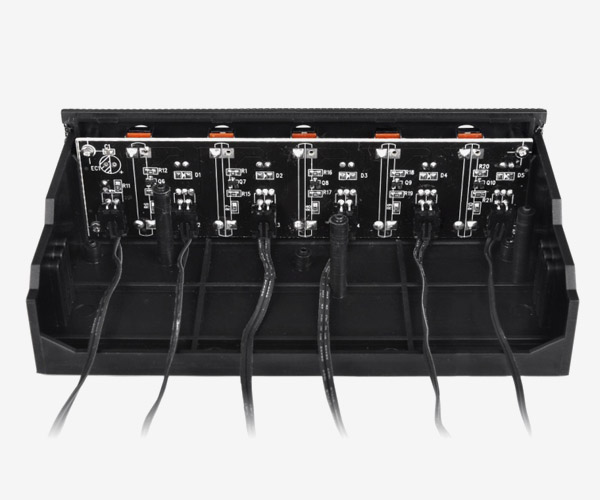
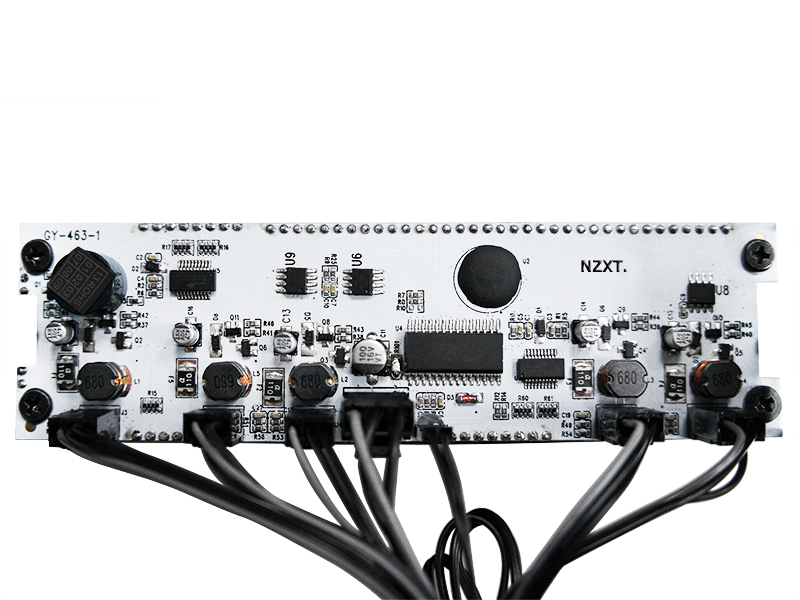
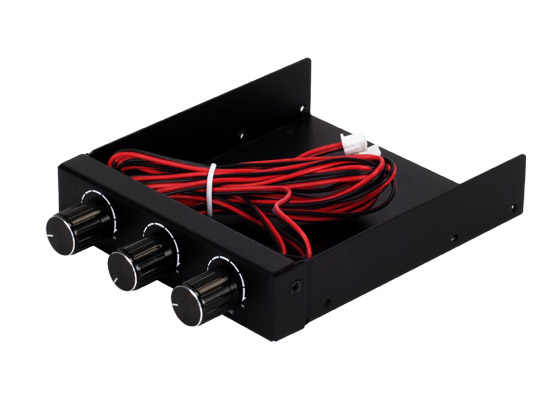
Side view of the Aerocool Touch 1000.

Installation is fairly easy: just slide the controller into an empty 5.25-inch drive bay and secure it to the case with the included screws. Then you can place the temperature sensors where you want them to be and connect up the fans.

The fan connector cables are labeled FAN1 through FAN4 and the temperature sensors are labeled: CPU, VGA, HDD, and SYS. Each set of cables can be kept together, or each wire can be pulled apart.

In the center of the panel is the Aerocool logo, which can be pressed to lock and unlock the panel. To the left and right of this logo are arrows which will scroll through the fan and temperature readings (even when the panel is locked). Towards the left of the arrows is the RPM readout, and towards the right of the arrows is the temperature readout (in Celsius or Fahrenheit). A plus in the top right corner and a minus in the lower left corner allow you to make any needed adjustments to your temperature alarm or fan speed. The upper left of the panel shows which fan the curent RPMs are, while the bottom right shows which temperature sensor is being displayed.

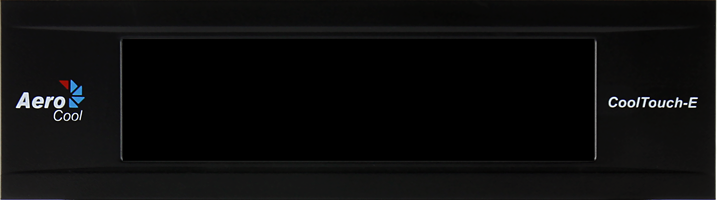
One of the drawbacks of this controller is that, at only 6 watts per channel, it pales in comparison to some equivalently-priced and lesser-priced controllers (for example, the Aerocool Touch-E, also reviewed on this site, is cheaper and boasts 20 watts per channel). You may have problems running more than one fan on a single channel, and you’ll definitely want to make sure this controller is powerful enough to accommodate your fans. But if you want a controller with an attractive touchscreen display, and especially if you like the Touch 2000 but can’t spare two drive bays, the Touch 1000 is definitely a controller to consider.

Aerocool Touch 1000 Specifications:

  • Dimension: 149.5(W) x 42.5(H) x 70(D) mm
  • Box Dimension: 186(W) x 60(H) x 110(D) mm
  • Net Weight: 220g
  • Gross Weight: 390g (Retail box included)
  • LCD viewable area: 118 (W) x 25 (H) mm
  • Connectors: 4 x 3-pin connectors / 4 x heat sensors
  • Material: Brushed aluminum front bezel w/ steel bracket
  • Max wattage per fan channel: 6W
  • Inside this packaging: screw 4 (M3x5) / sensor sticker x 6 / spare sensor cables x 2 / spare fan cables x 2

Product Links:

Aerocool Touch 1000 product page on aerocool.us

Aerocool Fan and Temperature Controller (Touch1000) on Amazon

Aerocool CoolTouch-E Review

Aerocool CoolTouch-E

Front view of the Aerocool CoolTouch-E.

The Aerocool CoolTouch-E is a 4-channel, 20 watt per channel touchscreen fan controller which fits into a single 5.25-inch drive bay. The touchscreen is aesthetically pleasing, although not as much as some of Aerocool’s other touchscreen controllers. This controller, however, does offer good performance at a reasonable price ($36.99 on Amazon as of this writing).

The CoolTouch-E is made of black plastic; the front is dominated, as you might expect, by the touchscreen. If you look at the rear of the controller, you can see the PC board and the fan connector header. The power supply connector is a 4-pin Molex connector, while the fan connectors support bouth 3-pin PWM fans and 4-pin fans.

Installation of the Aerocool CoolTouch-E is easy: just slide the unit into an open bay and secure it with the included mounting screws (there are 4 of them). Then connect your fans to the included mounting screws. Then, connect the CoolTouch-E to your power supply and connect your fans to the controller. As mentioned earlier, this controller comes with both 3-pin and 4-pin connectors, so you should be able to connect any fan in your case to it. Since each of the CoolTouch-E’s four channels can supply up to 20 watts, if you have more than four fans, you may be able to split one or more of the connectors to accommodate them.

One installed, you can select one of 7 available colors for the display from the front panel. A button in the bottom right of the screen lets you change the color of the fan controller’s backlight. The colors available are: red, green, yellow, blue, purple, light blue, and white. You can also turn off the display. This is helpful if your system has a particular color scheme and you want to match it.

Aerocool CoolTouch-E

Rear view of the CoolTouch-E.

On the left of the touchscreen display, there is a fan animation which indicates that the fan is going. The currently selected channel is displayed in the middle of the screen; the arrows on either side let you switch channels. To the left of this is a control that lets you disable the selected fan. On the other side of the channel display are two speed control buttons (plus and minus buttons) that allow you to adjust the speed. The Aerocool CoolTouch-E can run fans at three speeds: 50%, 75%, and 100%. The top half of the screen is a speed indicator. Some users may take issue with the fact that the controller only allows you to adjust the fan to three different fan speeds (many other controllers allow you to adjust the speed along a sliding scale), but having a choice of three different speeds (as well as being able to turn the fan off) will likely be enough for most users.

In addition, some users may take issue with the construction of the CoolTouch-E. It deserves mention that the controller is made of plastic, not anodized aluminum like some other controllers, and thus will probably not be as sturdy as the latter, not to mention the fact that touchscreens are inherently fragile.

However, if you want a powerful, aesthetically-pleasing fan controller at a reasonable price, the Aerocool CoolTouch-E just might be for you. It does not have all the features of some of Aerocool’s more expensive controllers, or of some competing products, but it will get the job done.

Aerocool CoolTouch-E Specifications:

  • Product Dimension: 148.6(W) x 42.5(H) x 65(D) mm
  • Box Dimension: 187(W) x 60(H) x 148(D) mm
  • Net Weight: 125g
  • Gross Weight: 250g (Retail box included)
    LCD viewable area: 100 (W) x 25 (H) mm
  • Connectors:
    • For Power Supply – 4-pin Molex connector x 1
    • For 3-pin fans/PWM fans – mini 4-pin connector x 4
    • For 4-pin fans – 4-pin Molex connecrtor x 4
  • Material: ABS Plastic
  • Speed Range: 0>50%>75%>100%
    Max. wattage per fan channel: 20W
    Inside this packaging: screw 4 (M3x5)

Product Links:

AeroCool Touch-E Fan and Temperature Controller (CoolTouch-E) on Amazon

CoolTouch-E product page at aerocool.us

Thermaltake F5 Review

Thermaltake F5

Front view of the Thermaltake F5.

The Thermaltake Commander F5 is a manual slider-style fan controller. It is a 5-channel, 8 watt per channel unit that is compatible with 3-pin and 4-pin fans, and it will fit into any 5.25-inch drive bay. Thermaltake obviously intended this as a budget-priced fan controller (as of this writing, it was selling for $26.34 on Amazon, although some sellers had it for about $20), and more budget-conscious consumers expecting a high-quality product from Thermaltake will undoubtedly consider this controller. But does it live up to the Thermaltake reputation for quality? We shall see.

The Thermaltake Commander F5 is packaged in a cardboard box with a large image of the controller. The bottom of the box lists six features of the unit (among other things, a mesh grille design and 5 independent sliders), a specifications chart, and six images covering some of the listed features.

When you open the box, you will find the controller wrapped in an anti-static bag with foam on either side of it to keep it in place. Removing the controller from the packaging reveals the installation guide, warranty policy flier, and four installation screws, as well as the cables, neatly tucked into the back of the controller. Since the cables are already connected, this also eliminates having to plug them in. The back of the Commander F5 is made of sturdy-looking black plastic. Looking at the front of the unit, you can see blue LEDs nect to each of the five sliders, as well as a red LED that servers as a power indicator on the far right of the controller.

Thermaltake F5

View of the rear of the Thermaltake F5, including the PCB and fan headers.

Moving once again to the back of the controller, the back of the PCB is exposed. Here you will see a few resistors and the solder points from the LEDs. In addition, the fan headers are fit against the floor of the controller to keep them from coming loose. There are 5 cables for the fans, marked appropriately 1 through 5, and all of them are 4-pin ready, although it should be noted that this fan controller will not work with 4-pin Molex fans. There is also a 4-pin Molex connector for powering the unit.

Installation of the Commander F5 is relatively easy, although the power cable is a bit short (100 mm). If you have a full-sized tower, connecting the controller to the power supply may be a bit of a challenge. If a fan is connected to each channel, then when the computer is booted, all 5 blue LEDs will light up. Even without any connected fans, the red LED will light up to show you the controller is powered. The LEDs are quite bright, however, which may be an issue if your computer is in your bedroom.

Controlling the fans entails simply moving the slider for each channel. The lowest setting for each channel delivers 4 volts. Most voltage-controlled fans shut off around 5 volts, so this should enable you to shut off such fans. Unfortunately, when the slider is turned all the way up, it only delivers 10.5 to 11 volts. This will limit the amount of noise, but it also limits the maximum speed to about 85 percent of what it could be.

In conclusion, the Thermaltake Commander F5 is somewhat of a mixed bag. On the one hand, it is aesthetically pleasing and relatively inexpensive. But the fact that the maximum voltage is less than 12 volts is a bit of a drawback. In addition, the fan connectors are somewhat cheap-looking, and the controller only provides 8 watts per channel, so you can pretty much forget about connecting multiple fans to a single channel. In my opinion, the budget price only goes so far, and budget-conscious consumers might be better off spending a few dollars more and buying the Sunbeamtech PL-RS-6 Rheosmart 6. The Rheosmart 6 is also a manual controller, but has 6 channels at 30 watts per channel. If the F5 were modified to provide 12 volts maximum output, I could give it at least a qualified endorsement, but in its current form, I am inclined to give it a thumbs down.

Specifications:

P/N: AC-001-BN1NAN-A1
Compatibility: 5.25” Driver bay
Weight: 185g
Dimension: 150 x 80 x 42 mm
Material: Plastic & Mesh
Main Function: Manual Fan Speed Controller
Color: Black
Cable Length: Power cable: 100mm; Fan cable : 600mm
Connector: 3-Pin x 5 ; 4-Pin power cable
DC Input: +12V
DC Output Range: 4V – 10.5V
Watts per Channel: 8W

External Links:

Thermaltake Commander F5 Fan Controller on Amazon

NZXT Sentry 3 Review

NZXT Sentry 3

Front vew of the NZXT Sentry 3.

The NZXT Sentry 3 is a full system fan controller with a touch screen interface. It is compatible with any 3-pin or 4-pin PWM fan and fits in a 5.25-inch drive bay. Once again, NZXT has done a superb job at providing a high-value, touch screen fan control at a budget price ($34.99 on Amazon as of this writing). With 15 watts per channel and 5 channels (for a total of 75 watts), it should meet the power requirements of most users. In fact, the product literature boasts that each channel can accommodate 3 fans. While it’s unlikely you will be running 15 fans simultaneously, it’s nice to have that option.

The Sentry 3 comes in a cardboard box that has large pictures of both the front and back of the controller as well as some features and specifications of the unit. Once you remove the controller from the box, you’ll realize just how large the screen is. The NZXT Sentry 3 offers the largest touchscreen of any single bay fan controller currently on the market (5.4 inches), and the large touchscreen is surrounded by a thin bezel. When powered off, you can see the touch points of the screen, which creates a bit of an eyesore. However, most users will leave the display on, so this should not be a major issue. The power button is near the edge of the screen, and therefore can be hard to press.

There are 5 fan connections, each of which will support a 3-pin or 4-pin fan. Although this controller allows you to connect 4-pin fans, it will not use any pulse-width modulation (PWM) features of such fans, as it controls fan speed through voltage adjustment. If you have fewer than 5 fans, you can unplug the connectors that are not needed. The NZXT Sentry 3 also has a 4-pin Molex connector for power. 2 temperature sensors are provided, but only one can be connected at a time. You also get tape to hold the sensor down, zip ties, screws and a user guide.

NZXT Sentry 3: Installation and Operation

NZXT Sentry 3

Rear view of the NZXT Sentry 3.

Installation of the NZXT Sentry 3 is relatively simple. Place the unit into any available 5.25-inch bay, and once it is screwed in place, connect one end of the fan cables to the controller and the other end to the fans. Connect the controller’s power connector to the power supply. Now, when you power up your computer, the controller should be operational. The screen layout is fairly intuitive. In the top left is the selected fan’s speed. If the fan is being controlled individually, it also shows the RPM. If the fan is linked to other fans, it shows the percentage. [One of the features of this controller is that you can selectively link multiple fans so they all increase/decrease at the same time. Underneath the fan speed is your current temperature reading from the probe. There is a circle in the middle of the display; by clicking on the circle, you can change modes. There are 3 modes: performance, manual, and quiet. In the manual mode, you have full control over the speed of the fans, while in the performance and quiet modes, the fan speed is handled by the controller based on the reading from the thermal probe. To the right of the circle is the powerslide bar which tells you the current percentage. This allows you to adjust the fans in manual mode. Underneath the bar is the channel selector; if you have fans linked together they will show an orange bar above each channel. To the right of the channel selector are the speaker and display switches; these allow you to mute the controller and turn off the display.

The NZXT Sentry 3 is easy to install and the touchscreen is easy to use, requiring only a light tap to operate. There are some minor issues, however, with this controller. One issue is that you cannot manually lower the fans past 40 percent (somewhat common with voltage-controlled fans). Another issue is that when you first boot the computer, the fans run at 100 percent for about 30 seconds before finally ramping down. In addition, when you decrease the speed, the controller can take 15-20 seconds to respond. Finally, the temperature sensors do not seem to be very accurate, although they should be close enough to be effective.

Despite these minor issues, the NZXT Sentry 3 is a good value, and with 15 watts per channel, it should handle even the most powerful fans, or even multiple fans on one channel with a splitter. If you are looking for a high-quality, high-powered fan controller at a reasonable price, the NZXT Sentry 3 should be on your short list.

Specifications:

Model Number: AC-SEN-3-B1
Dimensions: 129mm x 31mm
Material: Steel, ABS Plastic, Capacitive Touchscreen, PCB
Fan Connector: 3-Pin or 4-Pin Finish Textured Injected Plastic
Included Accessories: 4x M3 Screws
Form Factor: Single Bay 5.25″
UPC: 15671011923
EAN: 5060301691173
Connections: 1x Molex, 1x Temperature Sensor, 5x PWM Male Fan Connectors
Maximum Total Wattage: 75 Watts
Brightness Levels: On / Off
Control Modes: Manual / Performance / Quiet
Fan Channel Quantity: 5 Channels
Fan Channel Wattage: 15 Watts
Temperature Range: 0 to 120°C
Minimum Power To Fans: 0%
Screen Size: 5.4 Inches
Screen Type: Capacitive Touch
Fan Control Method: Voltage
Warranty: 2 Years

External Links:

NXZT Sentry 3 on Amazon

Lamptron Fan-Atic Review

Lamptron Fan-Atic

Front view of the Lamptron Fan-Atic with all 5 channels running at 5 volts.

The Lamptron Fan-Atic is a 5-channel, 60 watt per channel manual fan controller. It fits into a 5.25-inch drive bay. There are 5 switches on the front panel (one for each channel), and each switch has three positions, corresponding to the three modes of the controller: 0 volts (the “off” position), 5 volts (the low-speed position), and 12 volts (the full-speed position). Although it does not have all the features of some of the controllers reviewed on this site, it has a lot of power (300 watts in total), looks sharp, and has a relatively moderate price ($28.62 plus shipping  on Amazon).

The Fan-Atic comes in a box that features a picture of the controller on the top and some of the controller’s specifications on the bottom. Inside the box is the controller, a bag with 4 mounting screws, five 20″ fan extension cables and one molex connector for hooking this controller up to the PSU.

The Fan-Atic uses a brushed aluminum front with all aluminum construction. The difference between the black version and the silver version of the controller is that the black version is anodized with the black color, while the silver one is just brushed aluminum. The switches in the front are made from solid stainless steel construction. They are solidly built and make an audible click when you flip them into position.


There are 2 sets of color LEDs for the controller with the leads for each LED covered with heat-shrink. When the blue LEDs are on, it means that the switch is toggled up and the channel is getting 5 volts of power. Red LEDs means that whatever is connected to the channel is getting 12 volts of power.

Lamptron Fan-Atic

Another view of the Lamptron Fan-Atic, showing different LED colors.

On the back of the controller, there are five 3-pin connectors for the fans. One difference between this controller and some other ones is that the Molex power connector is soldered on and the accessories include a power cable extension. One concern is that there is only a single Molex connector which could be supplying up to 300 watts of power to the fans; other Lamptron controllers (e.g. the FC-8) use 3 connectors to push less power across the controller, so I am not sure how safe this is, at least in cases in which the user is drawing a lot of power.

When running the Fan-Atic at 12 volts, the output of each channel is within 5 percent of 12 volts, which is well within the ATX specs of what 12 volt output should be. There is greater variation when running the controller at 5 volts, with all channels running at less than 5 volts, and some running as low as 4.8 volts. which may be a concern. As it turns out, the Fan-Atic is a resistor-based controller, with resistors being used to drop the voltage down from 12 volts to 5 volts, which accounts for the lower voltage on some channels. [The variation would have been less if Lamptron had opted for a pulse-width modulation (PWM) design, but this likely would have added to the cost.] Some fans and pumps require 5 volts of power to run at all, and these accessories may not run if the power is that low.

All this makes the Lamptron Fan-Atic an interesting, if somewhat flawed, budget-priced fan controller. I recommend looking at other similarly-priced fan controllers before pulling the trigger on this item. The Lamptron FC2, for example, is slightly more expensive ($42.99 on Amazon), but it boasts a PWM design and 3 Molex connectors. For those wanting a less expensive controller, NZXT has several controllers in the Fan-Atic’s price range, and of course there’s the Bitfenix Recon, to date the only fan controller accessible from the Internet. For those who need the power, however, you cannot get much more powerful than the Fan-Atic’s 300 watts, and if you can tolerate the power fluctuations at 5 watts, then the Fan-Atic is a reasonable choice.

Lamptron Fan-Atic Specifications:

Dimension: 5.25″ Bay
Max Power: Up to 60W per Channel
Adjustment Range: (5V Off 12V), (7v Off 12v) please read the retailer’s description to make sure of type
Color Available: Black Anodized Aluminum, Plain Aluminum Finish

Lamptron Fan-Atic Features:

LED Voltage Indicator (12v-Red 5v-Blue or 12v-Red 7v-Blue)
Control up to 60W Per Channel
5 Independent 3 Way Adjustment Range Military Switches
Mesh Design to Match Mesh Cases

External Links:

Lamptron Fan-Atic 5 Port Military Switch Baybus on Amazon

Lamptron FC5V3 Review

Lamptron FC5V3

The Lamptron FC5V3, with 6 channels and a wider display than the FC5V2.

The Lamptron FC5V3 is a 6-channel, 30 watt per channel manual fan controller. It has the many of the same features as the FC5V2, but adds a few more features, the most notable of which is that it increases the number of channels from 4 to 6. It is available in black anodized aluminum and silver and fits into a 5.25-inch drive bay. The product is not yet available, so we can only speculate on what the price will be, but Lamptron’s website lists an MSRP of $89.99. Since Lamptron’s controllers usually sell for less than the MSRP, and the FC5V2 sold for about $55, we can probably assume a price between $55 and $89.99.

The FC5V3 includes 6 temperature probles, 4 3-pin extension cables for the fans, a Molex cable and mounting screws. There is also a braided extension cable provided for the power connector. Since the maximum power required by the controller is 180 watts (6 x 30 watts), a 500 watt or greater PSU is recommended. Each channel provides the full range of 0V-12V meaning you can switch fans off at will, distinguishing the FC5V3 from many other fan controllers. One of the new features of V3 of this fan controller is “start boost voltage”, which means that each fan gets an initial 12-volt boost, which should enable you to quickly find the lowest voltage for each fan. This can be disabled using a jumper on the PCB.

The circuitry of the FCV3 is ontained on a single PCB, which contains the 6 3-pin fan headers and 6 2-pin temperature probe connectors, the cables for the fans and the temperature sensors are included in the box, and the fan cables are braided.

Temperature can be toggled between Celsius and Fahrenheit, and, as with the FCV2, current voltage, RPM and temperature are displayed simultaneously for each channel. The far right dial also acts as a control button to toggle the alarm function (the V3 boasts 3 different alarm modes). The FC5V3 has a wider display than the FC5V2 to accommodate the additional two fan channels. The FC5V3 doubles the number of available colors for the display from 8 to 16, and they can be toggled using the first dial, which can be pushed in flush with the front of the panel when it is not needed. This is an improvement over the FC5V2, which requires the use of jumpers on the PCB to change the display color.

The Lamptron FC5V3 looks to be another reliable Lamptron product, and offers enough improvements over V2 (most notably, 2 extra channels, 16 display colors instead of 8, and the start boost voltage feature) to make it a compelling offering. Consumers looking for a budget model, however, would probably be better off with the Sunbeamtech Rheosmart 6, my favorite budget fan controller, or the Bitfenix Recon, which is not only moderately priced ($39.99), but can be controlled via the Internet. Consumers just looking for a basic manual fan controller and who are not put off by the Lamptron’s (projected) higher price will undoubtedly like the FC5’s simple-yet-elegant look (no cheap plastic here; the front is either brushed aluminum or silver). Those consumers should give the Lamptron FC5V3 consideration.


Lamptron FC5V3 Specifications:

  • Dimension: 148.5mm*42.5mm*63mm(5.25″ Bay)
  • LCD Dimensions: 136mm*19mm (wide screen)
  • Power Output: Up to 30 watts per channel
  • Control Channel: 6 Channels
  • Panel Color Available: Black Anodized / Silver
  • DC Input: +12v (Standard 4 Pin Molex / “D” Connector)
  • DC Output: 0V- 12V DC
  • Connectors: 6 X 2510-3pin connectors
  • Recommend PSU wattage: 500w or higher

New Features compared to the FC5 v2:

  • Start boost voltage
  • New wide LCD display
  • 16 colors to personalize the display
  • Commands on the front
  • 3 different alarm modes

Other Great Features:

  • 6 channels
  • 30 W per channel
  • Sleeved cables
  • Black PCB
  • CNC milled aluminium face-plate

External Links:

Lamptron’s FC5V3 page
Lamptron FC5V3 on Amazon

SilverStone FP335 Review

SilverStone FP335

The SilverStone FP335 comes in silver and black; this is the black version.

The SilverStone FP335 is a three channel, 4.8 watt per channel manual fan controller. The unit is available in both silver and black. The FP335 is actually two fan controllers. One unit fits into a 3.5″ drive bay in the front of the case. The second looks like an expansion bracket and will fit into an expansion slot in the back of the computer. The expansion bracket unit is marketed as an “optional” piece and you are supposed to use one or the other, but there is nothing preventing you from using both, and thus controlling as many as six fans at once. That having been said, the SilverStone FP335 is still a little pricey for what it offers ($23.99 U.S.D. on Amazon), but it will undoubtedly be a favorite among those who can’t spare a 5.25″ drive bay.

The unit that installs into a 3.5″ drive bay is made entirely of aluminum, and the finish on the front panel and the knobs is of high quality. It mounts easily into a 3.5″ bay. The controller is designed to work with 3-pin fans; it will also work with 4-pin fans and does not require an adapter. It will also work with 2-pin SilverStone fans, and there are separate headers on the PCB to accommodate such fans. The fan cables should be long enough to allow for placement of the fans just about anywhere in the case (almost 24 inches for each cable). The knobs are smooth and the fans turn up smoothly; the minimum voltage supplied to the fans is 5 volts, so even with the knobs turned all the way down, the fans will always be running at 40 percent of the maximum speed.

In summary, the SilverStone FP335 is a well-built, no-frills fan controller. Its power output of 4.8 watts is rather puny; in fact, I cannot remember any controller reviewed on this site that had a lower power output per channel. If you have fans that require a lot of power, think twice before buying this unit. On the plus side, the FP335 is one of the few fan controllers that gives you not one but two separate options for placing a controller in your PC without using a 5.25″ drive bay. This and the overall high quality of SilverStone products are its strongest selling points.

SilverStone FP335 Specifications:

Color: Black, Silver
Material: All aluminum 3.5″ bay, steel expansion slot, aluminum buttons
Max fan power: 0.4A per channel
Application: 3.5″ drive bay or expansion slot
Cable Length: 600mm
Fan Connectors: 2pin SilverStone fan connector, 3pin fan connector
Fan voltage range: 5V ~ 12V
3.5″ bay Dimension: 101.6mm (W) x 25.4mm (H) x 120mm (D)
Controller Board Dimension: 36mm (W) x 17mm (H) x 31mm (D)

External Links:

Silverstone FP335 product page on the SilverStone website

Xigmatek CSF-CBK33-U01 Review

Xigmatek CSF-CBK33-U01 Review

The Xigmatek CSF-CBK33-U01 (Mono-Cool)

The Xigmatek CSF-CBK33-U01 is a no-frills controller for controlling up to 3 fans. It has one channel and outputs a maximum of 10 watts. This is by far the simplest of controllers reviewed so far on this site, but if all you want is something that enables you to reduce the speed of the fans and thus lower the noise output, this may fit the bill.

The CSF-CBK33-U001 is shaped like an expansion card bracket and will fit into any available expansion slot on a PC. The circuitry is contained on a small PCB mounted onto the back of the bracket. Power input comes through a single 4-pin Molex connector, and the unit supports any fan with a 3-pin connector.

Once the controller is installed and connected to the PSU and fans, it will do the job. It should be mentioned, however, that even if the rheostat is turned all the way counterclockwise, the power to the fan will only be cut to 50 percent. This is a good safeguard, since no matter how low the controller is set, the fan will be running, and should be adequate if your main objective is to reduce fan noise. Still, if you want to be able to set the fan to a lower speed or turn it off completely, this controller will not do.

If you want a simple means of controlling up to 3 fans at a budget price (at the time this review was written, Amazon was selling it for $7.00), the CSF-CBK33-U01 may be just the thing. It can only handle 10 watts, so it may not be enough if your cooling requirements are substantial, but it is so cheaply priced, you could buy 2 of these and it would still be a cost-effective option.

Xigmatek CSF-CBK33-U01 Specifications:

Max Power: 10 W
DC Input: 12 V (Standard 4 Pin Molex connector)
Fan Connectors: 3
Plug Type: 3-Pin only
Included Accessories: 2x screws
Connections: 1x Molex
Max Combined Wattage: 10 Watts
Control Modes: Manual only
Fan Channel Quantity 1
Minimum Power To Fans: 50% (6-12 V)
Warranty: 1 year parts/labor

Xigmatek CSF-CBK33-U01 Features:

Total 10W DC output.
Design for 12V DC fan
Suitable for standard add-on card bracket
One Molex 4pin power cable for power supply
Design for 3pin cooling fan

External Links:

Xigmatek’s product page for the CSF-CBK33-U01


Silenx IXA-FCEX Review

Silenx IXA-FCEX Review

The Silenx IXA-FCEX in action.

The Silenx IXA-FCEX is a four channel, 6 watt per channel manual external fan controller. Unlike the NZXT Sentry LXE (Amazon), another external fan controller reviewed on this site, the IXA-FCEX is a much more basic controller. It does have one feature the Sentry LXE does not have: you can use this controller as a standalone device by plugging it into the included AC/DC adapter. Thus, without connecting the controller to a computer, the Silenx IXA-FCEX could be used, for example, to cool AV equipment or aquarium lighting. If you want to use it with your computer, simply connect the Molex connector to the power supply and plug in the fans. The controller has an LED light for each channel indicating when a fan is powered up. It sells for $19.99 (plus $5.50 shipping) on Amazon.

One caveat that should be made is that the power supplied when the Silenx IXA-FCEX is plugged into the adapter is only 20 watts (5 watts per channel). Thus, if you have fans with more substantial power requirements, you may want to check to make sure that this unit supplies enough power. In addition, the fans will not shut off completely, nor will the LEDs shut off. This product is designed to work with 3-pin fans; if a 4-pin fan is plugged into it, the LED light for that channel will not light up. In addition, quality control issues have been reported with some units, and some of the controllers have lost their ability to control fan speeds over time.

Nevertheless, the Silenx IXA-FCEX offers a great deal of functionality at a relatively low price, and if your power requirements are not that great, this is a product you might consider buying.

Silenx IXA-FCEX Specifications:

SKU: IXA-FCEX
Dimensions: 130x37x28mm
Channels: 4
Cable length: 500mm
input voltage: 12v
output voltage: 4-12v
power capacity: 6w max per channel
power capacity powered from computer: 24w
adapter input voltage: 100~240v
adapter output voltage: 12v
adapter cable length: 1700mm
power capacity powered from adapter: 20w

External Links:

Silenx’s product page for the IXZ-FCEX
Silenx IXAFCEX Four Channel External Fan Controller on Amazon

AeroCool Gatewatch 2 Review

AeroCool Gatewatch 2 Review

Front view of the AeroCool Gatewatch 2.

The AeroCool Gatewatch 2 is a 4-channel, 6 watt per channel automatic/manual fan controller. It fits into 2 5.25″ drive bays and has several buttons to control the fans and temeprature alarms, as well as to brighten and dim the LCD display. As a discontinued item, it has been available sporadically on closeout, and you might be able to snag one under $30.

Installing the AeroCool GateWatch 2 is easy: find 2 free 5.25″ bays for the unit and the holes provided should line up with the screw holes in the case. If you have a tool-less case, then you may have problems mounting a 2-bay device. Power is provided via a Molex connector, which provides power for the fans and the GateWatch 2’s display. Mounting of the temperature sensors (there are 4, one for each channel) is done with the included adhesive tape. Unfortunately, the tape comes loose after awhile, but you can always use your own tape.

The AeroCool GateWatch 2 allows you to configure up to 4 different alarms that can be based on a temperature or a lack of sensing fan RPM input. You can set the temperature alarm for anything within the range 25 to 90 C, at which point the reading will flash and an audible alarm will sound. The alarms are reliable, but it sounds for only a few seconds, so you have to be near the computer when the alarm goes off to benefit from it. The reading on the display will flash for a while longer before it too stops. It should be noted that the GateWatch 2 cannot power down your system. You cannot set a target speed for when the temperature exceeds the alarm temperature, which is a bit of a drawback.

The GateWatch 2 comes with 2 USB ports, and audio output/input jacks, which could come in handy if your case lacks these on the front panel, or if the front panel location of said ports is inconvenient.

As with a number of the AeroCool fan controllers, there are issues with readibility of the display. There are 3 settings for the display: high, low, and off. On the high setting, the display can be read from quite a distance, but you have to be level with the display; viewing the display from above or below will make reading the LCD panel difficult. Putting the included plastic magnification lens over the display does not help much and actually distorts the display.

Another issue is with the fan RPM settings. The GateWatch 2 only allows changing the fan speed between 700-1000 RPM. I would have expected a greater range of control.

Ultimately, this is not a product I would recommend, simply because it lacks many of the features of similarly-priced fan controllers (e.g. the ability to set a target fan speed when the temperature exceeds the alarm temperature, the ability to have greater control over the fan speed). The AeroCool Gatewatch 2 has apparently been discontinued and may be available on closeout, but unless you can find it at a bargain basement price, I would consider other options.

AeroCool Gatewatch 2 Features:

Futuristic clip-on magnifier for an enlarged LCD screen effect
Detects and controls 4 sets of temperature and fan speed channels
Automatic and manual control
Temperature warning alarm
LCD backlighting dimmer control
Switch between Celsius and Fahrenheit temperature displays
High speed USB 2.0 and audio ports

AeroCool Gatewatch 2 Specifications:

Power: 4-pin Molex Pass-Through
USB Connection: Motherboard Header
Audio Connection: Motherboard Header
Fan Connection: 3-pin
Fan Channels: 4
Thermal Sensors: 4
Magnification Lenses: 2 (Clear and Blue)
Mounting: 2 Consecutive 5.25″ Drive Bays

External Links:

AeroCool’s product page for the Gatewatch 2