Logisys FP600BK Review

Logisys FP600BK Review

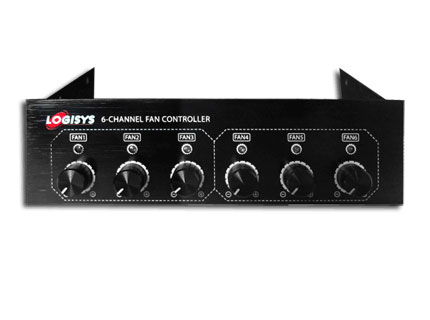
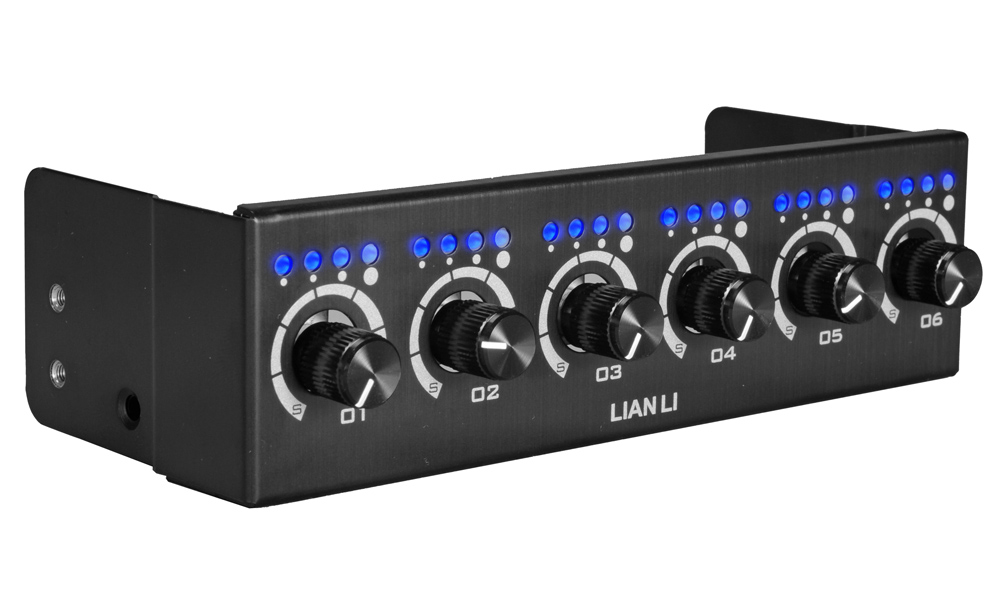
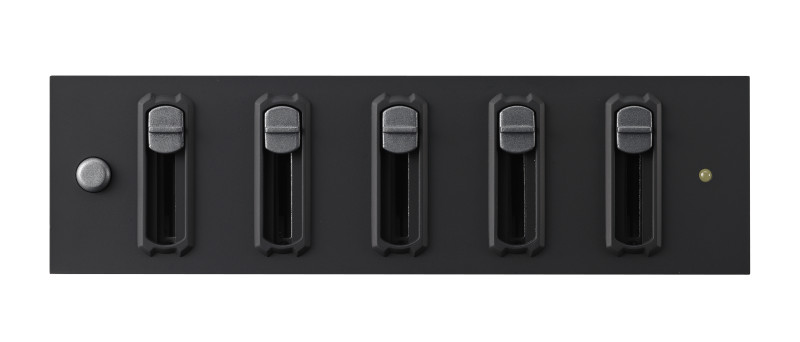
Front view of the Logisys FP600BK.

The Logisys FP600BK is a 6-channel, 36 watt per channel manual fan controller. It fits into any 5.25″ drive bay. With its extremely moderate price (as of this writing, it was selling on Amazon for $19.50 U.S.D.), the Logisys FP600BK will undoubtedly be on the short list of users who have heavy power requirements but do not want to spend a lot on a controller.

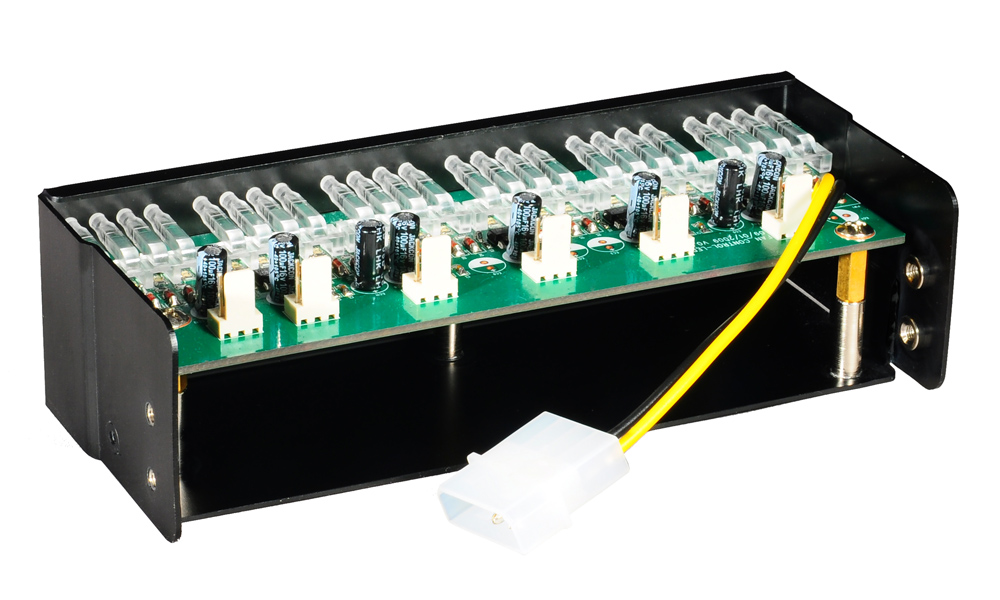
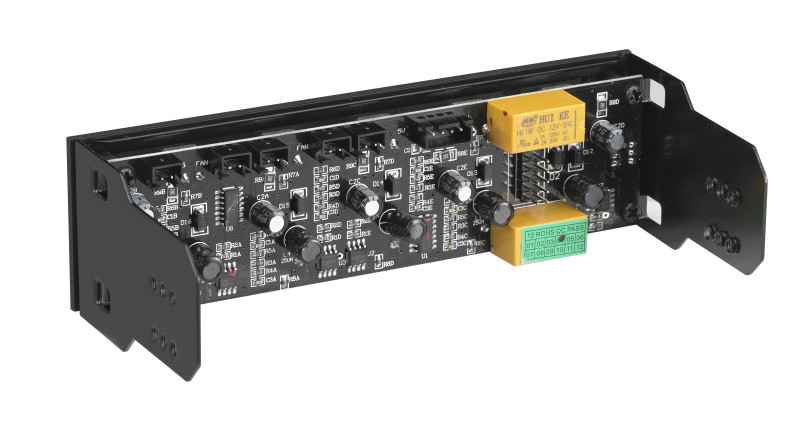
The FP600BK comes in a white box with an image of the controller on the front. Inside is the controller itself; the fan and power cables are already connected and bound together with a zip tie. The controller itself is made of brushed aluminum; the front panel is anodized black aluminum and should look good in any black or dark-colored case. The FP600BK is designed to fit into both traditional cases, so if you are planning to install this unit in a tool-less case, you may need to add a screw or two to stabilize it. The fan cables are labeled “FAN1” through “FAN6”, making it easy to keep track of which fan belongs to which channel. Once the fans are connected, you can connect the controller to the PSU via the 4-pin Molex connector cable and power up the computer.

Once the unit is running, the blue LEDs on the front panel are a little bright. It would be nice if there was a way of shutting off the lights, but there isn’t. In any case, a little electrical tape over the lights will resolve that issue. When the computer starts up, the fans are put on full speed for a few seconds until the controller adjusts them to their proper speeds. The specifications for the FP600BK state that fan speeds are controllable from 30% to 100%, but a couple of caveats are in order. First, some of the older fans need a higher voltage than 30% of 12V (3.6V) to run, and you will not have as much control over those fans. Second, this controller is not designed to work with pulse-width modulation (PWM) fans, and if plugged into the FP600BK, these fans will run at one of two speeds: on and off. Another issue is that although the specifications state that this controller supports 4-pin fans, in fact you will need to supply your own adapters in order to plug a 4-pin fan into the FP600BK. Even then, this unit is not designed to work with 4-pin PWM fans, and those users who want to control PWM fans would likely be better off purchasing a different product.

Logisys FP600BK Review

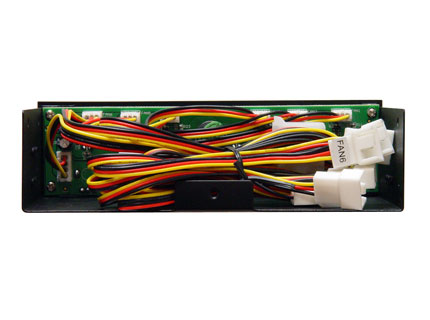
Rear view of the Logisys FP600BK, showing the fan and power cables.

Another concern is that although this controller can output a maximum of 36 watts per channel, there is only one Molex power connector on the FP600BK, and the wires are not particularly thick. If you are going to come close to using the maximum power output of this unit, you will do well to make sure it does not overheat. And the usual caveats about making sure you have a powerful enough PSU to provide power to the controller and other components applies (600 watts or higher would be ideal).

These concerns aside, the FP600BK is a solid product and should work well if you have all 3-pin fans in your system. The overly bright LEDs and the fact that it does not install easily into tool-less cases are shortcomings, but they are relatively minor points, and if all you need is a budget-priced manual controller, the FP600BK could be for you.

Logisys FP600BK Specifications:

Requires one open 5.25¡± bay for installation
Power input from PSU using 4-pin Molex connector.
Support fans with 3-pin power connector.
Each individual dial controls fan speed from 30%~100%
Control range from 5v~12v.
Indicator light will be on when the fan is connected.
Size: 149.2 x 42MM (5 13/16¡± x 1 5/8¡±)
Weight: 0.65LBS

External Links:

Logisys’s product page for the FP600BK

Silverstone CMD01-ESA Review

CMD01-ESA Review

Front view of the CMD01-ESA. Note there are no controls on the front panel; everything is controlled via software.

The Silverstone CMD01 Commander ESA Edition (CMD01-ESA) is a 5-channel, 6 watt per channel automatic fan controller. It fits in a 5.25″ drive bay, and is available in both black and silver. One of the caveats that should be mentioned is that this controller is that ESA stands for “Enthusiast System Architecture”, a royalty-free protocol created by Microsoft, NVIDIA, and Logitech. Therefore you will need a modern NVIDIA motherboard as a base. You can then control the controller, along with various other aspects of the system, with the nTune System Monitor software from NVIDIA. The CMD01 is listed on Silverstone’s website as a legacy product, but it is still selling on Amazon as of this writing. It currently sells on Amazon for $49.99 U.S.D., so it is relatively moderately priced for what it offers.

The unit comes in a compact black box. On the front is an image of the controller, and on the back are the controller’s specifications. The unit is placed in a cardboard box inside the outer box, which further protects it. Inside this box, you will find the controller itself, four thermal sensor cables, three fan extension cables, one USB cable (to connect the CMD01 to an internal USB connector on the motherboard), a set of four screws to secure the CMD01 in a 5.25″ drive bay, and a user manual.

The front of the CMD01 is made of thick aluminum, whlle the rest of the outer frame is made of steel. The use of aluminum on the front gives the unit a high-quality look and feel, or at least a higher-quality look than it would have if it were made of plastic. The PCB inside the unit is black and has a clean, elegant design. Connectors are grouped; the lighting unit connectors are on the left side of the PCB, and the fan connectors are lined up on the top. The four thermal sensors are pluged in beneath the Molex 4-pin power connector, and all the connectors are labeled. There are two integrated circuit chips on the PCB: the SILABS F321 (part of the USB), and the ULN2003AG (for power distribution).

Installation of the CMD01-ESA is very easy. It installs into any 5.25″ drive bay. Once the unit is placed in the drive bay, you just connect the fan cables and place the thermal sensors where you want them to be. The fan cables, however, may not be long enough to put the fans everywhere you may want to place them, especially in larger cases, so you may have to provide your own extension cables. Then connect the USB cable to the motherboard (note that the USB cable is a 4-pin; the typical USB connector on a motherboard is 9 pins). Finally, connect the PSU to the 4-pin Molex power connector on the CMD01. The four thermal sensors can be placed in your computer wherever you want the temperature to be monitored (e.g. memory, hard drives, etc.).

CMD01-ESA Review

Rear view of the CMD01-ESA.

Once hardware installation is complete, you probably want to turn on the PC, and make sure the CMD01-ESA displays a green LED and that all the fans are running. To use this controller, you must now download the nTune System Monitor from NVIDIA and install it under Windows. The software runs under Windows XP, Vista, and Windows 7 (but apparently not Windows 8). The nTune System Monitor uses ESA (Enthusiast System Architecture), an attempt by NVIDIA to define a standard based on the USB-HID protocol (a protocol used mostly for USB mouses and keyboards). This allows for drastically reduced costs, as there is no need for a dedicated driver, although the use of ESA requires an ESA-compliant motherboard. ESA also introduces monitoring of devices such as PSUs and watercoolers, devices that hitherto could not be monitored from software.

ESA is implemented in software through two programs: NVIDIA System Monitor (to track monitoring data), and NVIDIA Control Panel (to control devices). You will need an NVIDIA chipset-based motherboard to enable all features of these two programs.

If the Silverstone Commander is installed, a case icon symbol should be visible when the nForce System Monitor is run. Clicking on the icon will give you access to up to four fans and the four temperature sensors. You can easily control the speed of the fans, but you cannot control CCFL lights through the System Monitor. The NVIDIA Control panel offers the controls to change the fan speed from 0% to 100%, and to set the lamp colors. You can also define your own rules via the profile tab and assign different fan speeds to different temperatures. As an added bonus, ESA is being adopted by third-party utilities such as HWMonitor, and, as a result, HWMonitor is able to report monitoring data for many ESA devices, including the CMD01-ESA, even if the chipset of your motherboard is not an NVIDIA chipset.

The CMD01-ESA is a solid, moderately-priced fan controller that offers a much more granular level of monitoring and control than most fan controllers. Its main drawbacks, in my opinion, are the fact that it requires a motherboard with an NVIDIA chipset for all the features to work. Also, you cannot control the lighting accents with the software, and the cables are not long enough to reach everywhere in the case. Another complaint is that the power output is only 6 watts per channel, which is rather puny for the price, although it should be enough for most users. Moreover, this is a legacy product, so support for this product may be minimal at best. Still, if you have an NVIDIA chipset that supports ESA, and you don’t mind having to use software to use a fan controller, you could do worse than the CMD01-ESA.

CMD01-ESA Specifications:

Model No.: SST-CMD01B-ESA (Black)
SST-CMD01S-ESA (Silver)
Color: Black, Silver
Material: Aluminum front panel, steel body
Power requirement: +12V
Max fan power: 5 channels, 0.5A per channel
Operating system support: Windows XP, XP-64, Vista, Vista-64, Windows 7
Application: 5.25” drive bay, works with ESA motherboard
Connectors: 3 x 4pin peripheral connectors (300mm)
1 x USB connector (600mm)
4 x thermal sensors (600mm)
Interface: USB 2.0
Fan control function: Adjustable speed or thermal control by NVIDIA control panel
Max lamp power: 3 channels, 0.8A per channel
Lamp control function: On/off function control by NVIDIA control panel
Thermal sensor & range: 4 sensors, 0°C ~ 90°C
Controller Board Dimension: 130mm (W) x 35mm (H) x 55mm (D)
Dimension: 158mm (W) x 42mm (H) x 145mm (D)
weight: 0.8kg

External Links:

Silverstone’s product page for the CMD01-ESA

Enthusiast System Architecture on Wikipedia

STW-ICR-022: First Impressions

Introduction

STW-ICR-022

The outer box of the STW-ICR-022.

I recently came across an inexpensive fan controller on eBay, so I thought I would buy it and share some of my thoughts on installation. The controller is made by Sunshine Tipway Electronic Technology Co., Ltd. (STW), a Hong Kong-based company that manufactures computer accessories, and seems to be focused heavily on fan controllers. You can find out more about their products at the company’s website.

Unboxing

The controller I purchased was the STW-ICR-022, a combination fan controller/card reader with an eSATA interface. The box displays a picture of the controller with a list of some of its features:

  • 5.25″ standard drive bay design with LCD display for temperature & fan RPM speed information
  • 4 fans can be controlled manually and easily
  • Overheat alarm to avoid fan stuck
  • With eSATA interface, the speed is up to 3GB/s
  • All in one card reader
STW-ICR-022

The fan controller and instructions.

I presume the list includes poorly translated English (hence, “easily” instead of “automatically”, and “to avoid fan stuck”). The other side of the box shows the same two photos of the controller, but is written in Chinese. Inside the box, the controller and accessories is contained in an anti-static bag in between two pieces of polystyrene, as shown. Included is a small handout written in Chinese, an instruction manual (also in Chiense), and a big sheet of paper that is the installation guide (in English). Also included are some screws and adhesive tape for the thermal probes in a separate ziploc bag.

Installation of the STW-ICR-022

The fan cables and thermal probes are already connected to the controller. The fan cables can easily be removed to cut down on clutter inside the case if you have fewer than four fans to control. The thermal probes, however, are covered with hot glue, so you’ll have to remove that first if you want to unplug any of the temperature sensors. Installation is easy with the included screws. You will probably want to wait until all the fans are in place and plugged in before screwing in the controller, since the fan headers can easily become unplugged.

STW-ICR-022

The operating instructions (yes, they are in Chinese).

In my case, I hooked up three fans to the controller: [1] the CPU fan; [2] the rear exhaust fan, and [3] an old CPU fan which I put in the front in order to dissipate some of the heat created by the hard drives. Once the fans were connected, Those who have 4-pin PWM fans will be happy to know that the cables accommodate both 3-pin and 4-pin fans. it was a relatively easy matter to put the thermal probes in the appropriate places. The sticky tape included with the controller proved inadequate, so I used electrical tape. There is also a USB cable for the card reader, and a SATA cable for the eSATA interface.

Testing: The STW-ICR-022 in Action

With the installation complete, I powered up the system. The display cycles through displaying the fan speed and temperature for each channel. There are three buttons on the front panel: “RESET”, “MODE”, and “C/F”. “RESET” is presumably to restore factory settings, although when I pressed this button, it did not seem to have any effect on the settings. “MODE” toggles between manual and automatic mode, and “C/F” toggles between Celsius and Fahrenheit in the temperature display. There are alarms indicating when a fan stops (or is disconnected) and when the temperature of one of the thermal sensors reaches the alarm temperature. The alarm temperature is set by holding down the “MODE” button until the display starts blinking. Pressing the “MODE” again while the display is blinking allows you to select other channels. Pressing the “C/F” button while the display is blinking increases the alarm temperature (the threshold at which the alarm will sound). Once you reach 190° F, the temperature wraps back around to 104° F. Pressing the “MODE” button repeatedly (one cycle through all the channels) will take the controller out of temperature alarm setting mode.

STW-ICR-022

Close-up of the thermal sensors.

I disconnected one of the fans, and sure enough, the fan alarm activated. The controller started beeping, although it stopped beeping after about two minutes. As for the temperature alarm, the controller started beeping when the target temperature was reached. But the speed of the fan on that channel did not increase, even when the controller was in automatic mode, which is what I would have expected to happen. In fact, I’m not even sure what the point of toggling between manual and automatic mode is, since there does not seem to be a way to invoke automatic fan control. Also, the temperature readings seem to fluctuate quite a bit, and while they generally seem to be accurate, the fluctuations are a cause for concern.

I have not tested the card reader or eSATA interface yet, so I cannot evaluate their effectiveness. The specifications on the box, however, report that the throughput on the eSATA interface is “up to 3 GB/s”, which sounds right for eSATA. I have two additional points of contention with this controller. First, the box says “Maximum power output < 10W”. I’m not sure if that means less than 10W per channel or 10W total. If it is 10 watts per channel, this controller will be more than adequate; 10W total, however, makes for a pretty puny controller. Second, there does not seem to be any way of switching off the LED backlight that illuminates the case. This is a small point, but the LEDs generate a good deal of light pollution in a darkened room.

Conclusion

I will post a second article after I have done some more detailed testing on the controller. As of now, however, I cannot endorse this product, for the following reasons: [1] lack of instructions in English; [2] even though the unit is sold as a manual/automatic fan controller, there doesn’t seem to be any way to control the fans automatically. Admittedly, my appraisal of this product is influenced heavily by the lack of instructions in English; if there were clearly-written English instructions (there is a single sheet of paper written in English that explains how to install the unit, and what the buttons and display do), the full functionality of the unit might become obvious. Such instructions were not furnished, however, so I had to try to figure it out myself. If anyone has any experience with this product, and cares to fill in some of the gaps in my knowledge, I would love to hear it.

Specifications:

Dimensions: 14.9 x 8.8 x 2.4 cm
Installation location: 5.25″ drive bay
Power interface: Big 4-pin connector
Fan connector: 3-pin/4-pin
Material: Aluminum-magnesium alloy
Controlled fan: 4 fans
Cable length: 60.0 cm
Maximum power output: < 10W
Contents: 4 screws, manual


Lamptron FC10 Review

Lamptron FC10 Review

Front view of the Lamptron FC10.

A fan controller that combines aesthetics and functionality, the FC10 offers up to 30 watts per channel (with a total of 4 channels). It also features a remote control (for controlling the display), and the special edition has interchangeable faceplates. It fits into a single 5.25″ drive bay. The retail price is $69.99.

The product ships with a box that includes an instruction manual, 4 temperature sensors, 4 sleeved 3-pin extensions, 1 jumper, 4 screws, the remote control, and the fan controller itself. The cables are fully-braided, and should be more durable overall.

The remote control has 7 buttons: an “Open” button, a “Close” button, a “M” button, a “<<” button, a “>>” button, and a “+” and “-” button. Open and Close are to turn the display on and off, while the “M” button stands for mode and is used to switch between display modes: temperature, voltage, and RPM. The double arrows (“<<” and “>>”) are for channel selection, and the “+” and “-” buttons are for increasing and decreasing the voltage in 1 volt increments/decrements. Unfortunately, the only way of controlling the fans is through the remote control, so if the remote control battery dies, there is no way of controlling the fans until you get a new battery. Also if you lose the remote control, you are out of luck. In addition, the remote itself is somewhat thin and flimsy feeling.

The display uses real Nixie tubes: glass tubes filled with gas that give off an orange glow when current passes through them. These tubes were primarily used for scientific equipment between the 1950s and early 1970s, and give the controller a distinctly retro feel. Under each Nixie tube is an LED that indicates which fan/probe is under control/monitoring. There are also three LEDs indicating which is being displayed: temperature, voltage, and RPM.

Lamptron FC10 Review

Back view of the Lamptron FC10.

The back of the controller has all the different connectors on a PCB (there are two PCBs: one for the connectors, and the other for the Nixie tubes). In the top left corner, there are 8-pin connectors for the four temperature probes (PT1-PT4). On the right is a 3-pin connector with a jumper that allows the user to select the temperature unit (Fahrenheit or Celsius). Next to it is the remote received with a wired antenna. Under it is a 2-pin connector with a jumper to enable or disable the speaker. At the bottom right is the 4-pin Molex connector. The rest of the bottom of the first circuit board had the four 3-pin fan connectors.

The controller itself is reliable; the input and output voltages no not fluctuate by much, even when multiple fans are connected to it, and the temperature sensors are quite accurate.

The FC10 is somewhat pricey (list price is $69.99, but often sells for more), and the fact that it can only be operated via remote control will be a deal-breaker for some. Still, it is certainly a unique, stylish product, and those who like the look of the Nixie tubes might consider this controller.

Lamptron FC10 Specifications:

Dimension:  148.5mm x 42.5mm x 75mm (5.25″ Bay)
Power Output:  Up to 30 watts per channel
Control Channel:  4 Channels
Panel Color Available:  Brass, Black, White, Black Bench Drawing Metal, Black w/ Brass Trim
DC Input:  3 X +12v (Standard 4 Pin Molex)
DC Output:  0V-12V DC
Fan Connectors:  4 X 3-pin connectors
Recommend PSU wattage:  400w or higher

External Links:

Lamptron’s product page for the FC10

Hardware Roundup: 6-7-2013

This week was the week of the Computex trade show (June 3-7) in Taipei, Taiwan, and as a result, a lot of new products were unveiled. In fact, it may be too much for this installment of the Hardware Roundup, so I may post a second installment later this weekend. But here are the main highlights of the past week.

Cooler Master Compile List of Haswell-Compatible PSUs

Hardware Roundup: 6-5-2013 Or, more accurately, they have announced that all of their PSUs are Haswell-compatible. In face, most power supplies support Haswell. Among the improvements introduced with Intel’s Haswell processors, power consumption in idle mode has been reduced from 6W to less that 1W. This might cause some older PSUs to shut the system off when the CPU enters idle mode, or prevent the system from waking up out of sleep mode. If motherboard vendors disable this power saving mode by default, then an upgrade to Haswell will not result in any issues.

Still, you can go to Cooler Master’s website to see the full list of Haswell-compatible PSUs.

Kingston Announces SSDNow KC300

Kingston Digital, Inc. announced the latest addition to its SSDNow family, the KC300 solid-state drive. The SSDs are targeted at business users and replace the Kingston V+200 and KC100 drives. The 2.5-inch SSDs are based on the familiar LSI-SandForce SF-2281 and feature various SMART functions, as well as the option to check data integrity through DuraWrite. KC300 enables users to be more productive as the drive maximizes power efficiencies in notebook PCs. KC300 provides advanced power management via an LSI SandForce second-generation SF-2281 processor, allowing users to do more from a single charge.

The storage devices have a SATA 6 Gbit/s interface and come in capacities ranging from 60 GB up to 480 GB. The SSDNow KC300 SSDs are available in a regular version, which includes just the drive, and an upgrade bundle, which comes with several accessories and software to migrate data to the solid-state drive. The KC300 is available as a stand-alone drive or as an upgrade kit containing cloning software and other accessories for a desktop and/or notebook system. It is backed by a three-year warranty and free technical support.

Asus Unveils Maximus VI

Hardware Roundup: 6-5-2013

The Asus Maximus VI.

Asus announced its first Republic of Gamers motherboard for the mini-ITX form-factor: the Maximus VI Impact. The Maximus VI Impact is a mini-ITX LGA1150 motherboard with the Intel Z87 Express chipset and supports 4th generation Core “Haswell” processors. The CPU is powered through an 8+2 phase VRM design that protrudes the main motherboard in its own PCB. The PCB gets its power through an 8-pin EPS connector. The rest of the board is powered through a 24-pin ATX connector. There are three other daughterboards on the Maximus VI: the SupremeFX Impact, a sound-card with an audiophile-grade 115 dBA DAC, OPAMPs, and audio-grade capacitors; and an mPCIe combo card that lends it 802.11 ac WiFi and Bluetooth 4.0; and an ImpactControl card that gives overclockers POST diagnostic readouts and CMOS reset/restore at the push of a button, right from the rear panel.

The Maximus VI Impact also gives you four SATA 6 Gb/s ports, an eSATA 6 Gb/s port, six USB 3.0 ports (four rear, two by header), six USB 2.0/1.1 ports, HDMI, DisplayPort, gigabit Ethernet (Intel controller), 6-channel SupremeFX Impact audio with 8-channel digital output, a PCI-Express 3.0 x16 slot, and two DDR3 DIMM slots supporting up to 32 GB of dual-channel DDR3 memory. No price has been announced yet.

The product was introduced at Computex, where Asus chairman Jonny Shih challenged the notion that the DIY side of PC gaming is disappearing with the popularity of consoles and the growing influence of mobile gaming. “The core essence of building,” he said, “is the core feeling of accomplishment and satisfaction.” To this end, Asus continues to offer components suited to DIY enthusiasts, and has added several features for performance enhancement.

You can find out more about the Maximus VI at Asus’s product page for the Maximus VI.

Triplex Announces Slot-Powered Radeon HD 7850

Graphics card maker Triplex unveiled a new single slot Radeon HD 7850 2 GB (GDDR5 memory) air-cooled graphics card that relies entirely on the PCI-Express slot for power. It has a base clock speed of 860 MHz and the memory runs at an effective speed of 4.8 GHz. The card can only consume up to 75 watts from the PCIe x16 slot. This card will only be sold through OEM channels and will not be sold directly to consumers.

NZXT Announces HALE82 V2 PSUs

NZXT has announced a new lineup of power supplies at Computex: the HALE82 V2 series. The power supplies are fully modular, 80+ Bronze certified (ensuring efficiency levels up to 85%), and are available in black and white designs. They are built using a single powerful 12V rail to ensure your components get the power they need. For now, the HALE82 V2 will be available in two versions: a 700W unit and a 550W one. They come with a 135mm silent fan. Pricing is $106 U.S.D. for the 550 watt version and $132 U.S.D. for the 700 watt version.

You can find more information about the HALE82 V2, including more detailed specifications, at NZXT’s product page for the 550 watt HALE82 V2 and the product page for the 700 watt version.

Asus Launches ET2702 All-In-One PC

Asus has announced the ET2702, an all-in-one PC, at Computex. The ET2702 is the first all-in-one desktop with QHD resolution; it comes standard with a 27-inch, 2560 x 1440 IPS screen and offers three HDMI in/out ports that allow it to serve as a display for other devices and connect up to three external displays simultaneously.

For now, the ET2702 will include a choice of Intel 4th generation Core processors, a Radeon HD 8990A graphics card, an 802.11ac Wi-Fi that offers transfer speeds of up to 867 Mb/sec and Asus SonicMaster audio technology. In the U.S., the initial configuration will feature a Core-i7-4770 processor, a 2 GB AMD Radeon HD 8890A GPU, 16 GB of RAM, a 2 TB hard drive, 802.11ac and a Blu-ray drive. No pricing information is available yet, but it will reportedly have a price around $2000, and will be available in late July or early August.

You can read more about the ET2702 at the Asus website which has the original press release.

Gigabyte Debuts Z87-OC and Z87-OC Force Motherboards

Hardware Roundup: 6-5-2013

The Gigabye Z87-OC.

At Computex, Gigabyte has debuted a new Z87-based motherboard for Intel’s new Haswell line of processors, a board designed especially for overclockers. They debut a number of interesting features designed to “help enthusiasts and overclockers get the most performance from their hardware, as well as the most enjoyable OC experience possible.”

The board carries an orange and black theme, and has four RAM DIMM slots. It also has the OC Touch, onboard buttons which allow the user to fine-tune the CPU frequency. It also features four PCIe-x16 expansion slots and supports up to four-way Crossfire and SLI. The PCIe slots are spaced every other expansion slot, leaving room for dual-slot coolers. The Z87X-OC also features six USB 3.0/2.0 ports and two exclusively USB 2.0 ports. Gigabit Ethernet is provided through an Intel networking chip. THe board also features 8-channel audio via an ALC892 audio controller. Gigabyte has not yet made pricing and availability information public.

For more information, see Gigabyte’s product page for the OC or Gigabyte’s product page for the OC Force.

Lian-Li PT-FN04 Review

Lian-Li PT-FN04 Review

Front view of the PT-FN04.

The Lian-Li PT-FN04 is a 6-channel, 6 watt per channel manual fan controller. It fits in a single 5.25″ drive bay. The exterior is made of anodized black aluminum, and this controller will look great in a black case. It is rather expensive for a manual, 6 watt per channel controller ($45.99 U.S.D. at Amazon), however, so you will want to check your power requirements and do some comparison shopping before buying this one.

The PT-FN04 comes in a cardboard box with a picture of the controller on the top. The bottom lists the input voltage, fan speeds enabled (20% to full speed) and the size of the unit, but does not have detailed specifications. Inside is the controller itself, three fan cables, and some screws for mounting the controller in the case. The front of the controller contains six knobs, one for each channel. Looking at the back reveals that the controller circuitry is contained on a single PCB. The back of the LEDs dominates the front of the PCB, and there are 8 capacitors in front of the fan headers. There are six 3-pin headers on the back for the fans. If you have 4-pin fans, you will need to supply your own cables, as the extension cables supplied with the controller are for 3-pin fans. The power connector for the controller is a 4-pin Molex connector with a piggyback connector, which should help if you do not have PSU connectors to spare.

Lian-Li PT-FN04 Review

Back view of the PT-FN04.

Once installed, the PT-FN04 works smoothly. The blue LED lights along the top of the front are aesthetically pleasing (as you turn the fans up and down, the LEDs fade in and out). The fan adjustments are smooth as well. When the knobs are turned all the way counterclockwise, the fans still run, albeit at a reduced speed. This will be a bit of a disappointment to those who want to be able to turn the fans completely off, but it is a good fail-safe, since it guarantees that the fans are always running.

The PT-FN04 is a reliable fan controller, but its output of 6 watts per channel is rather low. If you plan to have more than one fan per channel, you will probably want to buy a more powerful controller, or at the very least, calculate how much power you will need to make sure the PT-FN04 is adequate. There are more powerful fan controllers at a similar price (the Lamptron FC-2 comes to mind). If this controller was priced around $25 U.S.D., it would be a more competitive product. As it is, I am not sure if it is worth the money, although it does what Lian-Li says it will do.

Lian-Li PT-FN04 Specifications:

6 sets of Fan Speed Controller, Using 1 x 5.25 Bay.
Single Fan maximum current support to 0.6A, Total of 3A (36W)
Adjust the fan speed to (H) High-100%, (M2) Middle-75%, (M) Middle-50%, (L) Low-25%
1000RPM (250RPM – 500RPM – 750RPM – 1000RPM), 1200RPM (300RPM – 600RPM – 900RPM – 1200RPM), 1500RPM (375RPM – 750RPM – 1125RPM – 1500RPM)
Dimensions: (W)149mm x (H)42mm x (D)72mm

External Links:

Lian-Li’s product page for the PT-FN04

Zalman ZM-MFC3 Review

zalman_zm-mfc3_02

Zalman ZM-MFC3 Review

Front view of the Zalman ZM-MFC3.


The Zalman ZM-MFC3 is a 4-channel, 8 watt per channel manual fan controller. It fits into a 5.25″ drive bay, and has an LCD display. It is an improved version of the Zalman ZM-MFC3. One thing that makes this unit unusual is that unlike most controllers, which are open in the back, leaving the PCB exposed, the ZM-MFC3 is completely enclosed in a case. This is one of the priciest controllers reviewed so far on this site (as of this writing, it is selling for $87.43 U.S.D. on Amazon), but you get a lot of extras with it.

The Zalman ZM-MFC3 comes in a rather small cardboard box with a picture of the controller on the front. The back of the box contains a list of the main functions of the ZM-MFC3, along with some of the more important specifications. Inside the box, the controller itself is in an anti-static plastic bag. All the accessories are included in a white box, and there is also a fairly detailed manual inside the box. The accessories are: four cables for connecting the fans (three of them have 3-pin connectors and one has a 4-pin connector for PWM fans; four temperature sensors; an expansion card bracket with a CVS connector which enables you to measure the power and some screws. One of the included cables is a Y-connector that allows you to control two fans on a single channel; there is a white connector and a blue connector on the other end. The white connector will feed the RPM signal back to the controller when plugged in, while the blue connector will not; this avoids the problem of two fans on the same channel supplying RPM data to the unit. If you use this cable and only plug in one fan, you will want to plug in the white connector. Another cable enables you to connect either two fans on a single channel, or a CPU fan (the second connector in this case can be plugged into a header on the motherboard that supplies the CPU fan’s RPM signal). The thermal sensors connect to the controller with a single connector, which makes cable management somewhat easier, but also makes it impossible to disconnect unused sensors. Also, the thermal sensor cables are only 21 inches (533 mm) long, so you may have trouble placing them if you have a large case. The sticky tape included for taping the temperature probes is purported to not stick very well, but this is a common complaint with many controllers.

Zalman ZM-MFC3 Review

Rear view of the ZM-MF3, showing the connectors.

The controller itself is fairly small (about 3.4″ deep) and fits in a single drive bay. Installation of the ZM-MFC3 is simple: just slide it into an empty drive bay and secure it with the screws. As for the connectors, they are easy to recognize, and the cables that correspond to each connector cannot be connected anywhere else. The one part of installation that is different from installing other controllers is connecting the power consumption meter. You must connect the CVS cable to the controller, and screw in the bracket in front of one of the unused expansion slots. then connect the watt meter to the power connector of your PC, and connect the USB-like connector from the watt meter to the bracket. [Even though the port on the bracket looks like a USB port, do not connect it to the USB header on your motherboard, or you may damage both the power consumption meter and your motherboard.]

Controlling the fans is easy. There is a large knob on the right side of the front panel. Pushing the wheel in and holding it for three seconds enables you to set the fan speeds. Pushing the knob repeatedly enables you to select one of the four channels, and once you have selected the fan whose speed you want to change, turning the wheel alters the speed. The display is easy to read and can be read from different viewing angles, which is a major improvement over the ZM-MFC2’s display. All four temperatures and fan speeds can be viewed at the same time (the fan speed and temperature of each channel takes up one quadrant of the display). The circle in the center of the display shows both the total power load (in watts), and the time since the computer was booted (total uptime in hours and minutes). The controller does not need any additional software in order to measure the power load.

In conclusion, the Zalman ZM-MFC3 is a solidly-built, easy-to-use controller with an impressive LCD readout. I hesitate to give it an unqualified endorsement for the following reasons. [1] It is not an automatic controller – even though it has thermal probes, there is no way of varying the fan speed according to the temperature. Many purchasers of fan controllers may never avail themselves of such functionality, but considering how expensive the ZM-MFC3 is, it is something I would expect. [2] The wattage per channel is fairly low (8 watts per channel) – again, this may be enough for most users, but for the price I would have expected more, and I suspect some users have shyed away from this product because the power output is inadequate. Still, if you are willing to spend close to $90 on a fan controller, this is one to consider. It delivers on everything Zalman claims it does, there is no overhead on performance, and it is definitely an improvement on the ZM-MFC2. Moreover, the power consumption meter is a unique feature which cannot be replicated easily via software or other means. Thus, the ZM-MFC3, while far from an ideal product, has a lot to recommend it.

Zalman ZM-MFC3 Specifications:

Dimensions: 147(L) x 87(W) x 42(H) mm
Power & Temperature Display: 10~999W/ -9.9 °C~+99.9 °C
Fan Compatibility:
1 x 4-Pin(Supports fans with PWM function)
3 x 3-Pin (Supports fans with RPM output function)
Fan RPM Control: PWM Regulation Method (Fan PWM)
Voltage Control: Method (Fan No.1~3)
Output Current: MAX 0.7A per each channel
Output Voltage: +4~11VDC
Input Voltage: +12VDC/+5VDC

External Links:

Zalman’s product page for the ZM-MFC3.


BitFenix Hydra Pro Review

BitFenix Hydra Pro

The front panel of the BitFenix Hydra Pro.

The BitFenix Hydra Pro is a 5-channel, 30 watt per channel manual fan controller. It fits into a 5.25″ drive bay, and is compatible with virtually any chassis with a free 5.25″ bay. Unlike the Bitfenix Recon, which sports a touchscreen interface, the Hydra Pro is controlled via 5 sliders, and while it lacks much of the advanced functionality of the Recon, its simplicity and stylishness (it will look good in any black case) will undoubtedly appeal to many users.

The Hydra Pro comes packaged in a black cardboard box. On the top of the box, there is a picture of the face plate of the controller; the bottom of the box lists specifications and key features. Inside, the controller is enclosed in a plastic bag between two pieces of polystyrene. The box contains the controller, a set of screws, and an instruction sheet. The instruction sheet is a “quick installation guide” which contains some basic instructions, but anyone with a modicum of experience in installing components won’t need them.

BitFenix Hydra Pro

Back view of the BitFenix Hydra Pro, showing the unit’s sole PCB. Note the power inverters on the right.

On the front panel, there is a button on the left side to turn the fan LEDs on and off, and the five sliders. On the right is the power LED, which indicates that the unit has power and should be functioning properly. The front surface is coated with the same soft-touch rubber as the Recon, and gives it a classy look and feel. The front panel is supported by a steel frame that also houses the PCB with all the components on it. The PCB is clean with the components soldered in place solidly. There are five 3-pin connectors for the fans, and there are also five 2-pin leads to power BitFenix Spectre LED fans. [You will need adapters if you want to connect 4-pin fans to this controller, as they are not included with the unit, or get the BitFenix Recon instead, which has 4-pin connectors.] There is also a 4-pin Molex plug which supplies power to the Hydra. The plug also has a piggy back so you end up with the same number of PSU connectors. I leave it to the reader to judge the wisdom of having a single power connector when the controller could output as much as 150 watts. As for the cables they are all pre-fitted to the controller, but all cables are removable, making cable management that much easier. The LED ribbon cable for the fan LEDs is 12 inches (305 mm) long, the fan cables are 28 inches (711 mm) long, and the Molex power lead is 26 inches (660 mm) long, so the cables should be long enough to reach almost anywhere in most cases. On the circuit board, in addition to all the connectors are two single phase HK 19F power inverters which can step voltage from 3 volts up to 12 volts.

Using the controller is simple; there are just five sliders and the button to control the fan LEDs. Although there is nothing to visually indicate how much the fan speed increases or decreases (not even tick marks), but the difference in speed seems to be from 50 percent to 100 percent. The sliders are made of plastic and some users have reported that they tend to fall off with regular use. With all the sliders in the down position and the fan LEDs off, you could have a computer that really runs in stealth mode. This is a manual fan controller, however, and does not incorporate a means of monitoring the temperature, so anyone buying this would probably do well to combine this with HWmonitor, CoreTemp, SpeedFan, or some other software-based means of keeping track of the temperature and/or fan speed to make sure the system isn’t overheating.

There are some minor drawbacks to the Bitfenix Hydra Pro, including the lack of 4-pin fan cables and the flimsiness of the sliders. Minor issues aside, however, the Hydra Pro is a reliable fan controller. It retails for about $39.99 U.S.D., which is a little pricey for a manual controller. It would be more competitive if it were priced about 40% lower, so the price would be more in line with other manual controllers. Still, not many controllers output a total of 150 watts, and fewer still allow the user to control fan LEDs, so if those are your main criteria, it will be money well spent.

BitFenix Hydra Pro Specifications:

Materials: Steel, Plastic
Dimensions (WxHxD): 147 x 43 x 67mm
Form Factor: 5.25″ Drive Bay
Channels: x 5
Watts Per Channel: 30W
Fan LED Connectors: x 5 (compatible with BitFenix Spectre LED/Spectre Pro LED fans)
Power Input: 4-Pin Molex
Extras: SofTouch™ surface treatment, LED power indicator
Hydra™ Pro Fan Controller: BFA-HDR-KSPRO-RP

External Links:

Bitfenix’s product page for the Hydra Pro

Fan Controller Buying Guide

Introduction

In the course of compiling reviews for this site, it occurred to me that that while the list of specifications for a fan controller are potentially quite long, the same handful of features tend to be emphasized on manufacturers’ websites and by customers in their reviews on sites such as Amazon and Newegg. These features tend to be ones that can easily dictate whether the controller matches the requirements of the buyer. There is no point in buying a dual-bay controller, for example, if our hypothetical buyer does not have two drive bays to spare. There are a few other features that, while not as conspicuously featured in ad copy or reviews, may have an impact on the functioning of the controller or on the overall look and feel of the product and therefore are also worth mentioning. With this in mind, it is possible to compile a fan controller buying guide based on these criteria.

Fan Controller Buying Guide - Lamptron FC-2

The Lamptron FC-2 is a good example of a manual fan controller.

Manual or automatic fan control

Put simply, does the controller merely allow the user to control the speed of the fan or fans (by controlling the voltage of the fan), or does it allow the user to intelligently control fan speed based on the temperature inside the computer? If the user only wants to throttle the fan speed back sometimes, then a manual controller will likely be sufficient. In some cases, a very simple controller, or even just a rheostat spliced into the fan wire might do.

In other instances, the user may want to vary the fan speed based on the temperature. An automatic fan controller typically works by reading the temperature from a thermal probe inside the computer. If the temperature remains below a user-set threshold, the fan will run at reduced speed. If the temperature exceeds the threshold, the fan will run at full speed. In some cases, the control is more granular, and the user can set the speed at which the fan runs both below and above the temperature threshold. Automatic fan controllers include thermal sensors, which need to be placed by the user wherever the temperature needs to be read. This means an extra set of wires inside the case, which makes things a bit more complicated. Still, automatic control is a more efficient way of running the fans.

Fan Controller Buying Guide - Xigmatek CSF-CBK33-U01

The Xigmatek CSF-CBK33-U01 is but one example of a one-channel fan controller.

Number of channels 

Generally, you want to have as many channels as you have fans to control. If you have more fans than your controller has channels, you can always connect more than one fan to a single channel by means of a Y-connector. If you are using an automatic fan controller, however, keep in mind that in this case, more than one fan will be sending RPM readings back to the controller. Since it is unlikely the controller has the circuitry to deal with this, the RPM readings will likely be erratic. The best way of dealing with this is to leave the wire for the fan whose RPM reading you want the controller to see intact, and cut the yellow wire for all other fans, thus ensuring that only one fan sends RPM readings to the controller.

Except for very simple controllers such as the Xigmatek CSF-CBK33-U01 (a one-channel controller), most controllers have at least four channels. The Lamptron FC8 has eight controllers, which should be enough for most users. Installing a second fan controller is also an option, although this will increase your power requirements, so be sure your PSU (power supply unit) can handle it.

Wattage

Fans have different power requirements, but most fans require 12 volts DC to run at full speed. This means we can calculate the necessary wattage via Joule’s Law (P = V * I). if the fan draws 0.3 amps, then the fan requires 12V * 0.3a or 3.6 watts to run. Most controllers seem to provide at least 5 watts per channel, which is a little low, but should be enough for most users. Some controllers, such as the Lamptron FC-2, boast as much as 50 watts per channel. One thing to consider is that most fans draw a little bit more when the fan starts, so you probably want to leave a little headroom. For example, if the controller outputs 10 watts per channel, you probably want to make sure the fans on each channel do not require more than about 8.5 watts per channel during normal usage.

The one obvious corollary of this which nonetheless deserves mention is that as the controller’s output wattage increases, they are going to draw more power from the PSU, so you will want to make sure your PSU is rated high enough. The recommended minimum PSU output for the Lamptron FC8, for example, is 600 watts.

Fan Controller Buying Guide - Aerocool Touch-2100

Some fan controllers require two drive bays, like the Aerocool Touch-2100.

Number of drive bays required

Most fan controllers require a single 5.25″ drive bay for installation. A number of them require two 5.25″ drive bays. If you do not have a 5.25″ drive bay to spare, you still have a few options. A few controllers can be installed into a 3.5″ drive bay (the Scythe KM03, which has both 5.25″ and 3.5″ variants, comes to mind). And a few do not require a drive bay at all. The Sentry LXE is an external fan controller which has a separate LCD display and the controller itself is on a PCI card. On the other end of the price spectrum, the Xigmatek CSF-CBK33-U01 is a simple one-channel manual controller which can be mounted onto any available expansion slot. Most systems to which you would contemplate adding a fan controller, however, will probably have at least one available full-sized drive bay.

3 or 4-pin fan connectors

Most of the new fans have 3-pin mini connectors. The pulse width modulation (PWM) fans have 4 pins, and the ability of a fan controller to accommodate PWM fans, either by having 4 pins on the fan header on the controller, or by including 3-to-4 pin adapters with the controller, is always a plus. [Older fans usually had large 4-pin Molex connectors, but unless your fans are over 10 years old this should not be an issue.] If you have one or more PWM fans that are going to be controlled, you will want to find out if the controller you are buying supports it.

Ability to completely shut off fans

Controllers control the RPM speed of a fan by regulating the voltage. Most fans require 12 volts DC to run at full speed. The relationship of speed to voltage is linear, so as the voltage is cut, the fan speed is cut proportionately. But the fans require about 5 volts DC to run at all, so fan speed can only be cut back to 40 percent before it shuts down. Some controllers only allow the user to cut back fan speeds to about 40 percent. In some ways, this is a good fail-safe feature, since it means no matter what the user sets the controller to, the fans are always running. Still, the ability to shut off the fans completely is a nice added feature for those who put a premium on noise reduction.


Fan Controller Buying Guide - NZXT Sentry 2 alt view

The NZXT Sentry 2, one of many automatic fan controllers with a temperature alarm.

Presence of temperature alarms/fan alarms

It is always a good thing if the fan controller sounds an audible alarm when temperature thresholds are reached. Fortunately, many of the automatic fan controllers have such alarms. Unfortunately, many alarms only sound for a short period of time, so unless you are near the computer when the alarm sounds, you’re likely to miss it.

Some controllers have alarms that sound if a fan is unplugged or if a fan stops running, which is another good feature to have, since the failure of a fan will, if not addressed, lead to overheating and hardware failure.

Accuracy of readings

This seems pretty obvious: all other things being equal, you want the reported RPM speeds and reported temperatures to be accurate. The manufacturer-provided specs provide little guidance on this matter, and most likely you will have to plow through the product reviews to find out how accurate they are.

Colors

So far I have focused on the practical aspects of controllers, but in many cases they are installed in gaming rigs. Aesthetics will, in most cases, at least be a factor for these users, creating a demand for controllers with colorful backlights and displays. Manufacturers have accommodated this demand, and it is not uncommon to see products with bright LED backlights, as well as the ability to change the colors of the backlight. Some controllers with LCD screens have similar capabilities (for example, the Aerocool Touch-2100).

Ability to turn off the display (or backlight)

A bright display can be visually pleasing and generally is easier to read. But it also can create a fair amount of light pollution, so the ability to turn it off is always a plus.

Conclusion

These criteria are, in my opinion, the most important ones to consider when purchasing a fan controller. But your mileage may vary. I am approaching it from the perspective of a computer hardware enthusiast; others may rank these criteria differently or have entirely different criteria. I’d love to know your opinion, especially if you’re a hardcore gamer or like to make custom mods to your PC.

External Links

Here are links to some of the fan controller manufacturers mentioned in this article:


BitFenix Recon Review

Bitfenix Recon

Front view of the BitFenix Recon, the first internet-capable fan controller.

The BitFenix Recon is a 5-channel, 10 watt per channel manual/automatic fan controller. It has an LCD touchscreen which is used to monitor and control the system’s fans, fits in a 5.25″ drive bay, and retails at around $40 (the current Amazon price as of this writing is $39.80). If these were the only features of the BitFenix Recon, you would probably think it worthy of consideration. But the BitFenix Recon also has a feature which, to the best of my knowledge, no other fan controller boasts: BitFenix’s website claims that the Recon is “the world’s first internet-connected fan controller.” Once setup, the Bitfenix Recon allows the user to monitor and control their system using “any internet connected device, including smartphones, tablets, laptops.”

The Recon comes in a black box with a lime-green background and white lettering with a photo of the fan controller in the foreground and center. The rear of the box lists some of the specifications of the Recon. Opening the box reveals that the front of the BitFenix Recon is dominated by the LCD touchscreen, and the rest of the front is coated with black rubber (the Recon will look good in any black case). It should be noted that the Recon also comes in a white version. Looking at the back of the Recon reveals that the unit is connected to the PSU with a single Molex connector, and there are 5 fan connectors, one for each channel. There are also 5 temperature probes, which can be placed anywhere in the case. There are also two USB connectors which enable you to communicate with the Recon by means of another device such as a remote computer or a cell phone. The circuit board of the Recon has 5 aluminum heat sinks (one for each channel) and a built-in speaker for the temperature alarm. Also on the PCB are two specially-designed microprocessors that continually interact with the motherboard, providing you with real-time status while monitoring and controlling the temperatures and fan speeds. The PCB is well-secured with screws in all four corners. In the far right corner is the ribbon cable that connects the LCD touchscreen. All fan and temperature cables are already connected to the PCB. Included are 4 screws to mount the controller in the case, several pieces of double-sided adhesive (for the temperature probes), and two fan extension cables.

Once the Recon is installed in the case, the cables are connected and the probes are in place, you can boot the system and see the Recon in action. The LCD touchscreen is accurate and responsive, and thus configuring the Recon is relatively easy. In manual mode, changing the fan speed is as easy as pressing the fan icon to select the right fan, and then pressing the plus and minus icons on the touchscreen to increase or decrease the fan speed. It can take quite a few seconds, however, for the fan to actually change speed.

The controller is accurate, with a slight gain on voltages at the low end (5.7V instead of 5V). The temperature probes are accurate, as are the reported RPM speeds of the fans.

BitFenix Recon

Yes, it comes in white as well.

Accessing the device remotely becomes possible once the Recon software is installed on the computer on which the controller is installed. This software is Windows-based, so if you are running a non-Windows OS, you will still be able to use the fan controller, but you won’t be able to take advantage of the remote access capabilities. On the plus side, the mobile interface is browser-based, so it is compatible with virtually any mobile operating system, including iOS, Android, or Windows.

The software is easy to install, and the mobile interface is easy to use while giving access to the Recon’s advanced functionality. One of the nice features is the ability to store up to three user setting profiles. For example, you may have one for gaming, which would likely require more cooling, and one for normal desktop usage, which would require less cooling. Once the profiles are saved, you can switch between them with the press of a button. The interface also displays current temperatures and fan speeds, as well as a means of switching between automatic and manual mode, and between Celsius and Fahrenheit on the temperature display.

Overall, the BitFenix Recon is a well-designed and well-constructed fan controller. Still, there are a few drawbacks. The power output per channel is 10 watts, which should be enough for most users, but may not be enough for a handful of more powerful fans. In addition, the back of the case does not have a clip for guiding the cables, which is a minor issue but is still worth noting. Nonetheless, the pros far outweigh the cons. Moreover, as far as I know, this is the only fan controller that can be adjusted via the internet. And all this functionality is available at a relatively low price. If you only need a basic fan controller, this may be overkill for you and you may be better off buying a budget-priced controller; otherwise, the Recon is an excellent choice and a good value.

BitFenix Recon Specifications:

SpecsMaterials: SofTouch™, ABS Plastic, Steel
Dimensions (WxHxD): 147 x 43 x 67mm
Form Factor: 5.25″ Drive Bay
Fan Channels: x 5
Temperature Channels: x 5
Max Watts / Channel: 10W
Measurement Frequency: Every 0.1 – 0.4 Seconds
Temperature Alarm Range: 30?-90?
Temperature Range: 0-100?
Screen Size : 4.7″
Recon™ Black: BFA-RCN-KS-RP
Recon™ White” BFA-RCN-WS-RP

External Links:

BitFenix’s product page for the Recon.